
Watercolour Pencils Would ya look at that? I'm blogging at night. That's weird. Short-and-sweet-disclaimer: I do not claim to be an expert, a teacher, or an art prodigy when it comes to any of these tiplets or media. So, in the true spirit of CREATING and letting go and being loose - leave your mark. Okay. Let's get a little wishy-washy. You need a few things to get started here. The Watercolour Pencils. Alright - rip a page out of your sketchbook (you don't have to!) Throw down some colours. Spray it. NOTE from COMMENTS: I just let it air dry. Look at how beautiful that is. This is a scan of the finished product. A couple of months back I put out an ALL-CALL for starfish... and I got about 35 starfish photos in less that 24 hours. Alright. Have a beautiful night.
Shopping at DollarTree.com: Wedding Edition Wedding season is almost upon us once again! Are you or anyone you know preparing for the Big Day? Wedding crafts are among the most popular category of dollar store crafts; when planning a wedding on a budget (and who isn't these days?) even those who've never crafted a day in their lives pick up their glue guns and DIY as much as possible in the name of saving money. We've rounded up some of our favorite wedding-related dollar store crafts. [Tissue Paper] [Balloons] [Tissue Paper Balloon Lanterns by Kleas] If you're looking for an economical, DIY alternative to store-bought paper lanterns, try this easy idea incorporating balloons and tissue paper. [White Wedding Favor Boxes] [Heart Favor Boxes by Shindig Parties To Go] This project was originally made for Valentine's Day, but it translates well to weddings! [All-Occasion Gift Wrap] [Fruit Drop Candies] [Extra Large Star Party Favors by The Cheese Thief] [Clear Cello Wrap] [Cellophane Origami Star Garland by The Cheese Thief] [Silk Roses]
Gesso ©2004 - 2006 by Aisling D'Art Gesso is a useful option for art journaling. It's also used for painting and mixed media art. I use gesso often. However, many (perhaps most) artists never use gesso in their journals. Here's what gesso is and tips for how you can use it. Gesso can go under paint or heavy collage or embellishments, to make your journal pages stronger. Gesso is a primer. Originally, gesso only came in white. Gesso makes the surface a little stiffer. Today, gesso comes in many colors. It's useful for mixed media work as well as fine art paintings. Gesso is different from paint. Originally, gesso was a mixture of calcium--like chalk--in a thin base of animal glue. When you see religious paintings and icons on wood, they were probably painted over gesso. But, gesso changed in the 20th century. In recent years, some artists have begun to question whether or not acrylic gesso is the right product to use under oil paint. When I journal, I use white gesso as well as black gesso.
Maid of Honor: Her Duties in Detail - Wedding Planning - Bridal Party Help! What do you do as the maid of honor? Don't worry, we've got your job description down to a science. Photo: Karlisch Photography The maid/matron of honor is part worker bee, part emotional lifeboat. Lead the bridesmaid troupe. -- Wendy Paris See More: Your Bridal Party , Basics for Bridesmaids Art Journal Every Day Q: How can I find all the previous Art Journal Every Day posts? A: Find them all listed by category and linked here. Q: What is Art Journal Every Day? A: Art Journal Every Day is weekly feature on this blog. Q: What does the title "Art Journal Every Day" mean? A: I do my best to art journal every day. Q: How can I participate? A: Lots of different ways! There is a free flickr group here for sharing photos of your pages. Also, you can grab this button... ...for your blog by copying the text in the box and pasting it into your sidebar. Q: What if I've never art journaled before? A: Jump right in! Q: What supplies do I need to get started? A: You don't "need" anything.
10 ways to do something blue& - wedding blog - Girly Wedding - StumbleUpon 10 ways to do 'something blue' If you've been wondering how to incorporate your something blue here are 10 ways to rock the blue. 1. Jewelry is always a good way to add any color to an outfit. Especially if it is a pretty ring with a pretty blue stone like this one. something blue- blue ring source Lost & Fawned 2. something blue- blue sparkly nails source Louboutins3. something blue- blue bow- blue garter source garter girl 4.Feeling blue why not dress the bridesmaids in it? something blue- blue bridesmaid dresses by Gypsy Tree Photography 5.An easy blue is to add blue flowers to your bouquet. something blue- blue wedding flowers by Lifestyle Fotographie 6.Something a little more subtle is to add blue under the dress... crinoline..undies.. and other lady undergarments. something blue- blue crinoline source emmaline bride 7.Blue shoes are very in! something blue- blue suede shoes by Laura Murray 8.Really want to make a statement? something blue - blue signatures source the knot
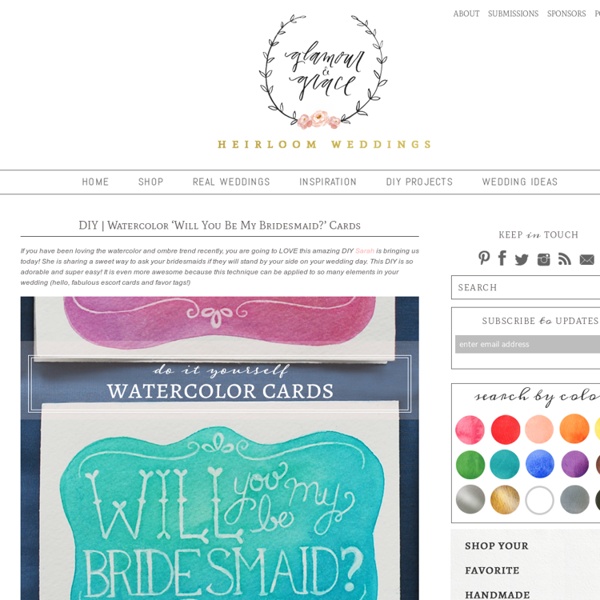
Rustic Wedding Ideas This Fort Worth, Texas wedding combines the bride’s passion for all things rustic with her love of peacock feathers. How about those blue peacock wedding shoes? They would have fit in perfectly with our blue wedding shoe round up… don’t you think? Courtney, the bride shares more details about her special day here. All of this Texas wedding goodness captured by Ryan Ray Photography. Ryan Ray is one of our exclusive The Hand-Picked Vendors. Photographer: Ryan Ray PhotographyVenue: The Stonegate Mansion, Fort Worth, Texas Hair: Dalton Salon Cake/Desserts: Zen Baking Company Caterer: H3 Ranch Dress Designer: EnzoaniFloral Design: DIRT Design Studio Groom’s Attire: Jos. Wedding Ideas: DIY Stationery and Cards! | Wedloft by WeddingWindow.com - StumbleUpon If you have a small budget for your wedding, one major way to cut expenses is to DIY! Today I’ve rounded up a group of super fun DIY projects that would make for some FABULOUS wedding stationery! 1. Stamped Celery Flowers – These floral stamps made with celery are unbelievable! Who would have thought that this healthy snack could be used to make stationery? 2. Photo Credit: A Day in My LifePin it 3. Photo Credit: Design SpongePin it 4. Photo Credit: Li’l MagooliePin it 5. Photo Credit: Design SpongePin it 6. Photo Credit: Make Grow GatherPin it 7. 8. Photo Credit: Little Birdie SecretsPin it 9. Photo Credit: MarthaStewart.comPin it 10. Photo Credit: MarthaStewart.comPin it Do you have any ideas for DIY wedding stationery?
Bridesmaids Gift Ideas | Inspirations & Creations I may be a bit biased, but I think my bridesmaids scored some sweet SWAG for being a part of our big day :) One thing I knew I wanted to do for sure was to make them something… because everyone just loves handmade goodies right?!? I saw this awesome diy doily bag on Design*Sponge. {image via Design*Sponge} After reading through the full tutorial on Ashley Ann Photography’s blog I got to work on making one for each of my bridesmaids! It took me a few trial/error bags but I eventually got the hang of it (the more spray adhesive the better!) For the initials I just printed off a letter in the size/font I wanted…carefully cut it out and then used the stencil that was left over to paint on each initial. The next thing I got for each of the girls was a pair of gray J Crew flip-flops (to match their J Crew BM dresses of course) to wear at the reception. {above 3 photos via author’s personal collection} Then I figured I should probably get them something pretty to wear and remember the day by.