do-it-yourself jewelry storage « Monaluna
Okay, yes, I’m on a storage kick these days. Have I mentioned that our house is kind of small? With very few surfaces on which to put stuff? I bought a much-needed jewelry box the other day, and when I got it home I realized there was no place to put it. Seriously. The only real surface is our dresser, which is now in the baby’s room serving as a changing table. I started by measuring out the layout, considering the length of the necklaces I had, how many earring hooks I wanted, and where I wanted the mesh screen placed. Then I screwed in the hooks, staggering the earring hooks and necklace hooks so that they wouldn’t interfere. I made a little box for post earrings and rings out of the scrap molding, and glued it together with gorilla glue and clamps. I glued the plywood backing to the frame using the gorilla glue, and then painted the whole thing white. Labels: there are no tags for this entry
Articles: Instagram Coasters — By Hayley Decker — Foam Magazine Articles
As our iPhone libraries begin to overflow, we're always on the search for practical, tangible uses for our Instagram snaps. Spruce up your place or dish these D.I.Y. coasters out to your friends to remind you all of your latest outdoor adventure/ music festival outing/ seafaring weekend. Or the newest FOAM cover of course. What You'll Need:-4-inch round, flat cork pieces -Modge Podge glue -Card stock paper -Instagram print-outs -Foam or felt mounting dots How To Make Them: 1. 2. 3. 4. Bottoms up!
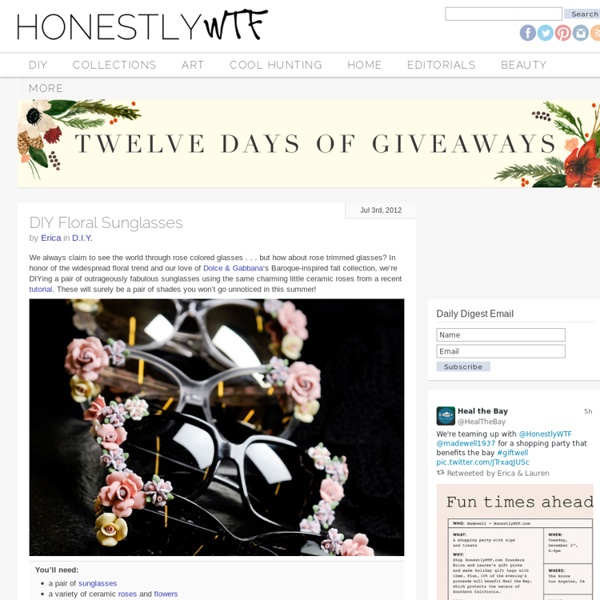
DIY Gold Tube Bracelets
I have very vivid memories of walking into a bead store for the first time, almost 15 years ago, and being overwhelmed by the million and ten ideas that filled my mind. I was immediately hooked on the concept of transforming simple and unexpected elements into something beautiful and wearable. That moment was the catalyst for my eventual path into jewelry design and craft – my higher calling, if you will. Today’s tutorial takes me back to my first foray into jewelry making, where I’ll show you how to make two delightful bracelets using the same basic component. For single, adjustable gold tube bracelets, you’ll need: Start by cutting the knotting cord into 2 12 inch pieces. And now, all that’s left is the sliding closure! . . . and bring the top cord under both the bottom and middle overlapping strands through the loop, into a knot. Repeat the same step on the right side. Continue to make 5-6 more knots. Trim away any excess cord. Your adjustable & colorful bracelets are done!
52 Weeks Project
All Natural Lip Balm
The week leading up to the new year wasn't exactly how I had pictured it. It was the last week of the boys winter break. I had envisioned walks around downtown looking at the lights, taking down the Christmas tree together, continuing our holiday baking marathon and maybe even a little post Christmas mall browsing. But alas, none of those things happened. The flu happened. Or rather, what I guess must have been the flu. Thankfully, I had made a big batch of lip balm the week before Christmas to give as little handmade gifts to my girlfriends. This recipe is super simple. The recipe came from this blog last year and I tweaked it a bit and she grabbed it from this book where she had tweaked it a bit. Sweet Orange Lip Balm 8 Tablespoons Coconut Oil 3 Tablespoons Beeswax 1.5 Tablespoons Raw Honey 30 drops Sweet Orange essential oil (if you want color) 1/2 stick of natural lipstick (I like Jane Iredale and Josie Moran) Remove mixture from heat, and add peppermint oil and lipstick.
DIY Embellished Friendship Bracelets
The weather is warming up and my wrists are feeling rather lonely and bare after hiding under long sleeves all season long. But after digging up last year’s DIY friendship bracelets, I realized they desperately needed sparkly and shiny upgrades. Today we’re showing you three easy ways to embellish your friendship bracelets, making them all grown up . . . To add rhinestones, you’ll need:a chevron friendship bracelet (tutorial found here)5-6” crystal rhinestone chain (last used here)1 yard of embroidery flossan embroidery needlea pair of scissors Thread the needle with embroidery floss and tie the end into a double knot. Push the needle through the back of bracelet. Stitch the floss between the first two rhinestone links, pushing needle out the middle of the bracelet. Continue stitching between the rhinestone links. Your friendship bracelet is sparkling and finished! Use a Sharpie or marker to make 5 evenly spaced marks along the middle of the friendship bracelet. Keep stitching.
DIY Elbow Patch
While perusing Pinterest one evening, I came across an intriguing tutorial on the wonderful art of needle felting. I had to learn more – especially after realizing it entailed repeatedly stabbing a needle up and down into a piece of fabric or sweater. A satisfying stress reliever that results in something wearable? You’ll need: With the sweater on, place a piece of tape about half an inch below the elbow. Align and center the bottom of the cookie cutter along the top of the tape. Fill the cutter, spreading out the wool fibers evenly. At the base of all felting needles are tiny, sharp burrs, which grab and interlock the wool fibers. Continue stabbing away until the surface is flat and even. Remove the cutter and use the tip of the needle to reign in any stray fibers, if necessary. Patch up any bare or uneven spots by adding more wool roving where needed. Carefully peel the sweater away from the foam. To smooth and set the patch, spritz with water and press with an iron on the wool setting.
DIY: Mason Jar Vases
Over the weekend I decided to spruce up some old mason jars. I first saw these on Pinterest and then discovered this DIY and basically fell in love with the idea. Who knew that with a little spray paint you could give an old jar a completely new look? What you'll need: mason jarsspray paintshipping labelsx-acto knife or scissorsfresh flowers Use your shipping label paper to print your silhouette of choice. Spray paint your jars. Once your jars are completely dry, remove the sticker. Add some fresh flowers and you're all set!