Rookie & RIT Dye Tutorial
http://rookiemag.com/2012/04/rit-dye-tutorial/
Easily Dunn
So I got this shirt in the 6th grade. And I keep on keeping it because I like the stripes or something…and maybe the colors. But I can’t wear it because a) it’s too short and b) it’s too thick to layer with anything. And in the middle of last week’s closet-purging, in a blinding stroke of genius, I decided to make it a cardigan. But the fastest, kind of laziest way possible.
Tutorial Tuesday: Leather Foldover Clutch Purse
If you want a foldover leather clutch you could buy this unlined one for $150. You could also buy one of the many available on Etsy. Or you could easily make your own.
help Im bored
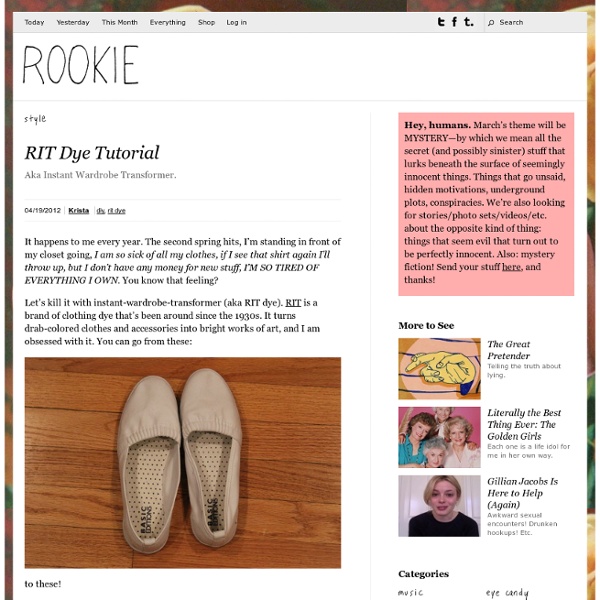
I don't know what the back of my head looks like I don't know who wrote Poor Richard's Almanack/what time it is I need to buy a gift for someone I don't know which fork to use
DIY Découpage Floral Bag - Honestly WTF
When H&M asked us to DIY a boho-inspired item for their summer issue, découpage was the first thing that came to mind. Honestly, does it get any better than customizing a simple handbag with a brilliant floral print? However you create it, it’ll be satisfying to know that you’ve designed yourself a one of a kind bag! You’ll need:a handbagcotton fabric with a large floral patternpainter’s tapeMod Podgecraft paint2 small plastic dishes2 brushesscissors Start by taping off the edges and hardware of the handbag. Squeeze a dollop of colored craft paint into a small disposable container.
DIY Shibori
Today marks HonestlyWTF’s four year anniversary. Four years! To celebrate, we’re revisiting the very first tutorial we ever featured on the site: shibori tie dye. Lauren and I first discovered shibori after discovering an old photo on the web. The idea of recreating an ancient Japanese dyeing technique inspired us to spend an entire weekend experimenting with our favorite deep blue, indigo.
Make This - Stab Bound&Journal - Luxe DIY
Make a hand bound journal with elaborate side stitching for yourself or as a gift. The stitching is a lot easier than it looks and is so much nicer to hold than a spiral bound edge. Supplies and Equipment – sharp utility knife and cutting surface BE VERY CAREFUL WITH THE SHARP BLADE – rulers – drill with 1/16th inch bit OR a small paper punch BE VERY CAREFUL WITH POWER TOOLS – fancy cover paper – I used Cavallini Vintage Tickets Wrapping Paper – 20″ x 28″ – 1 sheet of 8.5×11 for endpapers (this can be fancy or the same paper as your pages) – 10 sheets of 8.5×11 paper for pages – 3 yards of embroidery floss – mat board – I used Crescent No. 33 White & Cream Smooth Mat Board – Yes Stikflat Glue
The 36 Absolute Best Things in the World
Email There are somethings in the is world which are just so much better than others. We are talking about those little things in life which really do make life worth living.
Easy and Unique DIY VasesInspiring Pretty
Everyone loves vases, but it’s difficult to find one that is unique and not the same old run of the mill vase you’ve seen 1000 times before. As the most prominent centerpiece, you always want a vase to be special, just like the rest of your decor. Whether it is empty, holding flower, a candle pebbles or anything else, a vase can be boring or the perfect accent you’ve been looking for. And it’s only better when you can make it yourself flexing your craft skills and saving some money as well.
Related:
