
Mani Monday: Boo-tiful Nails Jeepers creepers! Halloween is only one week away! Get your Halloween glam on by polishing your nails in frightfully festive shades and prints. Below are a few of my favorite manicures to get you inspired... Some are spooky and a few are fun. I really like the sparkly black and the cool spider web decal: Now this is one that I am DEFINITELY going to try out soon: I really like these too: Aww this are really cute! Eek! Halloween French tips! These might freak me out every time one of my nails catches my eye... Crackle polish looks great with Halloween hues... A lot of these manicures have some pretty serious details that are usually pretty hard to achieve on your own. Which Halloween themed manicure are you going to try first?? Check these out too: Mani Monday: My Fall Picks Today's Video: Spookifying My Bedroom TGIF: Cheap Costume Ideas Mani Mania: My Favorite Fall Polishes Photos: PocusHocus , ILovedYouForever , Blogspot , Wordpress , SwellDesigner , Pinterest , Hallownails , Lacquerista
# Thesundaynailbattle / / Gradient Nails Plantons le décor, comme d’habitude : Dimanche, Sunday Nail Battle, Odile et 10 tubes. Encore une fois, elles m’ont fait bien plaisir avec le thème de la semaine puisqu’il s’agit de ma technique favorite du moment: le gradient. Je vous l’ai dit l’autre jour, si je n’avais pas de blog sur lequel il faut se renouveler sans cesse, je ne ferai plus que ca en ce moment ! Cet hiver j’étais accro aux gradient de paillettes, cet été je suis passé aux dégradés de couleurs. Bref, j’aime d’amour le résultat qu’on peut obtenir, comme ici ou encore ici par exemple. Pour aujourd’hui, comme à mon habitude, je n’ai pas su choisir, j’ai donc fait deux nail art totalement différents. La première version est donc la technique la plus facile pour obtenir de jolies choses: celle du dégradé de paillettes. Pour la seconde version, dégradé de couleur, ca se corse légèrement. Mon avis? Like this: J'aime chargement…
Humorous Illustrations by Wirdou – T-Shirt Designer ‘I’m a young T-shirt designer from Madrid, Spain. I started this as a hobby but now it’s become an awesome kind of job The following are a selection of humorous illustrations created by Spanish illustrator Wirdou! my nails!!!! :) 949 440 137 723 555 848 1103 1539 955 147 320 171 790 587 852 825 798 421 1009 233 207 642 411 663 404 433 407 1497 280 354 319 894 129 119 728 166 157 463 63 582 286 462 349 139 2078 1629
Owl Nail Art Tutorial For this design, you will need several colors of polish, I used OPI San-Tan-Tonio, Color Club Almost Famous, Color Club Twiggie, Sally Hanson Lacey Lilac and a Black and white. YOu will also need dotting tools, or your prefered method of making dots. I used a small detail brush for some elements, but you could also just use the dotting tools or a toothpick. I started with a base coat of San Tan Tonio, this color is prefection and a must have, in my opinion! I then used a large dotting tool to add two large circles connecting in the middle, this will make the mask for the owl, I used the same color and a detail brush to add the wings. Next I added in white with the large dotting tool. The Usinga smaller tool, I added in the black to finish up the eyes I used yellow to add the little feet and a beak I finished up using the detail brush to add some lilac v’s, if you don’t have a detail brush, you could also just add some polka dots. Like this: Like Loading...
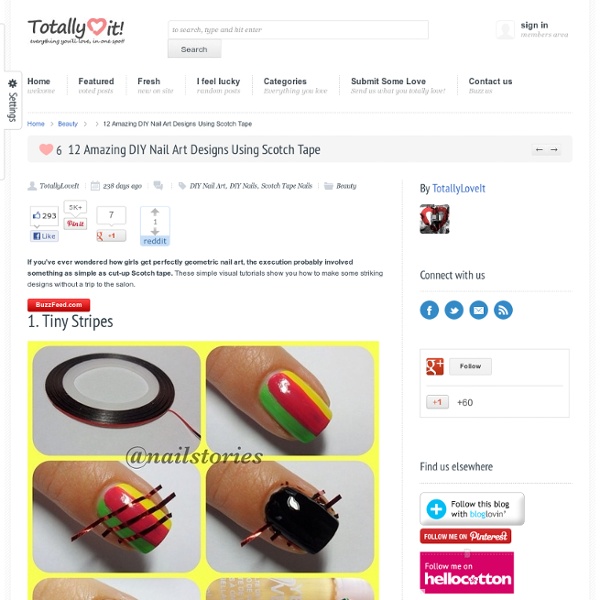
14 Examples of Creative Nail Art Stylish fingernails and the most unique nail designs from all over the world. Mario Nails Awesome nail art inspired by the Super Mario Bros. 3 video game. [link] Diamond Nails Katy Perry’s stylish manicure features nails covered in rhinestones. Pac-Man Nails Nail art inspired by the characters from the popular arcade game. Glowing Nails Fingernails that glow in the dark with get you noticed at a night club. Fast Food Nails Unique nail art features brand names of popular fast food companies. Bacon Nails This delicious looking fingernail art was inspired by BACON. Binary Nails Unusual manicure inspired by the binary numeral system. World Cup Nails Why not support your home team with a set of cool flag nails? Christmas Nails Fun manicure by Janet Riffe was inspired by Christmas holidays. Browser Nails Internet inspired nail art created by Japanese blogger Mamipeko. Twitter Nails Contemporary nail design dedicated to the Twitter nation. Spongebob Nails Soft Drink Nails Zipper Nails
Tuto Bonjour les filles ! Je reste dans mon délire "Je rentabilise à fond mes vernis menthes" en vous proposant un nail art qu’on pourrait appeler chevron ombré, ou un truc du genre. J’ai utilisé plusieurs vernis pour le réaliser: Saint George de chez A England, At Vase Value de China Glaze, Syrma de LM cosmetic, Mind your Mittens d’Essie et le Mor12 de Nfu Oh. Bien évidemment, le même motif est réalisable avec plein d’autres nuances et marques, c’est juste que ce sont eux que j’avais sous la main au moment où l’envie de gribouiller sur des ongles m’a prise ! L’idée me vient d’une image de mon dossier inspi, un nail art réalisé par Nailuminium sur instagram, une fille que je vous encourage d’ailleurs vivement à suivre puisqu’elle a de très bonnes idées et des réalisations toujours parfaitement exécutées qui donnent envie de tenter tout ce qu’on voit :) Enfin bwef, je vous montre les différentes étapes et vous fais un petit topo:1. Like this: J'aime chargement…
DIY Clothes Tutorial: Shirt to skirt. | Monoxious Today, we’re offering an alternative to wearing your boyfriend shirt. You heard me right, we all know our wardrobe extends far beyond our own cause there’s always nothing to wearrrrr and we all know that boyfriend jeans/blazer/shirts and all the rage this season. It’s time to raid the boyfriend’s wardrobe for this DIY clothes tutorial. We start of with a simple men’s shirt. This one’s from Primark [omg cheapppppp!!!] Excuse the srs face. We start off with buttoning the shirt at your waist. After that, we try and form a drape in the skirt so it doesn’t look that boring. Follow the diagram drawing above and you should be able to get a the first drape going. And this is what you should end up with after the buttonholes are in place. After that we tie the sleeves together. And there we have it~!!! We hope that you’ve enjoyed this tutorial~!!