DIY Stiffened Felt Gift Boxes
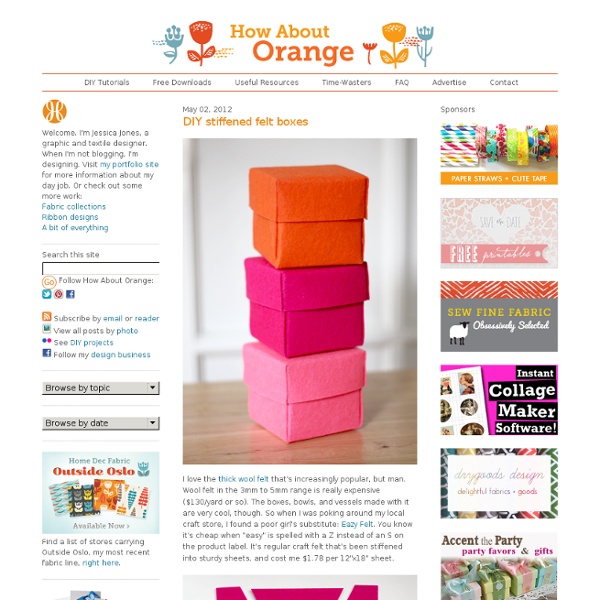
I love the thick wool felt that's increasingly popular, but man. Wool felt in the 3mm to 5mm range is really expensive ($130/yard or so). The boxes, bowls, and vessels made with it are very cool, though. So when I was poking around my local craft store, I found a poor girl's substitute: Eazy Felt. You know it's cheap when "easy" is spelled with a Z instead of an S on the product label. To make felt boxes, I cut a 9" square for the bottom piece, then added four slits and four diagonal cuts to trim away some of the excess felt on the tabs. I used a rotary cutter and ruler to cut out the main shape, then made the slits and diagonal cuts with an X-acto knife. The box top is similar, except the center area is larger to fit over the box bottom, and the sides are half the height. After the pieces are cut, crease the tabs against the edge of a ruler to make assembly easier. Fold the triangular tabs inward and bring the sides of the box up.
Take-out Box
I’m in a good mood and thought I’d come share one of my old products! These layered Take-Out Box Templates are super cute and fun to make! Perfect for packaging up small gifts and treats! It includes 2 sizes and they come in both .psd and layered .tif file formats. Enjoy! EDIT: I have made a separate download for paper scrappers/non-digi scrappers/people without Photoshop. You can now download ready to print PDF files for these templates!
Writing Wrapping
This year, I vowed to only make or buy handmade holiday gifts for my friends and family, and I've kept to it so far. But wrapping these gifts in commercial paper didn't seem to make much sense, so I wanted to create some handmade gift wrap to match. I happen to think a gift wrapped in newsprint is actually quite attractive, and love the look of text on a package, but wanted to put in a little more effort. So I came up with a cool option that's clean, masculine, and maintains the typographic look of the newsprint. Plus, it eliminates the need for any "to:/from" tags, as the recipient's name is right there in tasteful type. Once I figured it out, it was actually quite easy and quick - less than ten minutes per gift. Here's how to do it: Materials and Tools 1. 2. 3. 4a. 4b. 5. 6. Happy Holidays!
Gift Bows
(Another edit... four years later!) Just wanted to share these enormous gift bows I made out of brown paper grocery bags. One is even bigger than the gift... --------------------------------------------(editeddddd cause I made more) Cell phone photo tutorial...What you need: magazine page, brass paper fastener/brad, something sharp, scissors. 1.) 2.) Then loop the other end like so: 3.) 4.) And just keep going. 5.) And you're done! WARNING: May cause serious addiction. -----old post----- Yeah, I could recycle magazines by putting them in my recycling bin, but this is way more fun... (I also reused a pretty shoe box to put the gift in) And two more... They're super easy. Let me know if you have any questions.
Woven Gift Wrap
By Kate on August 8, 2012 I noticed that the woven gift-topper I made last year was doing the rounds again on Pinterest so I thought I would make an updated pastel version (pastels seem to be the new neon at the moment). I bought some quilling strips (0.5cm) to use this time which reduces the labour by about half (I’ve also been working on some more intricate woven ‘things’ for another project…more to come soon). Above: Mischevious hands – the unseen backdrop in all my photo’s ^_^ While I took photos today my boys were making their own presents by wrapping boxes in newspaper. Finally, the font used on these images is called soymilk and it’s free to download …yay!
Related:
Related: