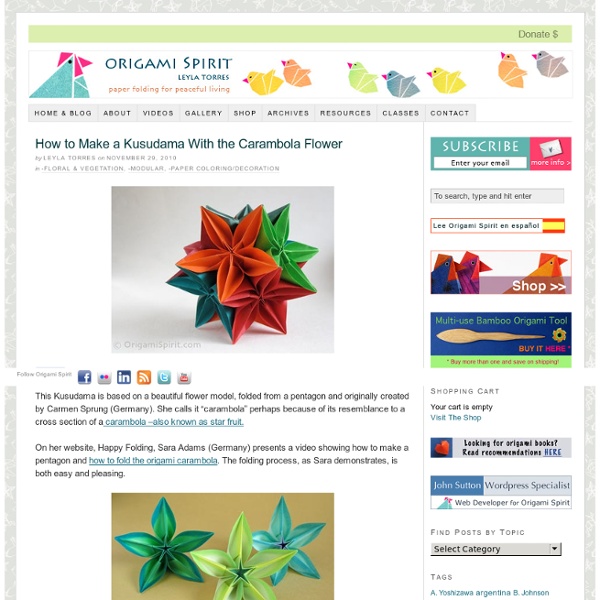
Galaxy de l'origami étoiles
When my 5 yo goddaughter and I meet up, we love to hand each other our little handmade somethings. She would shower me with sweet girly drawings, scribblings, love notes, masks or a surprise “masterpiece”. Godma would usually make origami iconic symbols. Not long ago I made her a galaxy of stars, one of her favourite shapes. I have complied a list of what I had made to share with you the wonders of star origami. The names of the first 4 stars are given by me as they don’t seem to have formal titles, so I took the liberty to describe them according to what they represent to me, hence they are by no means official. 1. I like that you get 2 stars from this miraculous modular construct by Trang Chung. 1. 2. Taking a cue from Craft Ideas, I 3D-ize a cutout star like this: 1. Notes: Will need a slim tool (e.g. needle, toothpick) to prop up the triangles while gluing. 3. I like this star by Tomoko Fuse on Extreme Cards. A 5 point pentagon-shaped paper is required to make this. 4. [p.s.
Cathey with an E: What the Hex?
I'm not a crafty person... but occasionally I pretend to be. When I saw this post ages ago on the ModCloth blog via Honestly... WTF, I thought I had finally found a DIY project that I could actually do! I can braid, and that's pretty much the only skill needed for this. No, this isn't mine. This one's mine. It was actually easier than I thought. But I still love it. And now, I feel braver. Ok, maybe not! Top two images from Honestly...
Paper Bow Tutorial
Good Morning, If you are new to this post, welcome, I am glad you are here. If you are a return visitors, I am glad you are back again. Please respect my time and my willing to share. I saw this origami bow tutorial here. A 3" x 3" paper would make a nice bow for greeting cards. A thin pattern paper would make a beautiful bow. If you are using double side pattern paper place the side that you want down. Mountain fold horizontally, crease well, then unfold. mountain fold, crease well and unfold. you should have this. Flip the paper over, valley fold diagonally, crease well, and unfold. valley fold, crease well and unfold. Follow the creased lines and fold your paper like this Press it down and fold the "closed" side about 1/2" down like the picture below, crease well. Open your paper completely like shown. You are going to mountain fold those lines or the small square. like this refold the paper like the 7th picture above except you will push the small square down like this then fold it like shown
How To Make A Stylish Photo Frame For Several Photos
Here is a simple yet stylish photo frame that can accomodate quite many photos at once. The idea is very simple. Fasten twines on the empty frame and hang photos using clothes pins on them.
Diamants sur papier 3D
Hello there. Hope you all had a great Easter! We had a lovely relaxing holiday (….well as relaxing as it gets with kids). It would have been great to have another week off ^_^ Before I forget I just want to say a big thank you for all the kind messages you have send me regarding my book (you really are a nice bunch!) I’ve been meaning to get this paper diamond up for weeks now…but it’s taken ages to figure the template out (and I’ve been having breaks between each failed attempt). It’s based on simplified version of Satoshi Kamiya’s origami diamond. These paper diamonds are tricky to make (& require a fair bit of patience) so definitely adults only! When you have made your diamonds you can attach thread and hang them up. How-to 1. 2. 3. 4. Happy Monday all! Edited to add: A few people have had problems printing the templates (the dotted lines do not print).
DIY Citrus Salt Scrub
It’s that time of year. Where you need all the exfoliation you can get! Everyone wants fabulous beach-ready skin! And lets be real, if you’re anything like me… exfoliating just didn’t seam important when you’re all covered up in winter clothing. What you will need: 1 cup sea salt 1/4 cup vegetable oil (or olive, almond or coconut oil) 1/2 tsp lemon juice (or zest) 1/2 tsp orange zest (not necessary) photo credit: via First mix the oil and sea salt together. How to exfoliate: Clean body as normal in shower. Now I’m ready for the beach. # kristanlynn xoxo *Like what you see?
Sock Monkey
Gosh… I am supposed to sew some thing for the Earth Month this April, but I can’t wait to sew these sock monkeys. My hands simply took over my head and see what I did after a few days and nights of sewing…. a house full of sock monkeys!!!! Do you love them? I have seen a lot of sock monkey photos hanging around friends’ photo albums in many photo sharing websites, so envy. …. With different sizes of socks, I made the sock monkey out of a family, from baby, toddlers, teens to adult. 3rd picture in the above album shows the family photo of the sock monkey, from daddy, mommy, sister, brother, triplet toddlers, and a baby. The siblings are indeed loving each other, not only they are huggy to human, but they also hug each other, like this one. {Get full details on next page.} Pages: 1 2 Get all updates via email: Highlights from Our Partners
Rosette Memo Board Tutorial
i like to blame it on my “mom brain”…..seems like every since i had babies, i’ve lost my mind and forget EVERY*thing! so i made this adorable little dry erase memo board to jot down notes and things i need to remember this summer. {like birthdays. i am the worst at remembering birthdays. my mom knows this and is so sweet to send me reminders when a birthday is coming up. thanks mom!} i love that my little rosette memo board stands up {with the help of a dowel}so i can find it easily…… instead of getting buried under toys or fabric or laundry! i added a scattering of brightly colored rosettes and a couple of rhinestones to add a little pretty to my memo board. perfect! i cut the vinyl with my Silhouette SDso that the wording is on the back of the glass so i can write all over the glass surface with a dry erase marker. here’s a quick little tutorial on how to cut your vinyl so the sticky side of the vinyl is on the front of the lettering: Share and Enjoy