
autumn leaf bouquet I don’t know what it’s like in your neighborhood, but when I step outside here in Oakland, I sense it right away: Fall is in the air! I’m lucky enough to have a few turning trees on my street, so I don’t miss out entirely on the brilliant autumn colors I remember from growing up in NH. Speaking of brilliant autumn colors, I’m thrilled to share this stunning maple leaf rose bouquet DIY from a fellow Kate — clay, fiber and paper artist Kate Hust. Kate first learned how to make these a few years ago from a retired art teacher in her community, and now they’ve become an annual tradition when fall rolls around. Her instructor taught her to wrap the leaves really tight, so they looked like rose buds, but Kate has modified the technique a bit to suit her own tastes: She likes to find the really big leaves and make them with large open “petals.” Read the full how-to after the jump! The best part of living in Northern Michigan is the changing seasons. Materials Instructions 1. 2. 3. 4. 5. 6.
The 10 Coolest Windows Shortcuts You Never Knew About Keyboard shortcuts are the essence of PC productivity. While newbs slowly mouse around their screens in search of buttons to click, seasoned tech vets hammer through a day’s work with ease thanks to a wealth of arcane hotkey combos that knock out useful tasks in seconds. Of course, every PC user knows a few handy shortcuts, and hardened system tweakers like yourself have forgotten more hotkeys than most users will ever learn. But here are 10 cool combos that even you might not know. 1. Walking away from the screen for a while? 2. The lazy way to delete stuff in Windows is to drag it to the Recycle Bin. 3. If you’ve got multiple windows open within a given app, this handy shortcut will let you quickly switch between them, so you don’t have to waste time clicking around in search of the right window. 4. Windows 7 made it a little easier to create new folders in Windows Explorer. 5. Got a bazillion windows cluttering your screen? 6. 7. 8. 9. 10.
How To... Embed This Infographic <a href= "><img src=" title="10 How Tos" alt="How To Infographic" border="0" class="nopin" /></a><br />Source: <a href=' title='Interesting Facts'><a href=' title='Interesting Facts'>Today I Found Out</a></a> 1) How to drastically increase the life of your shaving razor Before or after you shave (I prefer before so that the blades are dry), place your jeans on a hard flat surface; then run the razor up the pant legs about 10-15 times quickly; then repeat running it down the pant legs 10-15 times quickly. The threads on the jeans then will very effectively both fix any tiny bends in the blades that inevitably happen and will also sharpen the blades on your shaver cartidge. 2) How to make your teeth whiter Baking soda makes a good teeth whitener. 1.
Make your own jellyfish in a bottle. « BhoomPlay ~ Note for Thai fans ~ เป็นโพสเก่าที่มีแฟนบล๊อกจากต่างประเทศขอมาให้เขียนเป็นภาษาอังกฤษนะคะส่วนแฟนบล็อกที่ยังไม่เคยอ่านเรื่องนี้เลย ฉบับภาษาไทยดูที่นี่ค่ะ The other day, while I was thinking to get something to put in the water bottle for Bhoom to shake for fun. I saw a plastic grocery bag next to me and then this idea popped up. With some trials and errors, my little jellyfish comes alive just like I thought it would be. : ) When daddy and son first saw it, they’re surprised with their jaws wide open. Things you need to make your own jellyfish (Hope you can find all these in your kitchen) : 1. Instruction: • Flatten the bag and cut off the handle and the bottom part (see picture 1) • Cut along both sides (see picture 2) to split into 2 plastic sheets – by the way, we only use just one of them. • From the center of the plastic sheet, fold it like a tiny balloon to make the head part and tie it with the thread – not too tight (see picture 3). Like this: Like Loading...
15 ways to use vodka Keyboard: S - next A - previous R - random 15 ways to use vodka Share on FB 55920 Below Random Pics that horribly slippery slope Share on FB 160 it's the alpha and omega Share on FB 54 what superman batman and spiderman think about the iphone??? Share on FB 256 that's alot of milk Share on FB 153 bet you havent had this in dinner Share on FB 88 reading a good book best dog outfit ever! Share on FB 98 women Share on FB 19 it's frida! Share on FB 120 Home Page Top Month Previous Next
Turn Old Wood Shelves into a Chic Mini Bar While we’re not big drinkers, we do happen to have quite a large collection of barware & drink paraphernalia. With no extra storage space in the kitchen, I used these shelves I was going to give to Goodwill to create a mini side bar in our dining room & display all our booze. Here’s how I did it! before * Because I didn’t want a solid black look, I sprayed only one coat over the entire unit. In doing so, the original wood grain shows through a bit. after adding details * Using Nickel Plated Steel Thumb Tacks, {yes, the ones you use for your bulletin board!} for this project, which stick out a bit higher instead of flat like these. after …after
Make an Edible Candy Bowl | Dollar Store Mom - Frugal Fun - Crafts for Kids Today’s post is a lesson in improvisation. Why? Well, this project was INTENDED to be a candy tray, a fancy version of something I saw done flawlessly at Tutto Bella. After reading through that tutorial, I thought it would be a breeze! Famous last words, right? Now, if I was a crafting perfectionist, or blogging perfectionist, or if I’d had two more cups of coffee today, maybe I’d've tried a second time to make my vision work…but I’m not, I’m not, and I didn’t. Supplies: candy canes- $1 for twelveold fashioned hard candies- $1starlight mints- $1 for a bag, I used just one for this particular project Unwrap the candy canes and starlight mint and arrange on a baking sheet lined with wax paper or parchment paper. Bake at 350 for 8-10 minutes, but watch it closely the whole time!! Then I realized it was still quite hot and pretty pliable, so I quickly grabbed a bowl, turned it upside down and placed the whole thing on top.
DIY Pop Art inspired by Ed Ruscha Hanging in our old dining room, on either side of the window. What You’ll Need… * Two pre-stretched and pre-treated canvases {I used 20″ x 16″}* Words via computer/printer {you can use my templates here}* Scissors & Double Sided Tape {I found the dispenser double stick was better} * Spray paint color of your choice {I used black}. Steps… * Print out selected words {use my template if you wish} then carefully cut out the letters. * Apply your double stick tape to the back of your letters and . . . * Arrange & stick them to your canvases. * Evenly spray paint your canvases including the edges. * Once your paint is dry, remove the letters revealing the white canvas background. * To finish off the canvases, I used the same metal thumb tacks I used on our mini bar …though I didn’t mark the placement out first on these, I just eyeballed it. Voila! And as usual, my trusty quality control inspector LeRoy, was on hand to approve. In our Dining Room… Have Fun!
Recycle Tutorial: Woven Rag Rug Thank you for all the great feedback for liking my Braided Rag Rug. I understand that not everyone has a sewing machine or/and able to sew, so I created this no-sew version for the non-sewer who like to recycle their bed sheets or de-stash their fabrics to make this feet cozy Woven Rag Rug. This tutorial doesn’t require any loom for weaving; just use a sturdy corrugated carton box from your recycle pile. I hope everyone can do their part on greening the Earth again and reduce the rubbish that loaded the landfill. By the way, I gave the braided rag rug to my mum and she loves it so much, she is going to dig more old bed sheets out from her storage, which means I will have another bunch of supply to recycle. {Get full details on next page.} Pages: 1 2 Get all updates via email: Highlights from Our Partners
11 DIY Craft Supplies Make Your Own Craft Supplies! If there’s one thing I’ve learned about crafty people it’s that they can make just about anything! You can save money by making supplies yourself, get exactly the color you want, or just be able to whip up some baker’s twine without having to run to the store. Making your own craft supplies rocks! You know you want some of this beautiful tape…well, make it! Cathe also designed these cool printable handmade labels that you can download right here on Everything Etsy. Recycle and old t-shirt and learn how to cut continuous t-shirt yarn at Releve Design. Laura Beth from A Step in the Journey made her own baker’s twine…get out of town…it’s so cool! Make Geo Clay Beads and design your own jewelry. What a pretty and useful sewing tool caddy! This is a fun project…DIY pencils from Scissors.Paper.Wok – I could use a bunch of these on my desk. Everyone loves pom poms! Storybook Paper Flower Tutorial are perfect for wreaths, bouquets and so much more. ~Kim
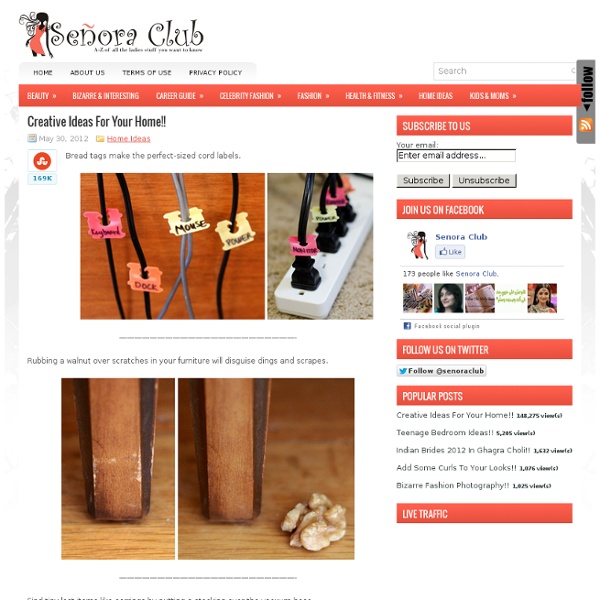
25 Clever Ideas to Make Life Easier Here are clever ideas to make life easier. To see the complete list of 25 go here. You can pin the pics directly to Pinterest by hovering your mouse over the pic then clicking the “pin it”! Via: amy-newnostalgia.blogspot.com Why didn’t I think of that?! Via: apartmenttherapy.com Rubbing a walnut over scratches in your furniture will disguise dings and scrapes. Via: unplggd.com Supposedly you can remove crayon masterpieces from your TV, computer screen, or walls with WD40 – I’m not going to try it though! Via: athomewithrealfood.blogspot.com Stop cut apples browning in your child’s lunch box by securing with a rubber band. Via: marthastewart.com Overhaul your linen cupboard – store bed linen sets inside one of their own pillowcases and there will be no more hunting through piles for a match. Via: iheartnaptime.net Add this item to your beach bag. Via: realsimple.com Attach a velcro strip to the wall to store soft toys. Via: flickr.com Look up! Via: instructables.com Gotcha! Via: stephmodo.com
Project: Wooden Salt Cellar By Mark Frauenfelder A couple of years ago I whittled a wooden spoon as a thank-you gift for our family friend Valerie, who was my daughter’s elementary school art teacher. Valerie appreciated it so much that my wife asked me to make another wooden gift for Valerie’s upcoming birthday. I thought about it for a while and decided that a salt cellar would not tax my meager skills. For a PDF of this project, visit the build page on Make: Projects. Materials & Tools Wooden branch, about 3″ in diameter Workbench Saw Drill with bits Dremel tool Sandpaper Snap-blade utility knife Beeswax Directions Step 1: I started out with a branch that had fallen off a tree in our backyard. Step 2: I sawed off a 3″ section of the branch, using a miter box. Here’s the piece I used for the salt cellar. Step 3: I put the biggest drill bit I had into my drill press and started drilling a bunch of holes into the wood. Step 5: The above steps took fewer than 20 minutes to complete. About the Author: Related
makekind: a guest column by laura parke of a girl who makes This week I’m sharing a simple, yet somewhat time intensive project. It’s a catch-all of sorts made from sheets of cardboard. I did this project in steps so it didn’t seem so daunting – it’s worth it because the end product is custom and so, so useful. Here’s how to make your own!: MATERIALS // 25 pieces of cardboard measuring 10″ x 10″, straight edge ruler, a pencil, glue, utility knife with plenty of extra blades. STEPS // 01 MEASURE YOUR TEMPLATE Using the straight edge and a pencil, measure a 1″ border on one piece of cardboard. 02 // CREATE TEMPLATE Once you have everything measured out, use a utility knife to cut out each compartment to create a template. 03 // MAKE YOUR PIECES Using your template, you’ll cut out 20 sheets of cardboard, like this: 04 // GLUE PIECES TOGETHER First, glue 5 uncut pieces of cardboard together to create a bottom. 05 // KEEP GLUING Next, take the 10 pieces that have the two cutouts and glue them right on top of the stack of cardboard.