background preloader

Lily Pad Hexagons...

Lily Pad Hexagons...
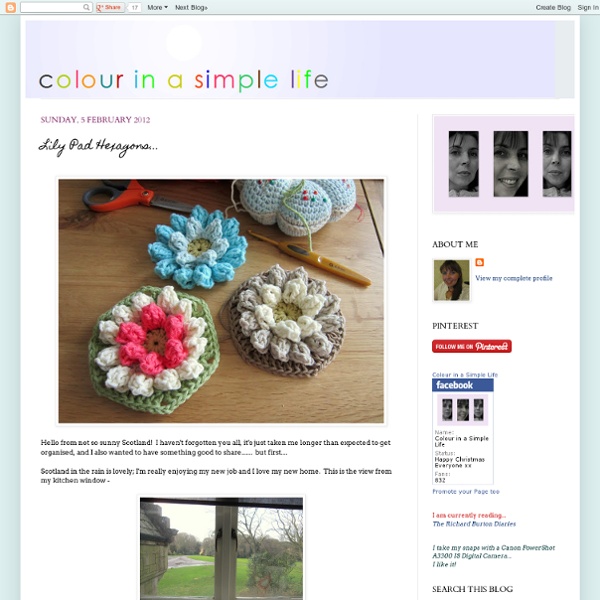
Hello from not so sunny Scotland! I haven't forgotten you all, it's just taken me longer than expected to get organised, and I also wanted to have something good to share....... but first.... Scotland in the rain is lovely; I'm really enjoying my new job and I love my new home. This is the view from my kitchen window - and these were my moving in treat to myself... I can see a loch from my bedroom window, but I'm not taking any pics until I can get out there when the sun is shining, and that has only happened so far while I've been at work. Now enough of the necessities of life and on to the good stuff! And if you look from the side I think they look rather like lily pads...... Now I'm aware that my instructions for the puffed daisy hexagon has stumped some readers who are not quite as experienced in the crochet techniques required, so I have produced a photo-heavy tutorial below that I hope can be followed by all. Lily Pad Hexagons Related:  crochet

le crochet géant! Bon, vous aviez bien compris, malgré vous peut-être, que nous sommes dans une période crochet . C’est comme ça, ça ne s’explique pas, c’est l’air du temps… Et dans la grande tendance CROCHET il y a une niche encore plus chouette: le crochet géant . (photos trouvées sur Pinterest) Pour le crochet géant , c’est bon, le sourcing est désormais accessible, chez brutalux (clique) : si vous avez envie de vous y mettre, voici quelques pistes pour commencer (avant le tapis, plus ardu): les cols rapides et graphiques, les corbeilles et les poufs… pour les corbeilles voir ce blog par exemple : En ce qui concerne les poufs, voici ce que j’ai réalisé récemment, en crochetant en même temps 3 grosses pelotes (pour ce pouf de 70cm de diamètre il faut 15 pelotes) au crochet n°20. et enfin le plus facile et le plus rapide, les cols, il suffit de 3 pelotes de laine n°6. Il faut monter 25 mailles puis crocheter un tube en mailles serrées. Vous aimerez peut-être aussi :

A Better Granny Rectangle « crochet again Well, I think it is better : ) As I said before, in my other Granny Rectangle post (don’t go there, I think this one is better), I have always been unsatisfied with how the center of granny rectangles line up in the middle, instead of alternating like it does in the rest of the fabric. It seems weaker and is not as pleasing to me, I just don’t like it : ) Don’t know why I didn’t do it this way the first time I got the idea, but at least I thought of it now. For the size I did in the example: Ch 22 Ch 21 (corrected 8-24-13) In the 6th chain from the hook, 3dc. In the space on the end created by the dc and foundation ch; 2dc, ch3, 3dc, ch3, 3dc. 2 corners on the end made. 3dc in each space between across… At the next end; in the ch 5 space 3dc, ch3, 3dc, ch3, 3dc to make the corners on the other end. Now, go across the other side, making 3dc in each space between… Slpst into the top of the beginning ch3 and there you have it! Like this: Like Loading...

Modèle de fleur au crochet Réalisation des pétales La résille a formé des arceaux. Ce sont eux qui vont aider à la construction des pétales. 1) Dans chaque arceau de 2 maille en l'air, faites 1 maille serrée + 1 demi-bride + 1 bride + 1 demi-bride + 1 maille serrée. 2) Fermez le tour par 1 maille coulée dans la première maille serrée. 3) Cassez le fil. - 2ème rang de pétales : 4) A nouveau dans chaque arceau, crochetez : 1 maille serrée + & demi-bride + 2 brides + 1 demi-bride + 1 maille serrée. 5) Terminez par une maille coulée. - 3ème rang de pétales : 6) Dans chaque arceaux de 4 mailles en l'air : crochetez 1 maille serrée + 1 demi-bride + 3 brides + 1 demi-bride + 1 maille serrée. 7) Terminez par une maille coulée. - dernier rang de pétales : 8) Dans chaque arceau de 5 mailles, crochetez : 1 maille serrée + 1 demi-bride + 2 brides + 1 double bride + 2 brides + 1 demi-bride + 1 maille serrée. 9) Terminez par une maille coulée. 10) Cassez le fil, c'est terminé.

crochet house shoes sur Etsy, la plateforme de vente internationale du fait main et du vintage. Puffed Daisy Hexagon Season's Greetings! I'm sorry that it has been a while since my last post, but I've had some technical gremlins here that have kept me off-line! It's been wet, wet, wet here for so long that I've forgotten the last completely dry day we've had – mainly miserable rain, but mixed with some snow for the last few days. Not pleasant to be out in, but the perfect excuse to stay by the fire and crochet! I'm still bobbling along, but the rounds seem to take an age to complete now, so I can only manage one or two rounds at a time... Of course, my itchy fingers have needed something smaller and quicker to create between marathon rounds so some experimenting was in order. Puffed Daisy Hexagon - FOR A PRINTABLE PDF OF THE PATTERN CLICK HERE. I despair when I read my patterns; if any of you manage to decipher it/them you deserve a medal! Anyway, I'm obsessed with these at the moment, so enough typing, I'm getting back to bobbling. xx

Carina's Craftblog: Tutorial: crochet granny triangle So! Here we go with the granny triangle tutorial. Did you master the magic circle yet? Ready to go? By the way, this is the yarn I use. If you don't fancy using the magic circle, you can make a ring by making 4 chain stitches and joining them into a ring. July 2012 - Please note: these days I do very little crochet because I'm working on an embroidery book. Por favor, respeta mis derechos de autor. Round 1 Img. 1: Ch3 in the magic circle, counts as first dc, 2dc into circle, ch2, 3dc, ch1, 3dc, ch2, 3dc, ch1, 3dc, ch2, 3dc, ch1, join into top of chain Img. 2: notice how I am holding the ring? Img. 4: See how that's all neat and tight? Round 2 Img. 7: chain 3, counts as first dc Img. 8: 2dc in the corner/ch space, ch2, then 3dc in the corner Img. 9: find the ch1 space from the last round - sometimes a bit tricky to find.. Img. 10: 3dc into the ch1 space, then repeat the following sequence twice: 3dc in corner, ch2, 3dc in corner, 3dc in ch1 space. Thank you!

des cols au crochet pour les fêtes Les fêtes sont toutes proches et on a envie de faire quelques efforts vestimentaires pour briller de mille feux ! Pas toujours envie non plus d’investir dans des tenues trop apprêtées que l’on aura du mal à ressortir. La solution ? Accessoiriser une tenue que l’on a déjà. Et c’est Catherine, l’auteur du blog Petite Pimprenelle qui manie le crochet avec grand talent qui vous propose ce très joli tuto. Catherine, on t’écoute ! Le col au crochet peut être l’accessoire idéal pour mettre en valeur une tenue de fête si on décide de le crocheter avec des fils brillants. C’est ce que j’ai fait pour mes deux filles et je vous propose de vous aussi les réaliser. Certaines connaissent et ont déjà crocheté ce ravissant modèle développé par Emma du blog « Lulu Loves », mais pour celles qui ne parviennent pas à crocheter en anglais, je vous propose une traduction de ce modèle, avec bien entendu l’aimable autorisation de l’auteur. De quoi aurez-vous besoin ? Du fil ou un mélange de fils à crocheter en 4 :

Simple Sunburst Crochet Heart Tutorial Hello Lovelies, we are enjoying a quiet half term week here , I've been busy spring cleaning and reorganizing. But I've also taken the opportunity to write out another tutorial for you . My original Sunburst Granny Heart , which I posted last spring has turned out to be one of my most popular patterns. That's quite a complicated design though, with many different stitches . In this version my aim was to simplify things and also to create a solid version, suitable for stuffing......... What do you think ? Here goes with the tutorial...lots of pictures and tips as usual ......enjoy :0) I'm again using U.S. terms and you start by making a modified sunburst granny circle. Hello again, here goes with round 4....starting to develop the heart shape. In the next stitch make 1 hdc......... 1 dc in each of the next 2 stitches........ In the next stitch make 2 dc.......... followed by 1 dc in the next stitch and 2 dc in the following stitch......... Then it's time to make the second "bump".

7 Best Crochet Mandala Patterns Awhile back I did a roundup of some of the most beautiful crochet mandalas I’ve seen online. But what if you want to make your own? There were a few links to patterns in that post but here are seven more excellent crochet patterns for mandalas. This roundup includes both free crochet patterns and ones that you can buy. 1. Barbara from Made in K-town shared a free crochet pattern for this beautiful springtime mandala. 2. Etsy’s CAROcreated sells the PDF patterns for overlay crochet mandalas including the pattern from this one: I really love the version of this crochet pattern crocheted by A Creative Being: 3. The free crochet pattern for this mandala made inside of an embroidery hoop is available from Mitten & Makings. 4. Crochet with Raymond has a great granny circle mandala pattern but her pattern I really love is this one for the African Flower Mandala. 5. For something a little bit different you could try out the pattern for this Mandala Crochet Rug sold through Ravelry. 6. 7. Kathryn

Crocheted Linen Grocery Tote It's always a good time to eschew the plastic bag in favor of an earth friendly one. My favorite choice is the netted grocery tote. It has all the conveniences of a plastic bag and none of the detriments. I love that it scrunches up into a tiny ball inside my purse, weighs nothing, and fits more groceries than I can even carry - magic! Our knit version of this bag has been a perennial favorite at Purl (check out Elisa's Nest Tote), so here, finally, is a crocheted option. The Materials 1 skein of Louet's Euroflax Original, 100% linen. The Pattern Gauge 5 1/2 single crochets = 1 inch Finished Size Approximately 17 inches tall x 11 inches wide and very expandable. The Bottom Chain 6 and slip stitch into the first chain to form a ring. Round 1: Make 11 single crochets (sc) into the ring. Note: Mark the first stitch of the next round with a removable stitch marker, safety pin or paper clip. Round 2: Make 2 sc into each stitch of the round. (22 stitches) The Body The Handles

Granny Heart Tutorial Following my post and pattern for the Grannie Heart Bunting, I thought the hearts would make an excellent starting subject for my first tutorial. So, here we go. My Grannie Heart Tutorial... ★★☆ - Improver A few notes before we begin: Yarn: I used Debbie Bliss Baby Cashmerino and a 3.5mm (E) hook, but you can use whatever yarn you like, just use the recommended hook size for your yarn. Terms: I've used British crochet terms throughout, so I must apologise in advance to anyone who is used to using the American terms. To clarify, the British terms that I have used are below in black and the American terms are given in green in brackets: British (American) Slip Stitch (Slip Stitch) Chain (Chain) Double (Single) Treble (Double) Double Treble (Treble) WRITTEN PATTERN - If you'd like the written directions only, please visit the Cherry Heart Boutique and download the Granny Heart Bunting pattern, which contains the heart instructions. Foundation ring: 1. 2. 3. 4. Round 1: 5. 6. 7. Round 2: 8. 9. 10.

Enfiler des perles.. Ca semble tout simple, dit comme ça: enfiler des perles ... et bien avec un mode d'emploi , insérer des perles dans son tricot c'est tout de suite très très simple: That seems quite simple, said like that: thread pearls and well with an instructions for use, insert pearls, it is very very simple at once: Il faut un crochet fin ( 1mm, 0.75mm ou 0.6mm pour des perles très fines), des perles ( oui je sais ça a l'air evident comme ça, mais on ne sait jamais!) A fine hook (1mm, 0.75mm or 0.6mm for very fine pearls), pearls is needed (yes I know that looks evident like that, but you never can tell!) Ensuite sortez la maille où vous souhaitez enfiler la perle. Then take out the stitch where you wish to thread the pearl. Ensuite remettez la maille sur l'aiguille de gauche et tricotez la comme vous le souhaitez. Then put back the stitch on the left needle and knit as you wish it. Et enfiler des perles redevient le jeu d'enfant qu' on aimait tant!

CAL Granny Mandala - le tuto complet - Made by San... J'ai commencé à répondre à vos nombreux messages hier, mais je ne pouvais pas vous répondre à toutes individuellement, trop long... Alors voilà les explications complètes pour le premier mandala, j'espère que vous n'avez pas trop attendu ;) Granny Mandala J’utilise un crochet 8 et des fils ¾ que je crochète en double Je crochète toujours dans la(les) CH du tour précédent Point utilisé : 2Brides crochetées ensembles = 2BrEns (pour simplifier les explications) = 1 jeté, piquer à travers le rond, 1 jeté, tirer à travers le rond, 1 jeté, tirer à travers 2 boucles, 1 jeté, piquer à travers le rond, 1 jeté, tirer à travers le rond, 1 jeté, tirer à travers 2 boucles, 1 jeté, tirer à travers les 3 boucles restantes sur le crochet. Tour 0 (fuchsia) : 4CH + MC Tour 1 (fuchsia) : * 2BrEns + 1CH * 6 fois (= 6 BrEns) Tour 2 (kaki) : * [2BrEns + 1CH + 2BrEns + 1CH] * 6 fois (= 12 BrEns) Tour 3 (orange) : * 2BrEns + 2CH * 12 fois (= 12 BrEns) Tour 5 (lavande) : * 2BrEns + 1CH * 24 fois (= 24 BrEns)

Related: