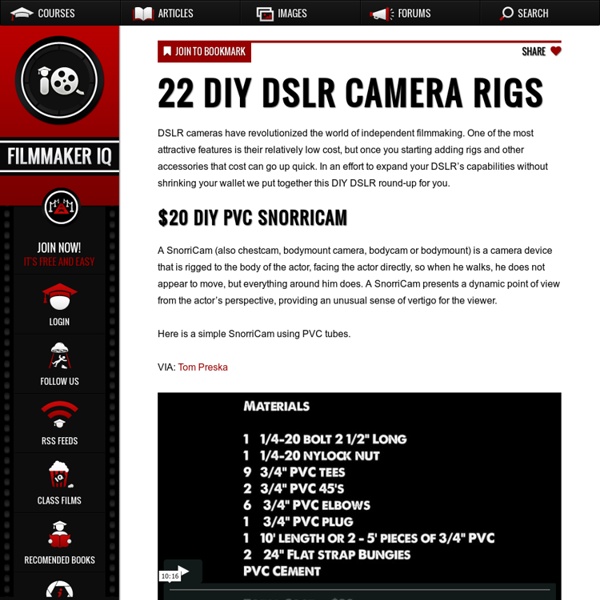
22 DIY DSLR Camera Rigs
Camera Strap Tutorial – Guest Post & Priddy Creations Giveaway
Today’s guest tutorial is from Amy at Priddy Creations! Priddy Creations is a shop full of custom camera accessories! Before I share this much requested tutorial, I thought I would answer a burning question that I have been bombarded with….WHY WHY WHY would I want to share a tutorial on an item I sell for profit? A little background…I started making and selling camera straps back in January of 2008. Back then, there was only me and one other person selling the camera strap slipcovers. My main reason for offering this tutorial, even though I do sell these as part of my inventory, is because I am extremely thankful for the support and business I have received throughout the years and I want to give something back to the “lovers of all things handmade” community. The tutorial idea actually started as a plan for an eBook for my camera strap slipcovers back in June of 2009 (I actually had to look that up…was thinking it couldn’t have been THAT long ago). Padded Camera Strap Slipcover Tutorial
FilmmakerIQ.com
Garment Rack D.I.Y.
Looking for a budget friendly way to create garment racks for your home? Today Rachel shares her D.I.Y. method... You'll Need: Two 1/2" x 60" black steel pipes, Two 1/2" x 48" black steel pipes, Four 1/2" x 8" black steel pipe nipples, Two 1/2" x 2 1/2" black steel pipe nipples, Six 1/2" x 1 1/2" black steel pipe nipples, Six 1/2" black tees, Four 1/2" black 90 degree elbows, Four 1/2" galvinized floor flanges, Two 1/2" black steel end caps, 1 can of black spray paint (optional) and Work gloves. Preparation: Spray paint your floor flanges black to make it consistent with the rest of the pieces. One: Group your small pieces for easier assembly. If you plan on transporting your garment rack to events or are moving houses, just unscrew the bases, the bottom 4' pipe, and the two 6' pipes.
PRODUCCIÓ
Trucos y técnicas para postproducción 3D
1. Duplicamos la capa con el render original y le aplicamos un desenfoque gausiano (probad con diferentes intensidades). 2. A esta segunda capa superior le cambiamos el modo de opacidad de Normal a Screen (Trama, creo que es en castellano). 3. Opcionalmente, ajustamos la opacidad de esta segunda capa. Con estos pasos veréis que el resultado ya cambia bastante. 4. Debéis andar con cuidado al usar este truco. Jugad con el grado de desenfoque que apliquéis.
REALITZACIÓ
CINEMA
Free Music Archive
Related:
Related:
