DIY Glow Jars Tutorial
Posted on October 19, 2011 by Christina Aren’t these glow jars sublime? They take about two minutes to make and cost only 20 cents a piece. How’s that for an enticing DIY wedding project? These would look amazing at an evening outdoor wedding. Line walkways with them, or place them on tables. If you like this project, check out my DIY ‘glitterarium‘. DIY Glow Jars Tutorial For each glow jar you will need: a jartwo Glow Sticksscissorsrubber glovessafety glasses Disclaimer: This is a project meant to be done by an adult – not a child! Purchase Glow Sticks (I got a pack of 15 for $1.50) and dig a jar out of your cupboard. Grab two glow sticks and cut at one end.
HOW TO: Recycle a Tin Can Into a Gorgeous Outdoor Lantern for Summer Parties
All you need to do to get started on this eco-friendly summer craft project is gather the following materials: 2-4 cleaned, empty tin cans (you can use any size)a hammeran assortment of nails (for larger or smaller holes)colorful permanent markerspaper, pencil, masking tape, scissors (if you plan to use a pattern)votive candlesa towel With your newly gathered used tin cans, remove labels, and clean thoroughly. Fill each can with water and freeze overnight until solid. The ice stabilizes the can and prevents it from bending when you punch holes in them later. Decide on a design for your punched-tin decorations. Cradle the frozen tin can in a folded towel (to prevent the can from moving and to catch ice chips). Rinse the can under a hot tap until the ice block pops out and allow the can to dry. If you want to add color to your new punched-tin lantern, you can create a variety of fun, shiny designs by simply using colorful permanent markers.
Melted Crayon Art
Perhaps I should begin this post by introducing you to my mom, also known as Her Ladyship Craftiness…er, Her Royal Craftiness? I’m still working on the title. Regardless, she’s the coolest, most creative and talented woman I know. She can make pretty much anything. At least once during high school, I borrowed a friend’s purse, brought it home to Mom, and she whipped one up just like it for me. Yes, I probably abused the power of being Her Ladyship’s daughter, and I no longer steal my friends’ purses, but the point is: my mom is awesome. If you follow Young House Love, Bower Power, Making a House a Home, or Style by Emily Henderson you know how timely her visit was, as today is the big reveal for the Pinterest Challenge. The supplies were pretty simple: canvas, crayons, and hot glue. The next step was to peel off the paper labels from all 60 crayons. It worked like a charm. What do you think of our masterpiece? Total money spent: $9.60 Total time spent: about 1½ hours Like this:
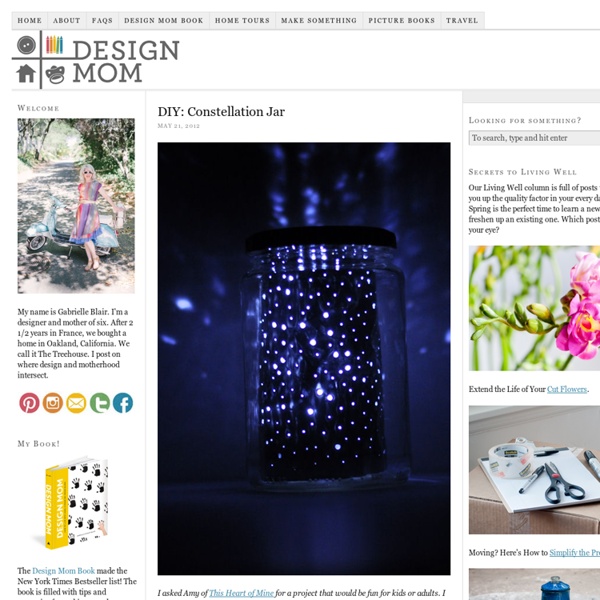
glowing jar project
Thank you for being here and looking at this old-old tutorial of mine! A lot has changed on this blog lately, why don't you go check it out after you learnt how to make your own jars? For one, the blog is now written in english/hungarian entirely, can't wait to see what you think about other things on from panka with love! Since the above image is one of my 'most famous' photos, I've got a lot of requests on how I made these glowing jars. A fölső kép miatt (ami az egyik legismertebb képem) elég sok kérést kapok, hogy csináljak egy lépésről lépésre segítséget a befőttes üvegeimhez. In general about this project / Általában erről a projectről: I have a lot of mason jars. Rengeteg befőttes üvegem van, kicsik is, nagyok is, de úgy látom, hogy a nagyobbak jobb választásnak tűnnek ehhez a projecthez: azok aztán nagyon szépek és mágikusak lesznek! Ingredients / Hozzávalók: Mason jar / Befőttes üvegGlowing paint / Világító festék (a linket eltávolítottam)Paintbrush / EcsetSome water / Kis víz 1.
Friday Flowers: Ombre Chrysanthemums
I love this project. It's fast, cheap, easy, AND it's fun to say aloud: obmre chrysanthemums. Chrysanthemum is one of my favorite words of all time. I like the way it requires you to scrape your tongue across the back of your teeth to pronounce it properly. And, for another thing, it is one of the few multisyllabic words I enjoy spelling. Ombre is big again this year, so I thought I would incorporate it into a flower project. I was all set to show this to guys last week, but then I decided it was missing something. *Can I just take a sec to point out that I even have a closet that can hold a giant chrysanthemum lantern? What's the difference between the two versions? Coffee filters: $2.00 (tip: I buy packs of 700 coffee filters at Costco $2.50) Required quantity varies. Dye: $4.00 per bottle I used Rit liquid fabric dye because I wanted a rich, vibrant orange and I have found (through much experimentation, I might add) that nothing else produces saturated orange/red colors like this dye.
How to Make a Pencil Holder Using a Can
Hi everyone! Today I'm sharing a tutorial on how to make your own pencil holder with a recycled can. Are you ready? Here we go...First you will need these items: * A recycled soup or bean can (cleaned) *Scrapbook paper, wall paper or gift wrap paper * Scissors or other cutting device * Spray adhesive or mod podge *Clear tapeThis is what I did... I purchased scrapbook paper which runs about 50 to 60 cents a sheet. I grabbed a soup sized can from the recycling bin. I Removed the wrap from the can. I measured the original can wrap against the scrapbook paper with a ruler. Once I had my measurements, started cutting the paper. I Wrapped the paper around the can, to keep it sturdy, I took a small piece of tape and taped down one end of the sheet of a paper on the can, then wrapped the sheet of paper around the can and sealed it with clear tape, you can use mod podge. Hello new pencil holder and it holds magnets too!! Be creative!! Now for my short collection of random musings, read on.
little monster: EDIBLE FINGERPAINT
This weekend, we made edible fingerpaint on a cloudy Saturday morning. Rowan has a lovely habit of eating his crayons (and dirt and rocks!), so making a safe, ingestible fingerpaint sounded like a good project for us. I have experimented with making play dough before which worked out really well. Here is the recipe I found on Momtastic (great website btw). Edible Fingerpaint(via Momtastic) 1/3 cup flour 2 tablespoons sugar 1 teaspoon salt 2 cups of water Food coloring In saucepan, on low/medium heat, warm up flour, sugar, salt and water. Divide mixture evenly into 4 small cups.
Pallet coffee table, esprit cabane, make your own furniture
This modern, ethnic-looking coffee table, with its ochre stripes that conjures up visions of Marrakech, was made from a wooden pallet discarded in a shopping area. The painstaking task of removing nails and sawing wood was avoided by fitting the pallet with a hardboard bottom and filling the cracks with mortar. And presto, we have a table top. If you like contemporary design, you can also fill the cracks with concrete, and then smooth and add a wax finish. To start, choose a pallet in good condition. To help fill in the cracks, nail down a few pieces of scrap wood. Once the mortar is dry, remove the formwork and carefully sand the table top. You can either paint the mortar or leave it as is. To make "legs" for the coffee table, attach two thick boards, such as formwork planks, to the sides of the pallet, using 80 mm (3 in) screws. Other pallet craft projects (click the following thumbnails):