Solucan Kompostu Nasıl Yapılır? - Permakültür Platformu - Permakültür Bilgi Paylaşım Ağı
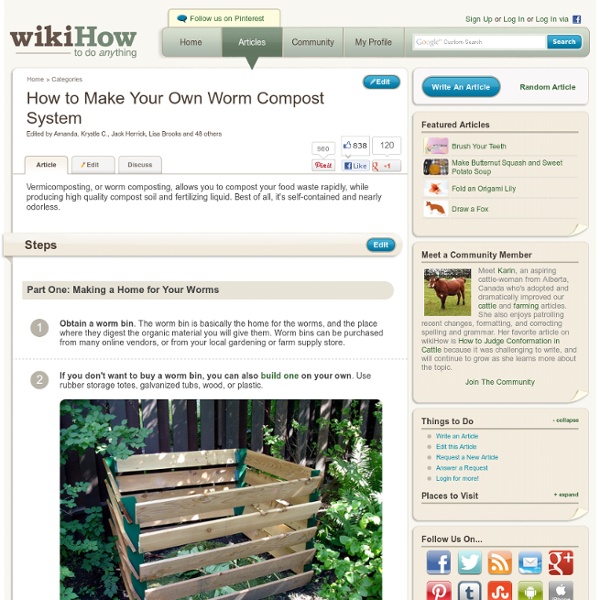
Kendi Solucan Kompostu Sisteminizi Nasıl Yapabilirsiniz [WikiHow sitesinden çevrilmiştir; yazanlar: Amanda, Krystle C., Jack Herrick, Lisa Brooks] Solucan kompostu yapımı hem atık gıdalarınızı hızlı bir şekilde komposta çevirmenizi, hem de yüksek kalite kompost ve Red Wiggler kompost suyu elde etmenizi sağlar. 1. Bu kaplar internet üzerinden ya da tarım aletleri satan dükkanlardan satın alınabilir.Kendi kutunuzu kendiniz de yapabilirsiniz. 2. parçalanmış gazete kağıtları parçalanmış gazete, saman, kurumuş ot ya da benzeri malzemeler koyun. 3. 4. solucanlarınızı meyve, sebze atıklarıyla besleyin hızlandırır ve solucanlarınızı memnur eder. 5. Kauçuk eldiven giyin, komposta dönüşmemiş her türlü büyük sebze malzemesini bir tarafa taşıyın. 6. işte sonuç Püf Noktalar Kutunuza koyacağınız yumurta kabukları ürettiğiniz kompostun kalsiyum içeriğini artırır.
Build an Ant Farm
By Rebecca ClarkIllustrated by Sabine Deviche Materials Two clear plastic CD cases, standard width Sieve for soil Dry soil, ideally from place where ants were collected (approximately 3 cups before sifting) Container for sifted soil (approximately ½ cup after sifting) Utility knife or other sharp knife that can cut plastic Clear packing tape Spoon Eyedropper (for watering soil) Straightedge for scoring and cutting plastic Marker to note exit/entry point location Two pieces of dark construction paper, or aluminum foil to cover sides of farm This project requires adult supervision for cutting plastic. Video Tutorial Step by Step Instructions 1. 2. Mark the corresponding location on the underside of the upper CD case, where you will carve a small, circular hole using a utility knife or other sharp blade.The plastic may crack if you carve too quickly, so work gradually and avoid applying too much pressure. 3. 4. C. D. 5. 6. 7. E.
Solucan Gübresi Nasıl Yetiştirilir? - Birinci Bölüm -
Evsel ve bahçesel atıklarımın büyük bölümünü kompost haline getiriyor ve bahçemde kullanıyorum. 2013 de kompost işlemini bir adım ileriye götürerek solucan ile kompost (vermicomposting) yapmaya karar verdim. "Solucan gübresi" içindeki gübre kelimesinin bizde yarattığı kötü kokulu çağrışımlarının aksine yağmur sonrası toprak kokan, siyah renkli, organik açıdan çok zengin doğal bir oluşum. Ben solucan gübresi demek yerine solucan toprağı demeyi tercih ediyorum. Onbeş gün boyunca Worm Farm, Vermicomposting arama kelimeleri ile onlarca Youtube videosu indirdim, izledim, sınıflandırdım ve notlar aldım. Bu kadar Youtube ve video indirmekten bahsetmişken hangi program ile Youtube videoları indirilebiliyor bilgisini de vereyim. Başlangıç seviyesi videolar içinde gerek görüntü gerek içerik açısından en iyi bulduğum videoyu izleyerek devam edelim. Kısa özetle evde solucan yetiştirmek için yukarıdaki hazırlıkları yapmalısınız. İlk solucan kovamı hazırladım.
Project WILD in Ohio
Project WILD Training Workshops >> Project WILD involves young people and wildlife, a proven formula for generating interest and participation. Project WILD is a supplementary education program emphasizing awareness, appreciation, and understanding of wildlife and natural resources. Attractive and easy to use, Project WILD is an ideal way to supplement your curriculum and fire the imagination of your students. Project WILD teaches young people how to think about wildlife, not what to think. Project WILD was developed through a joint effort of the Western Association of Fish and Wildlife Agencies and the Council for Environmental Education. The pre-K Growing Up WILD guide from Project WILD is also available through workshops. Hello High School Teachers!! You can also sign up for the Educator Edition of the Wild Ohio E-Newsletter to receive monthly professional development opportunities right to your inbox. Hey Early Childhood Educators!!!
Worms And Stuff » Red Wiggler Worms in Alaska
Worm Composting
Published by City Farmer, Canada's Office of Urban Agriculture City of Vancouver - City Farmer Wormshop See these links first. City Farmer's Step-By-Step Photo Guide to Worm Composting See City Farmer's wormshop instructor describe how a worm bin works.
Vermicompost
Rotary screen harvested vermicompost, composed of worm castings Vermicompost is the product or process of composting using various worms, usually red wigglers, white worms, and other earthworms to create a heterogeneous mixture of decomposing vegetable or food waste, bedding materials, and vermicast. Vermicast, also called worm castings, worm humus or worm manure, is the end-product of the breakdown of organic matter by an earthworm.[1] These castings have been shown to contain reduced levels of contaminants and a higher saturation of nutrients than do organic materials before vermicomposting.[2] Containing water-soluble nutrients, vermicompost is an excellent, nutrient-rich organic fertilizer and soil conditioner.[3] This process of producing vermicompost is called vermicomposting. Suitable species Blueworms (Perionyx excavatus) may be used in the tropics.[5] However, P. excavatus worms are not suitable for worm compost bins in most of the contiguous United States. Large scale Small scale