background preloader

Tuto

Tuto
Vous avez été plusieurs à me contacter pour me demander des explications concernant les débardeurs que j'ai fait pour Miffy et pour PCGP. Afin d'en faire profiter le plus grand nombre, voici un petit tuto! Les mesures correspondent à un 36/38, à vous les adapter en fonction de votre taille. Les marges de couture sont incluses.1- Pliez votre tissu en deux dans le droit fil et reportez le patron en le positionnant au bord de la pliure (2 fois).2- Pliez chaque partie du bas en deux dans le sens de la longueur envers contre envers (bien sûr les mesures sont données à titre indicatif, à vous de les adapter en fonction de la largeur souhaitée pour la bande du bas). Voilà j'espère avoir été suffisamment claire, sinon n'hésitez pas à me poser vos questions. Bonne couture! Related:  Femme

Voir le sujet - [tuto]Jupe "gitane" - jupe "victorienne" J'ai réalisé un tutorial super détaillé pour celles qui veulent se faire une jupe facon "jupe tzigane" (rom) :L'avantage, c'est qu'elles ne servent pas qu'a la danse :elles ont un rendu superbe pour pas mal de costumes, historiques (piraterie, jupe/jupons/robe des 18e/19e siecle, "pseudo medieval"), ou cosplayD'ailleurs, porté courte devant, et tout le reste mis a l'arriere au niveau des fesses, ca donne un joli effet "faux cul" ... avec un fort coté jupe 18-19e siecle ^^Je precise : j'ai essayé de détailler au maximum ! J'ai appris en lisant et suivant des instructions trouvées sur des sites en anglais, et sans details + tout en anglais, ca m'a saoulé ... J'utilise donc de mon experience pour en faire profiter d'autres ! PRINCIPELe principe de ce type de jupe est simple sur le fond :On va assembler plusieurs lignes de tissus (morceaux rectangulaires), et chaque largeur de ligne mesurera le double de celle du dessus ! Ma ptite derniere, non finie, mais "sortable" : -Jupe a 4 lignes :

DIY RECY OUTFIT / CrazyArt / SAShE.sk Andrea M. » Inšpirácie z internetu / Pred 6 rokmi / 1 komentár / 28 lajkov / 280x zobrazený A som tu opäť s DIY návodmi a vylepšeniami pre nás hendmejďáčky. Dlhšia odmlka, no o to väčšia chuť opäť pridávať. Plné skrine starého oblečenia a my stále dokola kupujeme nové. Alebo sa dá využiť recykláciou na výrobu nového! Načo vyhadzovať šušulky za drahé handry, keď si môžeme šatník oživiť napríklad aj takto: Zo starého trička s hlbokým výstrihom si bez zbytočného prešívania a strihania takto rýchlo a jednoducho poskladáme, obmotáme novú minisukienku. Pre obľúbenkyne nožníc a strihania je tu tričko prestrihané na moderné tielko, alebo big XXXXXXL tričko pretvorené na romantické letné šatočky, či minisukňu na traky. Mojím favoritom sa stali tmavé tričko-šaty zdobené výraznými ružičkami. Ako čerešničku na torte som si vychutnala prerábku neforemných žabiek na úplné nové sandále skvostného dizajnu. A na záver sušiako-vešiak na prádlo či tričká (alebo smraďošky ponožky), vualá vstavaný do steny.

immi-modèle fait RECICLAGEM DE ROUPA Neste espaço vou abordar a reciclagem de roupa. Actualmente é muito mais do que uma necessidade, hoje ela tem que ser encarada como um caso de sustentabilidade e preservação dos recursos naturais. Os recursos do planeta começam a escassear e por uma questão de solidariedade para com as gerações futuras temos que nos consciencializar que o reaproveitamento tem que fazer parte do nosso dia-a-dia. Aquilo que em principio começa como um passa tempo (hobby) pode muito bem passar a ser uma forma de negocio.

Hooded Tunic Tutorial Nicole Blum from One Golden Apple and Improv Diary joins us today with this fun Tunic Tutorial. You can use old t-shirts or new jersey yardage to come up with a simple, comfortable piece that fits you perfectly. If you love Nicole’s style and today’s tutorial, be sure to check out her book coming out next spring, Improv Sewing: 101 Fast, Fearless Projects. Learn more about Nicole in her introduction, and check out One Golden Apple for lots of “fast and fearless” tutorials to whet your appetite for the book! Hello, fellow makers and dreamers and lovers of this fantastic blog of ideas. I have come up with this project to illustrate just how fun it can be to make your own clothes without complicated patterns or fancy equipment. This is an upcyled tunic made from four panels, each from a different t-shirt. What you’ll need: Directions: 1. 2. Make a mark on paper’s edge where the neckline of your shirt touches. Cut out your paper pattern. 3. Important! 4. 5. 6. 7. 8. 9. 10.

Old Mens T-shirt Sewn Into Women's Dolman Tee My husband and I are runners so we have a million t-shirts. I love transforming these boxy, oversized tees into something I will actually want to wear other then for a nightgown. I love this heather grey and wanted to make it into my favorite style tee. I love the comfortable, effortless style of the dolman tee... It took me about 15 minutes or so. Supplies: DIY intructions: Full Video go here (it's old though). Begin by removing the collar of the shirt, pull to create an off the shoulder look. Mark your 1/2 your hip measurement inside the t-shirt so it's even. Pleat about 4 inches up by folding accordion folds and pinning through front and back. Mark your arm hole measurement and pin from the under arm seam to that measurement. When you sew, start at the bottom hem and sew up to the under arm seam in a gradual line. Cut all the excess interior fabric away or serge the interior.

Summer Cardigan This tutorial was originally posted as part of Summer of Skills series over at Brassy apply. Reposting it here now. I sew clothes all the time...for my daughter.For me? Not so much. Even simple repairs like sewing on a button, or hemming a pair of pants languish for months in my unfinished pile, before they get to my machine. With that state of affairs, I signed up for Meg's SOS series, for "Something for Me" part - not sure what I was thinking. Supplies: 1. Construction: 1. 2. 3. 4. 5. 6. 7. 8. The cardigan is done...now for the embellishments...I drove myself crazy on this one. Excited enough to run to the nearest target and get this... And I doodled away...knowing fully well that there was no going back now. Remember to draw your doodles in as thin a line possible, because they will become wider as they dry. Finally I got this... I think I like it...I think I love it...as in..really really love it.

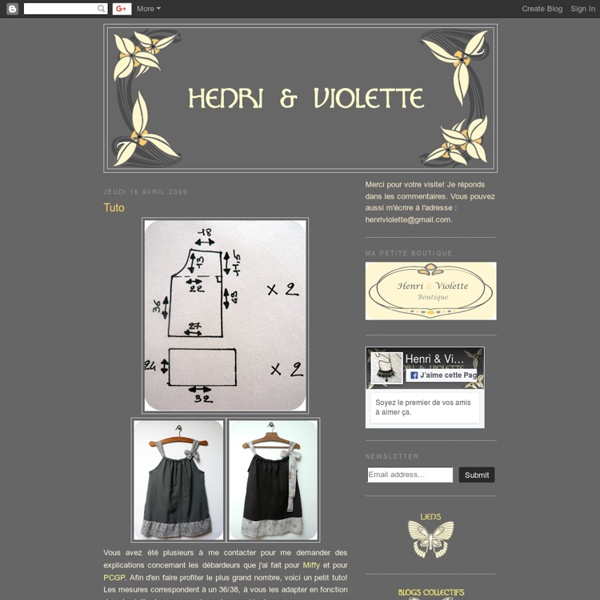
Petits Patrons Gratis Voici mon premier pull réalisé au tricot : Matériels utilisés : - Aiguilles n° 5 pour les côtes 1x1 et aiguilles n°5,5 pour l'ensemble. - 5,5 pelotes Schoeller Stahl, Elfin, coloris n°0001, 140 m / 50 g, 90% d'acrylique et 10% de mohair. Un peu de Technique. Il s'agit d'un pull tube. Après avoir mesuré plusieurs pulls du commerce, j'ai défini les mensurations (en noires sur le schéma) qui convenaient. J'ai réalisé un échantillon en jersey (le point principal de ce pull, plus précisément l'envers) et j'ai compté le nombre de rangs et de mailles sur 10 cm. Une fois le nombre de mailles et de rangs par cm connus, il suffit de convertir les mensurations finales du pull (Ex : 60 cm (longueur dos et devant) x 2 rangs / cm = 120 rgs). Pour finir, le rendu est sympa et il ne gratte pas.

How to Make a Flirty Flapper T-Shirt March 24th, 2009 Email 12 users recommend I just can't get enough restyling! Cal Patch Here are the two unsuspecting "befores." Folding the neckline this way helps you cut it symmetrically. Photo: Cal Patch I like ruffles. You'll need two T-shirts in similar or complementary colors, scissors, tape measure, pins, and thread. 1. Cut a low V or scoop-neck; you may want to draw it with chalk if you're new at this. 2. I also unpicked the hemstitching on the remainder of the bottom edge to maximize the length, but this is optional. 3. Cut the largest quarter-circle you can from fold to fold, yielding a big circle of T-shirt fabric. Make sure the diameter of the circle is at least 3 to 4 inches bigger than the measurement you wrote down; if not, you'll need a bigger T or to piece together a bigger circle. Open up the circle along the cut and you've got your drapey ruffle! Cut a few extra curved strips from around the edges of where you cut the circle. 4.

Un tee-shirt "paiLLe" ... Ce tee-shirt est celui qui a été le plus épinglé sur Pinterest (pas dans mon tableau, mais ailleurs) parmi toutes les épingles que j'ai mises. Dernièrement un tuto et un patron m'ont été demandés. C'est chose faite ! Tissus utilisés : - Jersey peu élastique trouvé au fin fond de Tissus Jaurès - Tissu coton à motifs de chez Toto Un peu de technicité : - Il a une coupe droite pour donner un effet un peu "loose". - Encolure en V mais modifiable pour devenir ronde. - Parementure devant et dos. - Brides et boutons dans le dos. - Manches courtes à "revers". Le tuto et le patron en taille 38/40 sont disponibles sur demande à cette adresse : m.bidouillibidouillages@gmail.com Vos Belles Réalisations :

PROJECT #9 : THE SILK T © 2011 Runway Sewing. All Rights Reserved. Here is how you make this elegant but sophisticated and simple T shirt. Material: 1.) 1 yard silk or light weight cotton fabric 2.) thread 3.) pins 4.) scissors 5.) measuring tape 6.) sewing machine 7.) marker or chalk 8.) 1/4" bias binding (optional) 9.) Duration: 2 - 2 1/2 hours Sewing Level: Beginner 1. 2. 3. (After you draw #5 below, redraw the side seams so that right under the armhole it curved in about 1/2" and blend back to 0" at bottom hem. 4. 5. 6. You did it! 7. 8. 9. Good luck and Enjoy!

Faire une robe tunique en moins d'une heure Facile et rapide à faire, cette robe "tunique" m'a tout de suite intéressée ! J'ai trouvé le tuto ici. A l'origine, elle s'appelle "tunic museum" et est réalisée dans un tissu à motif particulier (qui se répète 4 fois). 3 coups de ciseaux, quelques coutures, une ceinture (ouaih, en plus, j'ai "supprimé" l'étape couture élastique du tuto initial ... !!!) Quand je l'ai finie, je me suis dit que vu la simplicité, ça allait vraiment faire "robe bidouillée", mais non, franchement, ça passe ! Et finalement avec 1 coup de ciseaux et un nouvel ourlet en plus : J'ai utilisé un morceau de tissu de 1m20 sur 1m40 (mais au final 90 cm sur 1m40 auraient suffi !) J'ai coupé en 4 (mes fameux 3 coups de ciseaux du départ !) j'ai cousu comme ça : puis comme ça : afin d'obtenir ça : Un petit ourlet au cou, aux manches et en bas et c'est fini ! Ma version courte pour la plage et sur des leggings pour la ville : et avec une ceinture positionnée en taille basse : A bientôt

Re-Style#54, Five Minute Draped Vest #2 This Re-Style will be slightly different, because I am adding video instructions. Gasp! That's right, I am jumping off the dock and into the dark, cold waters of the unknown. Tutorial Things you need Extra large, Shirt Mens Shirt * I use Hanes Tee-shirts.Scissors Cut where the red marks are. Here is a quick video on how I did itWATCH ME. I hope this video explains it for you. Please leave an Email if you have any questions, so I can reply back to you. How I wore this VestHERE. You can also use it as a scarf , just wrap around your neck and pull one end through the hole. some other vests I have made are Have a wonderful day. Lots of <3, Anne

Related: