background preloader

How To Crochet: Blanket Stitch

How To Crochet: Blanket Stitch
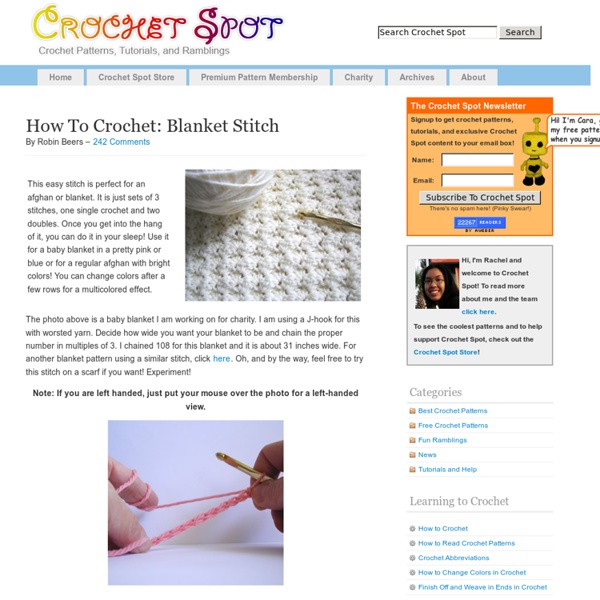
By Robin Beers – 242 Comments The photo above is a baby blanket I am working on for charity. I am using a J-hook for this with worsted yarn. Decide how wide you want your blanket to be and chain the proper number in multiples of 3. I chained 108 for this blanket and it is about 31 inches wide. For another blanket pattern using a similar stitch, click here. Note: If you are left handed, just put your mouse over the photo for a left-handed view. Start with a foundation row of a multiple of 3 chains. I chained 12 here. Row 1: Make 2 double crochets in the 3rd chain from the hook. *Skip 2 ch. Make 2 double crochet in the same ch. Repeat from * to the end of row 1 ending with 1 sc in the last ch. Row 2: Chain 2, turn, make 2 dc in first sc. **Skip the next 2 dc, Make sc and 2 dc in next sc. Repeat from ** across ending with 1 sc in the top of the ch-2. Repeat Row 2 until desired length is made. If you have any questions, don’t hesitate to ask. Click here for more blanket patterns!

Cuddle Soft Baby Blanket There are currently no images from other crafters. close Terms & Conditions You must enter into this Agreement if you want to submit digital images or other content to Prime Publishing through Sharing Customer Images (the "Service"). As used in this Agreement, "we" or "Prime Publishing" means Prime Publishing, LLC. and "you" means the individual or entity submitting materials to Prime Publishing. Any individual or entity that wants to use the Service must accept the terms of this Agreement without change. 1) Eligibility. 2) Definitions. 3) License Grant for Materials. 4) Removal of Materials. 5) License for Name, Trademarks and Likenesses. 6) Specifications and Guidelines. 7) Representations, Warranties and Indemnities. 8) Restrictions. 9) No Obligation. 10) Changes to Agreement. 11) Prime Publishing Intellectual Property. 12) Communications. 13) Waiver. 14) Disclaimer. 15) Miscellaneous. Sharing Your Own Images Who can share images? You! What should I share? What shouldn't I share?

Those amazing crochet shorts! Free charts and written patterns of the motifs! DISCLAIMER!This is not a project for a beginner in any way. Nor is it for the faint of heart. You're going to need a good working knowledge of crochet and garment making to pull this off. Or, just great big balls and a hell of a lot of patience. I don't have any actual patterns for these bad boys. So, these shorts keep popping up on pinterest. I've also been seeing a lot of 'where can I get this pattern'? I'm also going to give you a written step by step of the bottom bit, which is just a pineapple motif, you may need to adjust the number of stitches involved to match the motif in the shorts (I counted 7 TR in the first round) The first bit, the waist band is super easy, Just single crochet until the chain is as long as your waist (or hips-wherever you want them to sit) is wide. The next bit is just a bunch of these pretty circles: Notes. join each round, R1: 12 DC in magic ring. join. The next bit is pineapple motifs. Written instructions are as follows:

Big Circle Afghan Square [ Close Privacy Policy ] Privacy Policy / Your California Privacy Rights Revised and posted as of March 4, 2013 Prime Publishing, LLC ("Company," "we" or "us") reserves the right to revise this Privacy Policy at any time simply by posting such revision, so we encourage you to review it periodically. In order to track any changes to this Privacy Policy, we will include a historical reference at the top of this document. This Privacy Policy will tell you, among other things: Your California privacy rights. ACKNOWLEDGEMENT/YOUR AGREEMENT Company websites are not intended for use by individuals under the age of 18 or those who are not legal residents of the United States. HOW DO WE COLLECT INFORMATION AND WHAT INFORMATION DO WE COLLECT? Distribution Partners Website operators that license our ad serving technology pass information to us so that we may serve advertisements to you. Website Registration Forms We collect information about you when you register on one of our websites.

Prendisole. Pagine venerdì 25 maggio 2012 Prendisole. Prendisole. Schema. Pubblicato da Evhenia a 12:59 Invia tramite emailPostalo sul blogCondividi su TwitterCondividi su FacebookCondividi su Pinterest Etichette: prendisole Nessun commento: Posta un commento Post più recentePost più vecchioHome page Iscriviti a: Commenti sul post (Atom) JR Crochet Designs: Angel Wings Shawl Pattern Angel Wings ShawlBy Julee Reeves You can download the pattern in PDF format HERE!! Materials:Approx. 16 ounces of yarn of choiceSize "H" crochet hookTapestry needle Special Stitches and Abbreviations:shell: (2dc, ch2, 2dc) in indicated space.V-st: (dc, ch1, dc) in indicated space. Make loop (magic loop or ch3, sl st in first ch to make loop)Row 1: Ch4 (counts as dc, ch1), Dc, (Ch1, Dc) 4 times, turn. (5- ch1 spaces, 6 dc) Row 2: Ch3, (dc, ch2, 2 dc) in next ch1 sp, ch1, V st in next ch1 sp, ch1, shell in next ch1 sp, ch1, V st in next ch1 sp, ch1, (2 dc, ch2, dc) in next ch1 sp, dc in top of ch3, turn. ( 3-shell, 2-V sts, 6-ch1 sps {including ch1 in V Sts}) Row 3: Ch3, shell in next ch2 sp, *ch1, dc in next ch1 sp, ch1, V st in next V st, ch1, dc in next ch1 sp, ch1, shell in next ch2 Sp*. Row 4: Ch3, shell in next ch2 sp, *(ch1, dc in next ch1 sp) 2 times, ch1, V st in next V st, (ch1, dc in next ch1 sp) 2 times, ch1, Shell in next ch2 Sp*. Repeat Row 5 until desired size.

Photo Tutorial: Folding Single Crochet Stitch (in Beyond the Square #23) - Sewing Daisies A quick tutorial... To show you how to do the Folding Single Crochet Stitch used in Beyond the Square Motif #23 (round 4). Combined with the Front Loop Treble (used in round 3), you can create this lovely ridge effect. Please note that there is a video tutorial available. Click Video to view. Video A little disclaimer... I use American crochet terminology in my tutorials . Crochet Stitch Anatomy 101... To succesfully complete round 4 of Beyond the Square motif #23, you need to work with the BACK loops of round 2 & 3. To identify the correct loops to work with, turn your work over. the BACK loop of round 2, has a distinct edge of single loops (see blue ridge in photo)the BACK loop of round 3, is the loop found on the FINGERS side of your work. *To complete the Folding Single Crochet Stitch - you must insert your hook (pick up) the BACK loops of rounds 3 & 2 (in that order). Insert hook into BACK loops of rounds 3 & 2Yarn over x1Pull yarn through first two loops only How easy is that?!... To recap:

Passion-Crochet

Related: