Liberty of London Swatch Portraits
In our teeny-tiny fabric shop, Purl Patchwork, it is a challenge to find fresh ideas to display our favorite products in customer-friendly ways. We were really scratching our heads when a bunch of new Tana Lawn prints from Liberty of London arrived last week on unruly five-foot-tall bolts! Our solution: we filled a handful of simple wooden embroidery hoops with swatches of fabric and displayed them all on the wall like a family portrait gallery. These swatch portraits are so easy to make and they make great gifts too! The Materials To make one portrait: A square of fabric, at least 2" wider than your hoop in all directions. The Pattern Place fabric in the hoop, pull taught. Turn to wrong side, run a small line of glue around the inside hoop, just next to the fabric.Press fabric into glue, all the way around. Allow Glue to dry. Trim fabric to edge of hoop.
Obsession : Ombre Hair (with DIY)
I'm currently seeing Ombre Hair everywhere on the web. The trend has not come to my country yet, so I've never seen it in person, but I really think I'm going to give it a try. Do you have Ombre hair, or are you going to try it, or do you hate this trend?
Crown Hill: Friendship Ear Buds
I first saw this idea on pinterest, and loved the look! Anie, of SassyBudsz, has opened an etsy shop selling friendship ear buds. Check out her shop here. SassyBudsz also has a blog and a facebook page. Check it out! This craft brought me back to making friendship bracelets on warm, sunny days at family camp. All you really need is some string, and ear buds. To get started: tie the string onto the end of the cord with a knot. Step 1: Bring the string under the ear bud cord leaving a loop on the right for your hand to fit through. Step 2: Reach through the loop, grab the ball of string, and pull it through. Step 3: Pull the string tight against the cord, as you can see in the next two pictures: It's as easy as that! Here are the multi-colored Sassy Budsz that Anie sent me in the mail.
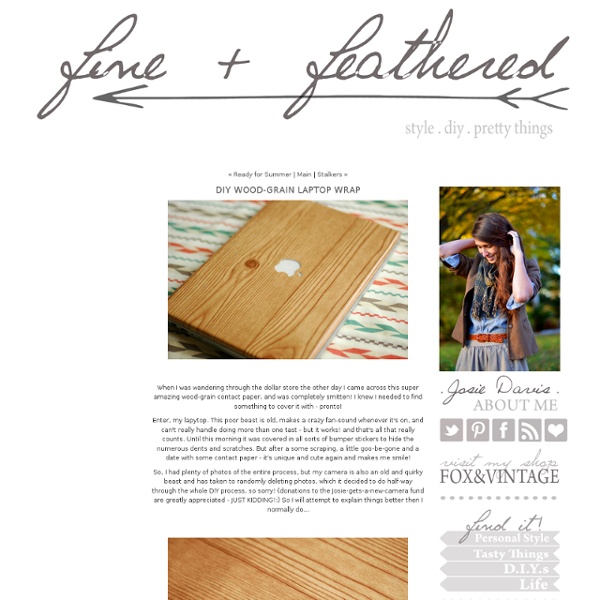
diy: bird mobile
One of my very best friends is pregnant - someone with whom I went to preschool, Mother's Morning Out and Girl Scouts, and who I picked up every day for high school. She and her husband live in Kentucky now, and they're decorating an adorable baby-girl nursery. Two years ago, I made a bunch of little birds to decorate our wedding reception, and I based the pattern on these beautiful birds that Jessica had made for me. I thought they would make a perfect mobile for a nursery some day, even before Spool's showed up online (theirs is adorable, too). Materials: 1/4 yard each of four contrasting fabrics needle and thread polyester stuffing 10" and 12" wood embroidery hoops monofilament or fishing line about a dozen crimp tubes (available at beading stores) needle-nose pliers, for flattening crimp tubes staple gun and 1/4" staples Here is the simple pattern that I made to make these birds. When you've made eight birds, sew them onto the inner ring of a 10" and a 12" embroidery hoop. Done!
FIKS*D: How to Make ... Washi Tape!
Are you like me and just can't bring yourself to spend a lot of money on things that even though they are really pretty, will probably just sit there for ages without use? I've always loved the look of washi tape but find it so expensive and hard to justify. So, I decided to get creative and make my own.. All you need is some double sided tape and tissue paper! Too easy!
Simple Shell Candles {Tutorial}
Got candles??? Make some of these beautiful shell candles and add a summer glow to your table any time of year! I’ll just give you a quick how-to on creating these and then you’ll be making candles out of every shell, tea cup or old tin you find around the house. First, you’ll need these supplies from a craft store… soy waxwicksfragrancedye I really like the way soy wax melts so I always use it whenever I’m making candles. Find and clean a large shell.Take a glass measuring cup and melt one cup of wax to start. Tips: I use just a little yellow to give it a slight color like the inside of a shell. These would be wonderful for a dinner party on the porch! If you have a bunch of shells left you might want to make a shell frame! Have fun! ~Kim
the DIY: FISHTAIL FRIENDSHIP (BRACELET)
If you know how to do a fishtail braid to your hair, then you pretty much know how to make this bracelet. But for those of you who don't know about the fishtail and those of you who are curious about the logistics of my specific bracelet, well, read on! You will need embroidery/ friendship thread in various colors, some tape and a bead! I used 9 strands of thread in 9 different colors. I twisted this top part so it doesn't get all tangled later. Where you twisted the top part, tie it around your finger. Then tie a knot. I'm now taking one of the strands and tying it around the other, almost like a tie. Then pull the end through the loop you've created and pull into a knot. Tape the top down to keep the bracelet stable. Star by grabbing one color from the right side and pulling it to the middle. Pull the same color from the left side. Add the piece from the right side to the left group of colors. Now take the color from the left side and pull it to the middle (over all the other strands.)
Simple Spring Framed Vases » Flamingo ToesFlamingo Toes
I don’t know about you but I am loving everything that is blooming right now! One of my favorite things to decorate with is fresh flowers. I think it brightens up a room so much! A couple weeks ago at Michael’s I found some tiny little glass vases for .99. Until now! It seemed perfect for my little vase display and I love it! Isn’t it bright and cheery? And not only were there 2 big bunches – but they were still in the paper, because Mr. So let’s get started. You’ll need frames, vases (one or two per frame), and twine. If you have frames that you are happy with – you can skip this step. I have a stash of ucky old oak frames – some of them were happy to donate themselves for a makeover. :) Start by painting your frames in the colors you’d like. Make sure your frames are covered well – and that you paint the inside section where the glass goes as well. Once your frames are dry, brush on a contrasting color - I used dark gray. Make a knot in the twine right at the neck. What do you think??