
DIY Picture Tiles - You Will Never Buy a Photo Frame Again Lately I’ve been having this huge urge to decorate the house. This is big news. I do not decorate. Arguably, one of the reasons why is because I. absolutely. hate. to. buy. mass. produced. decor. Anyway, this extends to photo frames. Nope. Long story short, I discovered this method of transferring my photos cheaply, quickly, and beautifully to something uncommon and unique. Tiles. The only thing that’s not particularly crunchy about this is that it uses Modge Podge or similar (and I’m not sure what’s in Modge Podge). It’s just grainy and doesn’t dry clearly. Boo. BUT, if you can overlook that one minor issue, I think you’ll love this. And it will be glorious. Here’s how you do it. First, you need to go to Home Depot, Lowes, or something like it. (FYI, I found that Lowes prices on tiles were cheaper than Home Depot. I like the stone tiles, because they have texture. So you pick out your tiles in the sizes you want. And then you get home and gather what you need. Cut them out. Go go go! Love me?
How I Furnished My Entire Home for $716.97 A few years ago, I moved to another state carrying only what I could fit in my car: a few boxes of clothes, a stack of books, and a coffee mug. Since moving is expensive – even when you don’t actually move anything – I had to find a way to furnish my entire house without draining what was left of my meager savings. I started shopping furniture websites and realized I’d have to spend $4,473.73 to get just the basics. That wasn’t happening, so I took an alternate path through garage sales, flea markets, and clearance racks – and I saved a ton of money. The Living Room Couch and matching chair: I got lucky with my living room furniture. Rooms to Go: $879.98 Donation: Free! Total savings: $879.98 What I learned: For some reason, it’s not embarrassing to ask friends and family if they have furnishings they no longer need – maybe because they tend to stash the stuff in a garage or spare bedroom, since throwing it away or even donating it to charity is such a hassle. Coffee table and end table:
Make-up Magnet Board We all know with craft blogs that original ideas are often hard to come by, we find ideas we love and make them our own but we didn't come up with the idea ourselves. I feel like I've finally done something original here and I'm excited about it. I'll show you the finished product and then explain. Behold my Make-up Magnet Board. I have a friend who is beautiful and stylish and has always loved make-up but recently took a course that intensified her love. The basket was a mess and I was overwhelmed with all my choices never knowing what to use, digging through to see what I had and find what I wanted was a pain. I painted it (The hard way, with a brush instead of spray paint. I went to the hardware store and picked up some metal and had them cut it to fit inside my frame. Here comes the brilliant part though. Here's the stash of eye shadows we're talking about (I've even added a couple since this picture). Next I wanted a place to store my brushes and liners though.
hitRECord Chalkboard Wall Calendar - Martha Stewart Home & Garden Thanks to paint that dries into a chalkboard finish, your board can be whatever size you desire and placed wherever you like. Store-bought formulas come in traditional green and black. But you can also follow our recipe to mix your own batch in any shade. Cleverly applied chalkboard paint means new places to track appointments, keep lists, and leave messages. Tip: Start with flat-finish latex paint in any shade. Wall Calendar A home office is the ideal spot for a family planner. Mudroom Mural The bottom half of a mudroom wall is just the right height for pint-size Picassos -- when coated with store-bought green chalkboard paint. Message Center Write-on paint needn't be applied only to walls. Pantry Reminder Covered with chalkboard paint, a pantry door serves as the perfect place to keep a running shopping list.
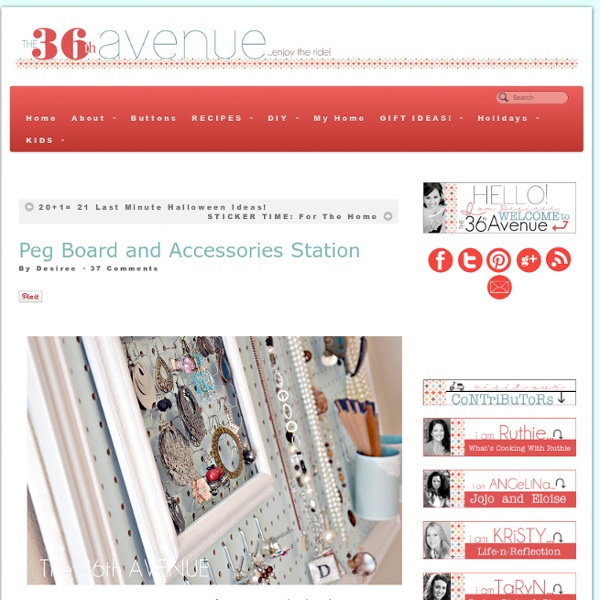
Earring Organizer Apparently I am a jewelry hoarder…I have an inordinate amount of colorful necklaces and earrings for just about every outfit (and then some!). To me, a great necklace and pair of earrings are like the cherry on top of a sundae of an ensemble. If you remember, I’ve already found a way to wrangle in my necklaces using about $10 worth of supplies. It was my mission this past weekend to do the same thing with my vast earring collection. After a quick trip downtown to a thrift shop, I came away with all I needed: An old (but rust-free) window screen – $2.00A back-less wooden frame – $2.00 I also went out to Lowe’s and picked up a $20.00 staple gun, but I don’t really count that as part of the total for this project since it can be used for many many projects down the road…Let’s just say I used about a $1.00′s worth of that cost on this project. My mom’s going to be jealous when she sees this – I bought the kind where you push on the FRONT of the gun to fire the staple. But, hey – It worked!
Put your stuff up in the air! Hanging DIY ideas & tutorials Posted by ScrapHacker.com on onsdag, juni 27, 2012 · 9 Comments To heck with both feet on the ground! Now’s the time to put your ideas up in the air! I’ve gathered a bunch of supafly D.I.Y to give wings to anything you’ve got around the house (well, almost!). pics via here The hanging desk is not only cool looking but an awesome space saver! Pics via GreenWeddingShoes, CapitolRomance & Etsy Gotta love the swinging chair! Eleanor from team behind awesome venture SCRAP (a.k.a the School & Community Reuse Action Project), has made a great ”Hanging notepad” tutorial for Etsy – DIY TUTORIAL HERE Hanging Notepad #2! Pics via here Check out the awesome tutorial on how to make a hanging ”Kokedama string garden”, by talented Aura Scaringi of Mimimou for DesignSponge – DIY TUTORIAL HERE Pics via previous post ”Brave Branches”, Love Aesthetics has made a great DIY tutorial: DIY TUTORIAL HERE Pics via here Pics via here Good Luck Hacking!
Build a Laundry Basket Dresser The free content provicded by this website is made possible by the following current sponsors. Thank you! Holder for Charging Cell Phone My husband and I both have cell phones. And both of us have phone chargers. And that means lots of obnoxious cords. You never know when one of us may be moving phone cords around, to give our phones an extra charge while we’re chatting away……… or trying to charge our phones up before running errands or something. Needless to say, those phone cords seem to be everywhere…..and are generally in the way and hanging all over the floor. (Okay, and how about when you’re in a hotel or visiting family/friends. I was looking around on the internet for a solution and found this. It made the perfect little holder for my cell phone while it’s being charged. Holder for Charging Cell Phone And no more phone hanging down from the outlet while in this room or that room……..the cord and phone are now up off the ground, and tucked away into the little holder, while the phone drinks up a full charge. If you look closely, you can see that the orange print is fabric. And turns out, it’s pretty useful.
Songwriting Exercises - Handout Songwriting Exercises by Joel Mabus Scaffolding Stuck? Here’s an old trick to get you going. What a good song offers is structure, repetition, form and balance. Try this exercise: A) Take some song you like — any song at all from any era, any style — just so long as it is familiar to you. B) Write a new lyric to that song. C) Take that new lyric and write completely new music to it. D) Edit. (Or you could do A-C-B-D — write the new music to the “scaffold” song and then write a new lyric.) What remains is a new song with only a hint of the “ghost” song that acted as a scaffold for the process. Listmaking Out of ideas? A list could become a song (remember “My Favorite Things” or Tom T Hall’s “I Love...”) or could be a starting pad for an essay song, enumerating facts or feelings. Focused Imaging Similar to listmaking, but more purposeful, is putting your imagination to work in creating a scene, place or mood. Imagine a perfect day in your childhood – or the day your childhood sweetheart left you.
Tutorial: Making a Stencil UPDATE: If you are here at All Things Thrifty for the first time, WELCOME!! Since I wrote this post about making a stencil I have found that making stencils are MUCH easier with my Silhouette Machine. So, if you would like to see an easy way to make a stencil with a Silhouette check out that post! UPDATE:Also, if you would like some FREE stencil designs, check out that post also! A few weeks ago, I came across this amazing image fromWhitewall and Co. I instantly fell in love with their stencils, but the prices were a little too high for my thrifty core. Step 1: Go to Office Max or Staples and get some clear folders like the ones in this picture below. Step 2: Cut the folders and tape them together. Tape the two folders together to create a large enough area for your stencil. Step 3: Find an image that you like for your stencil and have it printed large enough to trace. Step 4: Trace your image on to your plastic folders with your narrow sharpie. Here is when the FUN begins!
Bulletin Board In an attempt to organize my thoughts and of course, my odds and ends, I created this bulletin board using recycled and vintage materials, that has a special pocket too. Its cork, so you can stick things right to it quick and easy. And you can do it too… What do I need for this project? How do I make this? 2. 3. 4. 5. 6. Side note: I actually had a different tutorial planned for today. This entry is filed under bulletin board, decor, diy, home, housewares, how to, howto, organize, project, tutorial, vintage.