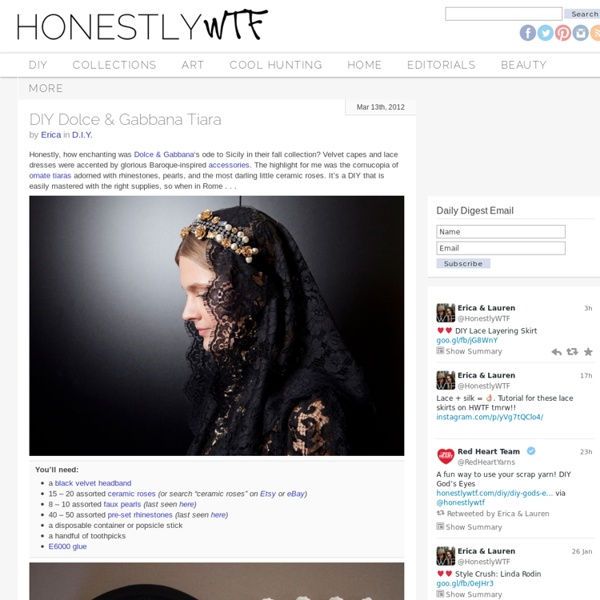
DIY Chindi Reindeer
The moment I spotted these colorfully wrapped reindeer and moose at Anthropologie last December, I knew I had to DIY it for HonestlyWTF this holiday season. Created in the style of vibrant Chindi rugs from Jaipur, India, these wrapped reindeer are incredibly fun to make, are a clever way to repurpose old t-shirts, and make fabulous gifts! You’ll need:paper mache reindeer or any other animal1 yard total of various colors of cotton or wool jersey2 small brown pom pomshot glue gunlots of glue sticksscissorsjingle bells (optional)string (optional) Start by cutting the fabric, along the width, into 1″ strips. Beginning in the middle of the torso will serve as the guideline. Continue twisting, glueing, and wrapping. As the rope begins to runs out, tie a knot at the end. Keep wrapping and again, follow the contours of the reindeer. There will be areas where wrapping all the way around won’t be an option. Tie on a few jingle bells around the neck and/or feet . . .
DIY Door Knocker Belt
After discovering lion drawer pulls at the hardware store a few weeks ago, we were immediately reminded of this vintage Moschino jacket spotted on Jane of Sea of Shoes. They were obviously too amazing to pass up and we knew we had to incorporate the mini door knockers into a DIY. Luckily, we were able to track down the same lion head drawer pulls online so now you can join in on the fun! You’ll need: Start by placing the drawer pulls along the backside of the belt and place them to your liking. Push the screws through the holes and twist on the drawer pulls, tightening each one with a screwdriver. Your Moschino-inspired belt is finito! Roarrrrr! (top image via Atlantis Home, rest of images by Honestly…WTF)
DIY leather lunch bag
Okay guys, I know you kiiiinda like our posts about what we wear... and I know you soooorta like our posts about Fashion Week. But there's one thing I know that you reaaaaaally like us for: our DIY posts. No, it's okay, you can admit it. No matter how hard we try with other posts, you really just want us to teach you how to make things.
Simple Ideas That Are Borderline Crafty (35 Pics)
Click Here For More Amazing Ideas
DIY Turband
DIY Gretchen Jones Necklace A couple of months ago, while visiting New York, we met the lovely Gretchen Jones and were fortunate enough to spend an entire day crafting in her über charming Brooklyn apartment. Not only is she […] DIY Woven Chain Bracelet Chain link bracelets, with colorful threads woven through them, have been popping up here and there.
DIY Polka Dotted Pants | The Average Girl's Guide
I’ve been a bit obsessed with the polka dot craze. I mean who’s not right now? However, I’ve been making my purchases at affordable shops like Old Navy, Target and Gap, avoiding $260 J. Instead I had it in my head to DIY polka dotted jeans. SuppliesDenim skinnies (just $10) or anything else.Clorox bleach pen (2); I used about one and a half. Instructions Lay denim flat, apply bleach dots with the thin side of the pen to one side. Dry overnight, flip and do other side, paying careful attention to cover the hems, crotch, everywhere. TAGG tip: keep a sheet of paper handy to tab the pen incase of leaks or if you’re noticing bubbles. Tagged as: denim, DIY, polka dotted skinnies
Make Your Own Christmas Decorations
Looking to make your own Christmas decorations to decorate your house with this Christmas? On this page you’ll find really simple photo instructions for how to make beautiful window stars. Make Your Own Christmas Decorations: Window Stars Some of my favourite easy to make Christmas ornaments are these gorgeous tissue-paper window stars. When the sun shines through them, they look absolutely stunning, and really brighten up a room :-) Here are some that I put up in our living room: And here’s one made by reader Esther and her children on a cold winter’s day: Thanks for sending in your photo Esther! To make your own window stars, you’ll need: Coloured tissue paper or kite paper (available from craft stores) A pencil A ruler Scissors Double sided tape Window Star Instructions Step 1 Using your pencil and ruler, draw 8 rectangles on the tissue paper and cut them out. You can use as many or few colours as you like. Step 2 Pick one of the rectangles. Step 9 The finished star!
DIY Chain Trimmed iPad Sleeve
Given that my iPad is one of few things I can’t function without, it was about time I gave it the royal treatment. Inspired by Stella McCartney‘s iconic Falabella bag, I whipped up a chain trimmed leather sleeve perfect for my favorite gadget! This tutorial is a great way to learn a super simple hand stitching technique which can also then be applied to other leather wares. Have I piqued your interest yet? You’ll need:leather iPad sleeve30 inches of stainless steel curb chain5 yards of waxed linen cord (last used here & here)all purpose rotary punch (last used here)an embroidery needlewire cutters or bolt cutter (optional)scissors Start by setting the rotary punch to the smallest hole setting. Each chain link is approximately 5 millimeters apart, therefore the holes should be spread apart with the same distance. Thread the needle with the waxed linen cord and tie a double knot at the end. Stitch the corner link through the same bottom hole twice.