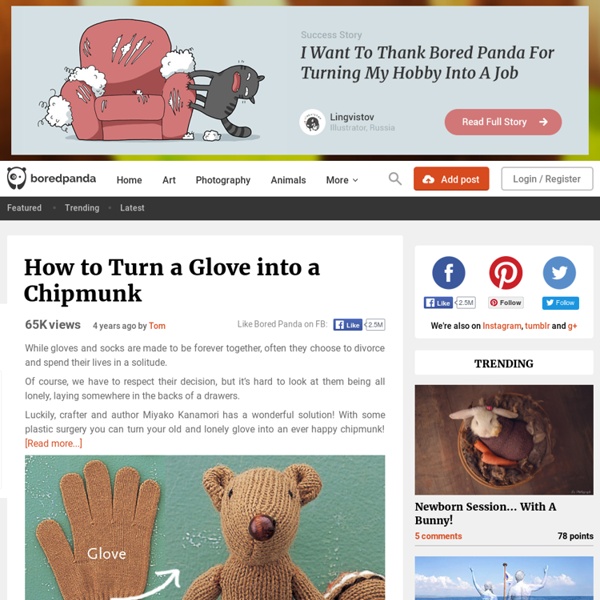
How to Turn a Glove into a Chipmunk
While gloves and socks are made to be forever together, often they choose to divorce and spend their lives in a solitude. Of course, we have to respect their decision, but it’s hard to look at them being all lonely, laying somewhere in the backs of a drawers. Luckily, crafter and author Miyako Kanamori has a wonderful solution! With some plastic surgery you can turn your old and lonely glove into an ever happy chipmunk! In her book, Happy Gloves: Charming Softy Friends Made from Colorful Gloves, Kanamori also gives complete instructions on how to make a frog, duck, flower, car, donkey, tiger, and more! Photos by Miyako Toyota | More instructions: Happy Gloves
charlaanne: made with love
ETA: The pattern is now available! You can find it here...Love, Charla Anne. Lily loves playing with her little dolls and carrying case. I made them for her birthday last year. ETA: The pattern is now available in my etsy shop!
20 Awesome Do It Yourself Projects
Thursday, June 14, 2012 4:30 am, Posted by Chris Groves | Internet 20 Awesome Do It Yourself Projects Topics: At Home Project Ideas , Creative DIY Home Projects , Do It Yourself Projects for 2012 , Fun How To Projects , What to Do with Extra Stuff Are you bored and have a bunch of extra little items hanging around here and there? You honestly don’t know some of the creative things you can do with what could possible be junk. If you know of any great at home Do It Yourself Projects please leave a comment to include your own and maybe we will add it to our list. And for the upcoming holiday season we want to give all you do-it-yourselfers a head start with these incredible Christmas DIY for 2012 1. More info: here | Buy: here 2. More info: here 3. 4. 5. 6. 7. 8. 9. 10. 11. 12. 13. 14. 15. 16. 17. 18. 19. 20. Incoming search terms:
Toute la Dinette en Feutrine & Tissu - Tuto DIY -
Dimanche 17 février 2013 7 17 /02 /Fév /2013 09:00 Tutos Dinette pour égayer sa Cuisine ! CLIC clic sur chaque Photo pour le TUTO Dinette Si un lien ne fonctionne pas n'hésitez pas à me le dire, merci. Réaliser Soi-Même une Cagette pour sa Marchande - Liste réactualisée en Février 2013 - De nouveaux patrons & idées Dinette en Feutrine en Free bientôt en ligne ici ! Pour visiter la cuisine de notre demoiselle... clic clic (des photos à faire, il manque bien des choses sur ces photos de février 2011) Réalisations extraites du Livre Big Little Felt Universe
Der beste Freund des Menschen... {free pattern} | titatoni ♥ DIY
...ist der Hund. Genauer gesagt, der beste Freund des Bagaluten ist Frido. Frido ist am Wochenende in der Stoffrestekiste geboren und hat seitdem unsere Herzen im Sturm erobert. Und weil Frido natürlich auch ein kuscheliges Körbchen braucht, haben wir einfach das Unterteil einer Waschmittelflasche mit etwas Sprühfarbe und Webband bearbeitet. Und das Beste ist: Frido kann schon ganz bald bei Dir einziehen (oder kleine Herrchen und Frauchen zu Weihnachten beglücken), denn die Anleitung gibt´s hier zum kostenlosen Herunterladen und Ausdrucken: Liebste Dienstagsgrüße, PS: Wenn Du noch mehr Upcyclingideen suchst,
La Fée "petits pois"
Noodlehead
laetibricole
Créations pour enfants et +
Knitting Crochet Sewing Crafts Patterns and Ideas! - the purl bee
Just Another Day in Paradise: Old MacDonald Puppet Tutorial and Pattern
EDITED NOTE: A couple of you have reminded me that I didn't show a picture of poor Old MacDonald. MY bad! HERE is where you can find a lovely picture of Mr. Farmer. Thanks for bringing it to my lovely attention. Here is it! I have scanned and downloaded the actual patterns into this post, but I am also posting the link to download them instead. There are 7 pattern pieces. Supplies you will need: Felt in following colors- tan brown white gray yellow blue cream black pink orange Coordinating thread Old MacDonald Patterns Basic Instructions: You will cut out each pattern piece in the color of felt depicted in the pictures of the whole set of puppets. The hardest part really will be cutting out all of the pieces. I will be showing how I sewed the horse, but the same basic instructions apply to all the animals, with just a few variations, which I will specify. First: Second: Prepare all the individual pieces. -sew the EARS by laying two pieces on top of each other and sewing around the edge. Third: Fourth: Fifth:
Related:
Related: