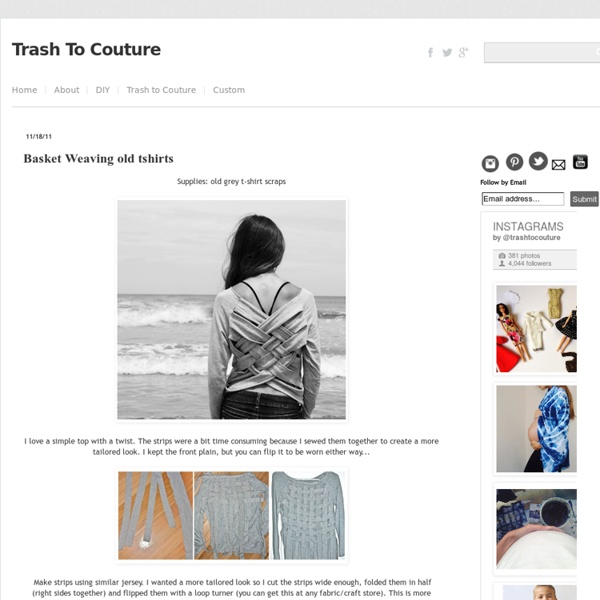
Basket Weaving old tshirts
I love a simple top with a twist. The strips were a bit time consuming because I sewed them together to create a more tailored look. I kept the front plain, but you can flip it to be worn either way... Make strips using similar jersey. I wanted a more tailored look so I cut the strips wide enough, folded them in half (right sides together) and flipped them with a loop turner (you can get this at any fabric/craft store). For an easier DIY you can cut the strips right from the back of the shirt. Weaved them in and out and sew! Once I got to the length I wanted, I made a larger strip to go all the way around. front and back view
DIY. Fringe Sleeve/Seam Tee
Great for making those tight tees wearable. Supplies: Fringe trim (3 yards) I used double sided fringe. You can make your own fringe here since it is hard to find. tshirt Can be made casual or dressy depending on the shirt you use. DIY instructions: Cut sleeves off and side seams open. Sew the fringe and shirt right sides together all the way around (front and back). Top stitch the fringe seam leaving enough room for your arm. I also did this with crochet trim here.
Fabric Necklace Tutorial
I still have lots of fun DIY projects and yummy treats coming your way this week-I was so so excited to see what Jenni would come up with and I was super impressed by this beautiful necklace she created. How fun! Hi Hi! Supplies: Scarf, scissors, iron and a needle. Step 1: Cut the scarf into 5 strips, each 2 inches wide. Step 2: Start folding the material back and forth like an accordion, ironing each fold so the material is pleated. Step 3: Cut tops to even off. Step 4: Using the last strip and a large needle, thread each pleated strip. Step 5: Trim bottom to create your desired shape. Tie around your neck over a little white dress to create the perfect summer look!
DIY Butterfly Twist Tee.
1 yard fabric. Where we currently live it's warm year round so summer DIYs are still on my mind... I love my diytwisted tee and wanted to do one that was horizontal. This effect is so simple and transforms your old tshirts into an interesting twist. You can get the pattern here and use your own fabric. First, you will want a wide shirt that isn't very long. Here is a really quick video of the process... If you're using the pattern connect the pieces together using tape. Cut the shoulder and side seams of one side of the sleeveless shirt. Twist the shirt so the right sides meet together. Pin the seams together and sew them...
dressed up Target sailor bracelet
The Target $1.00 bins…I can never pass by without peeking. Even if I am in a rush I do a fast paced ‘mall walk’ just in case there is something wonderful needing me to take it home. Earlier this week I saw simple Sailor Bracelets in several colors. Supplies: 2 Target dollar bin Sailor Bracelets fabric (3 1/2in x 30in strips) Step 1: Cut your fabric into 3 strips that are about 1/2 inch wide and 30 inches long Step 2: Tie the strips together at the end Step 3: Braid about 2 inches down Step 4: Begin braiding the fabric through the bracelet. Step 5: Once you’ve braided all the way around the Target bracelets, braid the fabric just a bit more. Step 6: Take the long ends of the fabric and tie them together. Step 7: As you braid the fabric it will fray a bit. If you don’t like the fabric fray you could do all kinds of things to keep the edges more defined. Yeah for Target!
DIY Cutout Striped shirt
Supplies: striped shirt, ribbon, or elastic I love basics with an interesting twist...Such a simple DIY and fun surprise in the back. Cut back in half. I'm using a cardigan so the front will be used. Press seams over with the amount of length you want the back to show. Evenly pin the ribbon or elastic. Top stitch the pinned straps. Cool effect and super easy.
My DIY - Nautical necklace
This is my first DIY project for the blog and I couldn't be more excited. That was a long time coming and I plan on doing this a regular thing. This one was so much fun to do. 1. SUPPLY: A colorful rope, embroidery tread in coordinating colors (I used two but take as many as you want, or none at all !) Now we will make the rope chain wich is basically a basic crochet chain stitch. Et pour mes lecteurs francophones, je serai heureuse de vous donner les instructions en français si vous le voulez. P.S.
5 DIY - Necklace Ideas
Hey my lovely fashionistas! I’m always here to inspire you and to awake your creativity and today I’m here with a very interesting post that is called “5 DIY – necklace ideas”. Are you excited? You don’t have to throw your money on expensive accessories anymore, because there are many diy tutorials that can help you to make them at your home. The one that you will make will look like the one in the store – believe me! And we all know that an accessory can change your look immediately! Check out these 5 stupendous diy necklace ideas and inspire yourself! DIY Neon Lace Necklace Ideas DIY Peter Pan collar necklace DIY Gretchen Jones Necklace DIY Babi Rorschach Necklace Outstanding Bolo Tie Thank you for reading!
UNE JUPE DANS UNE CHEMISE
Les PARTENAIRES d'IDEES MAISON
Related:
Related: