
Manicure Mondays – Feather Nails « Fab Fatale My sister is back in Florida visiting from Washington and we’re having so much fun together! She did the way popular lace manicure for me last month and I dared her to come up with another manicure as fun as the last. We ended up in Michael’s with a cart full of feathers and boas and this is what we came up with. Feather Nails Manicure Ingredients: Bag of {faux} FeathersA Base CoatA Base ColorThick Clear Top CoatTweezers To recreate my feather nails, first prep your nails with a base coat – I used Essie’s Protein Base Coat , followed by a base color. Next, top one nail with Seche Vite Dry Fast Top Coat and press a feather into the nail using tweezers quickly before it dries. Thanks so much to my sister for another fun manicure!
Spring Nail Art Courtesy of Miss Pop Nails Nail art is hot this season, and while you might fret that it isn’t office-appropriate (there are some major designs out there!), you can definitely find the right balance between 3-D stacks and pale pink. Nails are the new statement accessory that can take you from salon chitchat to conference room meetings, if you do it right. I personally understand the delicate difference, because before I became a professional nail artist (see my designs here!) PHOTO UPLOAD: See Yourself With Perfect Skin The Reverse French The usual French Tip is at the edge of the nails, but the Reverse French (also known as the Ruffian French) is flipped. QUIZ: How Quickly is Your Beauty Aging? The Glitter Fade This nail look is like the dress that takes you from work to a night out on the town. MORE: A Black Eye From a Manicure?! The Half-Moon The half moon is a nail art staple first worn by flappers back in the 30s. MORE: How Nail Art Got Me Out of Bed The Picture Frame Exaggerated Chevron
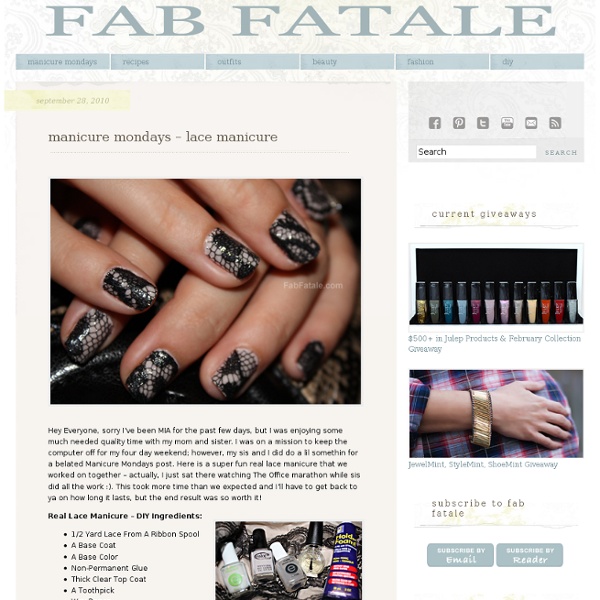
Mermaid Nails - Cupcakes and Cashmere Share this image Share It Pin It For our trip to Costa Rica, I wanted fun nails that had an almost tropical vibe. Share this image {Essie's Mint Candy Apple & Martha Stewart's Aquamarine Glitter} {Paint two coats of the nail polish} {Add top coat along the bottom half of the nail} Share this image {Dip a separate brush into top coat and then into the glitter} {Apply glitter to the bottom half of your nail} {End result} Manicure Mondays – Real Snakeskin Manicure DIY « Fab Fatale My buds, knowing the manicure addict that I am, love to share fun outrageous ideas with me. My good friend Kathy was watching The Today Show (video below) and they were doing an authentic snakeskin manicure that costs $300 in salons! How wild is that, literally?!? Kathy sent me the link and I was WAY way excited about the idea, but I really didn’t want to use real snakeskin and have PETA come after me lol. I’m not sure if they used snakeskin on The Today Show; however, we were able to . Real Snakeskin (Snake Sluff) A Base Coat A Base Color Thick Clear Top Coat Small Scissors Tweezers Kathy had the idea just in time for my sisters visit – my sister Lauren is the queen of the infamous lace manicure and feather manicure . We started with a Seche Clear Crystal Clear Base Coat and two coats of Sally Hansen’s Petal Pusher pink (last seen here ). Can you believe that we recreated a $300 salon manicure for free, using nail polish we already had and free snake sluff? The Today Show Snakeskin Manicure
my nails!!!! :) 949 440 137 723 555 848 1103 1539 955 147 320 171 790 587 852 825 798 421 1009 233 207 642 411 663 404 433 407 1497 280 354 319 894 129 119 728 166 157 463 63 582 286 462 349 139 2078 1629 DIY Tie Dye Nails ~ Red, White, & Blue Manicure for the 4th of July I’d been planning a festive red, white, & blue manicure for the 4th of July but hadn’t really come up with any original ideas until I featured a fun tie dye manicure tutorial on BlogHer Style over the weekend and was instantly hit with inspiration. But let me just warn you… this is not a project for the impatient or short-tempered, and why I decided to tie dye only six of my ten nails. However, my nails are very short at the moment and this, along with many nail art techniques are far easier with a larger canvas to paint on. Obviously then, my thumbs turned out the best. But I think with a little practice, the results could be even better, though I do love the final product and how they kind of look like stars AND stripes. Here’s what I used… 1. * I used Essie “Good to Go” top coat and ALMOST added a little glitter sparkles for fun. * You’ll need a pin or toothpick to create your tie dyed effect. How I achieved my tie dye nails… this video tutorial may help if you need it. 1. 5. Have Fun!
Fun Fridays: Easy Nail Art | Softcup As I have mentioned in the past, I am really enjoying Lauren Conrad's new website The Beauty Department. They always have fun hair, makeup, nail, clothing and decorating ideas that are a little out of the box. Take a peek at the website, you may be surprised at what you find. My newest find is nail art! A genius idea−applying nail polish to scotch tape to create shapes and lines to add to your mani, or pedi. Step 1: You will need polish, scissors and scotch tape. Step 2: Apply polish to the tape and allow it to dry. Step 3: Cut strips out. Step 4: Cut triangles out. And last but not least, apply a good top coat.
Create Ombre Nails With Just One Polish After progressing from hair to fashion, the ombré trend has made its way to your manicure. The look is simple to recreate at home, and you don’t even have to track down five sequential shades. The secret: you only need color. To get a gorgeous gradient, just pick a single pretty hue and then create your own lighter and darker shades using white or black polishes. Here’s how to get the effect: Step 1 Select your base polish. Step 2 Grab a paper plate, a piece of foil, or an empty egg carton to use as your palette. Step 3 Dab four drops of colored polish onto your work surface. Step 4 Now that you have four new shades, paint the nails on each hand from light to dark. Step 5 Add a glossy top coat to for shine and protection. No time for DIY polish mixing? Anna Norman Anna Norman is a Brooklyn blogger and nail art expert.
10 Nail Tutorials Even a Newbie Could Do By Jaime Morrison Curtis | Give your nails a little lovin’ with simple tutorials that take no time at all. Have you seen the new galaxy nail trend? I promise, it’s way easier than it really looks. nggallery id=’123009′ Paint with Tape Use scotch tape to help you achieve these stylish nails. More from Jamie: Blowing Up: 25 Easy, Inexpensive and Unexpected Ways to Use a Balloon 25 Totally Clever Kid’s Party Ideas 25 totally clever storage tips to keep your organized 25 brilliant and unexpected ways to use Mod Podge Like Jaime on Facebook Follow Jaime on Twitter Jaime Morrison Curtis is author of the bestselling book Prudent Advice: Lessons for My Baby Daughter (A Life List for Every Woman) and founding co-editor at Prudent Baby, the premier DIY destination for crafty moms seeking ways to make their lives even more stylish and beautiful. 25 weirdest, wackiest prom dresses… EVER 11 tips for dressing a not-slim body 25 totally pretty 10-minute hairstyles 17 fashion trends that need to disappear NOW
Nail Art Tape & Sequins Tutorial Nail Art Tape & Sequins Tutorial I've seen this look a few times and every time I kept thinking I have that glitter, I should do that! I haven't done anything with my nails for about two weeks so I thought now is the time to do the sequin nails, I have put it off enough! I gave it a try and I am very happy with how it came out, my ring finger is a little messy but I still like it. Here's what you'll need: A top coat (I use Rimmel Base and Top Coat), base color, sequins glitter, & nail art tape. First, prep for your manicure, to make it last longer. Apply one or two coats of your base color. *I waited till it was dry to apply the glitter but next time I will try it while still wet. With a little clear polish on your toothpick pick up a piece of glitter. Apply the glitter to your nail. *As you can see in my picture it is starting to get messy. Continue adding sequins until you are happy with the look. Apply half of your index finger with glitter. Cut off some tape from your roll. Like it?
nail insiration ♥ 350 272 991 510 746 2076 173 926 70 63 210 591 245 769 236 262 1513 623 598 177 1348 830 1208 893 629 527 514 241 71 168 527 541 334 2019 1714 36 185 56 286 100 45 80 54 94 50 52 202 83 214 401 786 35 175 155 596 363 241 45 188 74 1164 178 25 268 1513 481 762 789 606 91 79 1204 920 >How-To: Newsprint Manicure « A Pretty Penny I saw this newsprint manicure over on The Daily Nail and thought it was adorable (especially for bookworms and word lovers like myself). I did a little Google detective work to see how to recreate it, and was surprised at how easy it is! All of the tutorials I found called for vodka or other clear distilled spirits, but we were fresh out. I used isopropyl alcohol instead, and it seemed to get the job done. I tried a quick and dirty version this afternoon to share it with you: Like this: Like Loading...