
the DIY: PERFECT CHEVRON The chevron pattern is everywhere, and we LOVE it. We basically want to decorate our entire house in chevron, so we started with this project. There are zillions of tutorials for different ways to make the tutorial pattern, but we came up with our own. You will need: A blank surface (we used an 16"x 20" canvas), a ruler, a pencil, painter's tape, x-acto knife, and one spray paint color. Next, create dots with your pencil. In the next step, line up a ruler diagonally with the dots. Next you will connect the dots in the chevron shape like the picture above. When you are done drawing lines it should look something like this. Next, fill up the spaces with painter's tape and cover any part of the canvas you don't want painted. In this part we took an x-acto knife and made the edges straighter. Spray paint the empty spaces (or the whole canvas as we have done). When the paint has dried, remove the tape and then you have a perfect chevron print. P.S. Check out our whole bathroom decor here!
Build Your Own $20 Outdoor Cob Oven | Outdoor Pizza Oven | Cob Ovens (The following entry is all about making a cob oven, a lovely and inexpensive outdoor pizza oven. The construction details have been trimmed back a bit, but this article should still give you a full idea of necessary materials and the building process for making your own oven!) I must admit, I’m a bit of a breadhead. Few things are as exciting to me as freshly baked bread with a dab of butter, or hot and greasy scallion pancakes, or fluffy and airy naan, or a pizza fresh from the hearth of a wood-fired oven. (That last one trumps all the others.) Earlier in the year, the idea of baking in the outdoors in a wood fired oven became something of a romanticized (in every positive sense of the word) notion to me. So I picked up a copy of Kiko Denzer’s Build Your Own Earth Oven, a little gem of a book covering the construction of cob ovens from the ground up. The Foundation The Fire Brick Oven Hearth (Laying out the beer bottles, and later, filling in with sawdust/clay mortar) Sizing the Cob Oven
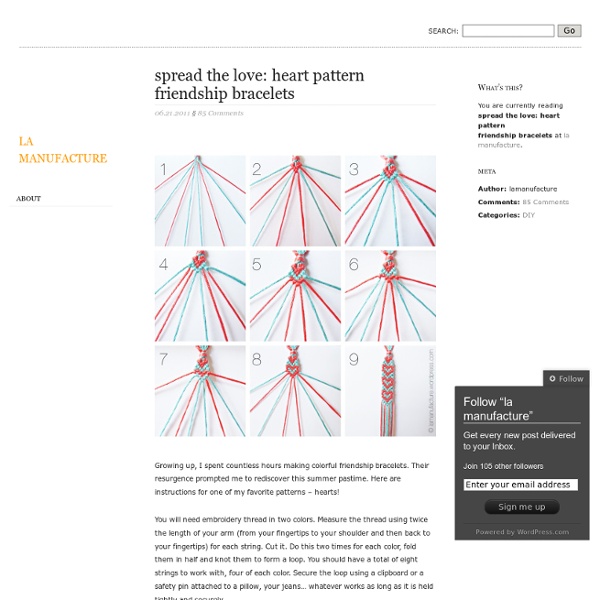
the DIY: FISHTAIL FRIENDSHIP (BRACELET) If you know how to do a fishtail braid to your hair, then you pretty much know how to make this bracelet. But for those of you who don't know about the fishtail and those of you who are curious about the logistics of my specific bracelet, well, read on! You will need embroidery/ friendship thread in various colors, some tape and a bead! I used 9 strands of thread in 9 different colors. You could do this with only 2 different colors or whatever color variety you want. I twisted this top part so it doesn't get all tangled later. Where you twisted the top part, tie it around your finger. Then tie a knot. I'm now taking one of the strands and tying it around the other, almost like a tie. Then pull the end through the loop you've created and pull into a knot. Tape the top down to keep the bracelet stable. Star by grabbing one color from the right side and pulling it to the middle. Pull the same color from the left side. Add the piece from the right side to the left group of colors.
MAKE IT: DIY Glitter Mason Jar + A Tip for Making the Glitter Stay Put! | By DIY Bloggista Allison For ages, people have been entranced by two things: glitter, and mason jars. Pictures of mason jars, pictures of glitter… even pictures of mason jars holding glitter inside, as if to *store* it in some way… pictures like this can be found readily across the internets – all of them, all the internets, even the ones women invented, silly New York Times article – and these pictures? They are being pinned every. single. However in more recent times, these same entranced people have been haunted by a certain burning question: “… but– how do I get the glitter on the OUTSIDE of the jar?” Well today, ladies and germs… today is the luckiest day of your motherloving lives, if you’ve been asking that burning question. Take it away, Allison… Allison here! Supplies Needed: 1. Start by painting the entire area with glue. Pou glitter over the mason jar and roll it around in a pile of glitter. And there you have it! Anyone up for trying a fun DIY this weekend? xoxo - Allison, Engaged & Inspired
Practical Ways to Store Food without a Fridge | The Lazy Homesteader Over the last couple of weeks there has been an article from treehugger.com floating around Facebook, Reddit, and Pinterest highlighting Korean designer, Jihyun Ryou’s five creative ways to store food without a fridge. The designer’s goal was “re-introducing and re-evaluating traditional oral knowledge of food, which is closer to nature,” by using objects to make this knowledge visible. The designs are super modern looking with clean lines and things like sand and water mounted to your wall. And, I have to admit, they do look cool, despite being kind of impractical. In light of their impracticality, and because we’ve lived without a fridge for the last 9 months, I’m offering up some practical answers to Ryou’s modern artworks; while less artistic, everyday homesteaders can apply them to their own kitchens. Symbiosis of apple and potato: Most fruits don’t need to be stored in the refrigerator. My mom had one of these hanging produce baskets. Verticality of Root Vegetables: Like this:
lizzy writes: magical carpet cleaner Several weeks ago I was heading out the door to a dinner party. In one arm I held a big salad bowl. In the other was a glass jar of salad dressing I had just made. As I tried to manuever open our heavy front door, the jar slipped out of my hand. In slow motion I yelled "Noooooo!" You guys, I was so upset. I didn't want visitors because it was so embarrassing. Well, this weekend I had enough. 1. 2. 3. 4. Quick craft // DIY galaxy envelopes Galaxy DIY’s are everywhere at the moment and it’s easy to apply this theme to lots of paper-craft projects. All you need is an old astronomy magazine (they contain page after page of mind-blowing images that you can cut out)! I made some envelopes (and some geometric wall-art….coming soon)! There are a gazillion envelope templates on the web that you can use (or you could use my string-tied envelope template). You could also make some galaxy gift-tags/ribbon or some 3d galaxy geometric shapes. Do leave a comment if you have any more ideas ^_^ Oh, and the font in the top image is called Later On and it’s free!
Saving Food From The Fridge: It Will Taste Better, May Even Last Longer And Reduce Your Energy Bills © jihyun ryou Fridges are a recent invention; for thousands of years, people lived without them, but had many low-tech ways of making food last. Today most fridges are filled with stuff that would last just as long and probably would taste a lot better if it was never lost in the back of the fridge. Some are looking at alternatives to such an expensive and wasteful model. She has developed a series of modern designs that rely on traditional techniques, learned from her grandmother and other elderly people in the community, the " traditional oral knowledge which has been accumulated from experience and transmitted by mouth to mouth." © Jihyun Ryou Here is an interesting and complicated example. Apples emit a lot of ethylene gas. © Jihyun Ryou The designer writes about the Verticality of Root Vegetables: Keeping roots in a vertical position allows the organism to save energy and remain fresh for a longer time. Kris de Decker elaborates: © Jihyun Ryou © Jihyun Ryou
How to make gift bags from newspaper | How About Orange - StumbleUpon When I bought something at a store recently, the clerk handed me my purchase in a bag made from a newspaper. I liked it very much and had to make some more—thus today's DIY recycled newspaper project: gift bags made from the Wall Street Journal. You can vary the dimensions, of course, but here's what I used to create a bag that's 5" tall, 4.5" wide, and 3" deep. Stack two sheets of newspaper on top of each other. This will be a two-ply bag for extra sturdiness. Cut out a rectangle that's 15.5" wide and 8.25" tall. Fold a flap 1.25" down from the top. Cut two pieces of cardstock or chipboard to 4.25" x 1", then glue them on the widest two panels just under the top fold. Put glue on the outside of the 0.5" tab and bring the left-most panel over to form the body of the bag, aligning the cut edge of the panel with the folded edge of the flap. Upend the bag so the 2" flap is now up. Put glue on both flaps and fold them inward to form the bottom of the bag.
DIY: Tribal print iPhone case ✪ DIY: Tribal print iPhone case ✪ Are you seeing lots of this type of pattern lately? It's either called the Aztec print or the tribal print! It's the one of the 'It' trends this season since it's the perfect mix of color and fun which is perfect for the summer! (especially here in Manila!) le inspiration which costs $40 each! What you'll need: Look for your colored permanent markers coz they're the only thing that'll put your patterns to life! A matte white iPhone case (or a blackberry case if you're on BBM) Any type of ruler. How did I do it? Don't be scared to start it! Think of any design and be creative with it! overwhelming but as you move on to the middle part, sometimes you just run out of ideas of what to do next! Remember, for this DIY, the more the details, the better! you'll need a lot.. I assure you that when it's done, you'll love the result! You can also apply clear nail polish to make it shiny & last longer Side view & top view of the finished product.
A Bridge to Nature: Barreau & Charbonnet's "Volet Vegetal" Urban Gardening Concept Posted by Ray | 27 Aug 2012 | Comments (3) All images courtesy of Barreau & Carbonnet; 'gif' it a second to load We're always curious to see new developments in urban gardening trend as it grows parallel to broader interest in sustainable foodways, from reclaimed spaces to apartment-friendly planters to conceptual experiments. The window-mounted chassis, which holds three planters, is operated via pulley, as a sort of drawbridge outfitted with houseplants and herbs: "Volet Végétal"' is a project that we thought for a Parisian design contest "Jardin Jardin" as an industrial product for people who are living in apartment deprived of gardens and balcony. If it weren't for NYC's oppressive humidity (this month in particular), the elegant system might make an immeasurable aesthetic improvement from the unsightly air conditioners that are an acne-like blight on many façades here—is this also the case in Paris? Hat-tip to Sarah
Rice glue recipe, esprit cabane, eco-friendly DIY and decorative arts In Asia, rice glue is a well-known product. This extremely resistant adhesive can be used to glue all types of paper. It is used in traditional bookbinding and luxury cardboard products: papers bonded with rice glue are considered tear-proof. In 1/3 liter (1 1/3 cups) of water, cook 7 oz of rice or rice flour* over low heat. Filter the glue and let it cool. For creative ideas using rice glue, see these pages: - paste paper, - punk dresser, - coiled paper basket. * Rice flour can be found in food stores.