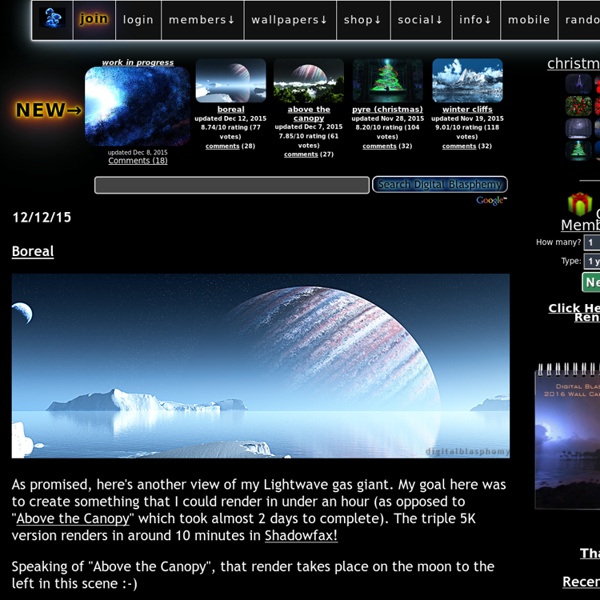
Digital Blasphemy 3D Wallpaper: Updates
Sailor Senshi Maker
Sailor Senshi Game by: Doll DivineArt by: Drachea Rannak This game has been updated! Check out the more robust, Sailor Moon Dress Up 3.0! Follow in the steps of Sailor Moon and create your very own Sailor Scout, or Sailor Senshi. It's funny, I never watched Sailor Moon myself, but I had always been a huge fan of the clothing styles and transformation sequences. Because the first release of this game was relatively simple in terms of outfits, I made sure to include a large color selection. Tags: dolldivine - anime - magical girl - weapons - tv shows - magicians
Wallpaper Art
Fonds d'écran - Haute Définition
Water effect photo montage
First of all you need your image. I found my image on sxc.hu. There a ton of free images there so keep on searching. Here are a few: and I also bought this one from istock:
Wallpaper sorted by Rating
Sorted by Number of Favorites There are 968 free desktop wallpapers available below, sorted by the number of people who have saved a wallpaper to their Favorites List. Only images from the last three years are included. You are on page 1 of 97. Your screen's resolution is 1600x1200 pixels. Quickly Download Every InterfaceLIFT Wallpaper! Build Your Own Bulk Wallpaper Download → Don't click on thousands of individual "Download" buttons. Get all of our wallpapers, in the precise image size you need for your display, in one custom download. June 2nd, 2011 These are the overwater bungalows at the Hilton Nui in Bora Bora last November. Canon EOS 400D, Canon EF 24-70mm f/2.8L USM lens, B+W polarising filter. October 21st, 2012 Over a Thanksgiving holiday I was spending some solitary time at the rapids. This shot is a composite of an exposure lasting several minutes using my Lee Big Stopper to blur the water, and another series of photos combined using HDR to freeze the leaves. November 15th, 2011
Digital Blasphemy 3D Wallpaper: Widescreen, Dual-Screen, Triple-Screen, iPhone4, iPad, Droid, XBox360, PS3, HDTV Backgrounds
Create your own Wallpaper - X3 Studios
Web tutorials and free templates | Water Dress
Step 1 Let's start from the beginning. Create new document (I used 960x1280px) and fill it with #909090. Now using Blending option apply Gradient Overlay for Layer 1. Step 2 Now let's find a model which will wear our Water Dress. Step 3 Now let's find a material for Water Dress. We only need a top part of this image (which by the way looks like a dress). Tip: It doesn't have to fit perfect, we will match this later. Step 4 Grab Magic Wand Tool (W), set Tolerance to 5 and delete blue background (select areas and hit Delete). Tip: If You use different splash image, You may have to use higher/lower Tolerance (depends on image) or even different selection method. Step 5 Change "dress" layer Blending Mode to Luminosity. Step 6 Duplicate "dress" layer, set Blending Mode to Overlay and lower Opacity to 40%. Tip: Try to experiment with Burn Tool (O) brush size and Exposure setting. Step 7 It's almost finish. Tip: Try to experiment with Sharpen Tool (R) brush size and Exposure setting. Final result
Peacock by *Eranthe on deviantART
Awesome digital bokeh effect in Photoshop
Our last Wallpaper of the Week was an image I had created using Pixelmator, and I really liked the outcome. The best part about it was that it was pretty easy to accomplish in Pixelmator, but I decided for perspective's sake to create the same effect in Photoshop. The process is easy as well, but with a few extra steps. As in the previous tutorial, I will show you how to create a digital bokeh effect, but this time in Photoshop. The process is very easy and we will be using the super powerful Brush Engine, one of the coolest things in Photoshop. Step 1 Create a new document in Photoshop. Step 2 Select the Ellipse Tool (U), and create a circle. Step 3 Select the ellipse and go to Edit>Define Brush. Step 4 Go to Window>Brushes (F5). Step 5 Before we start painting our bokehs let's create a new layer and fill it with a colorful gradient. Step 6 Let's create a new Folder in our Layer Palette. Step 7 Go to Filter>Blur>Gaussian Blur. Step 8 Create another layer and paint more brushes. Step 9 Conclusion
Related:
Related:
