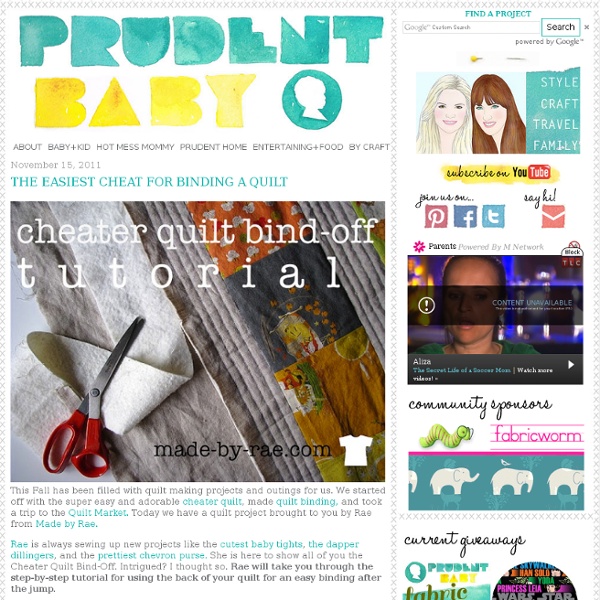
The Easiest Cheat for Binding a Quilt
20 brilliant things to make in a jar
Via: mycakies.blogspot.com Start saving your old jam jars! From cakes to herb gardens, pies to photo frames, and even entire meals … here are 20 fantastic things you never knew you could make with a jar. Via: fatgirltrappedinaskinnybody.blogspot.com Word on the street: salad in a jar is all the rage. Via: bakerella.com Cookies in a jar – a great gift idea. Via: rikkihibbert.co.za For a rustic vintage look, display your photos inside glass jars and bottles. Via: goodfoodbreadandmuffins.blogspot.com Chocolate muffin bread cooked in a jar. Via: pizzazzerie.com Super sweet. Via: simplebites.net Bread, cooked in a jar? Via: marthastewart.com A fabulous visual reminder of your favourite holidays. Via: bigredkitchen.com So let’s just cut to the chase – what about making all your meals in a jar?! Via: runwithglitter.blogspot.com There isn’t a child on earth who wouldn’t be wowed by these: rainbow cupcakes baked in a jar. Via: mybakingaddiction.com Individual cheesecakes in a jar. Via: flickr.com
diy angle
saying on pillow
ewe pillow#2
writing on snowman pillow
snowman pillow
house pillow
button wreath
Embroidered ewe
green plate by Kelly
x-mas plate by Kelly
Related:
Related:
