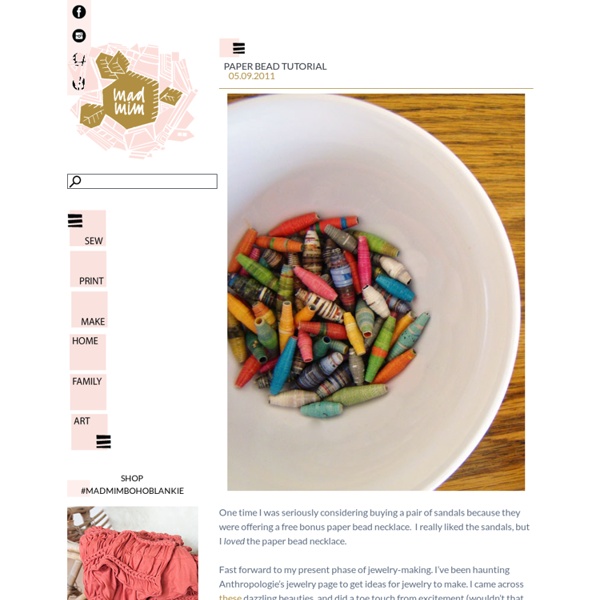
background preloader

Paper Bead Tutorial & mad mim - Sewing and other craftiness from Miriam Tribe.

Paper Bead Tutorial & mad mim - Sewing and other craftiness from Miriam Tribe.
One time I was seriously considering buying a pair of sandals because they were offering a free bonus paper bead necklace. I really liked the sandals, but I loved the paper bead necklace. Fast forward to my present phase of jewelry-making. I’ve been haunting Anthropologie’s jewelry page to get ideas for jewelry to make. I came across these dazzling beauties, and did a toe touch from excitement (wouldn’t that be awesome?!) What you’ll need: -magazines, colored paper, tissue paper, toilet paper (ok, maybe not) but really. -Elmer’s glue, Modge podge, and some kind of varnish. -scissors, or a rotary blade, quilting ruler and cutting mat (way faster) -round toothpicks -something to stick your toothpicks in like a styrofoam tray or packing materials, or cardboard box. -a paintbrush Before you start cutting, I’ll say a word about paper choice. Cut your strips: Measure 3/8″ from the bottom edge and mark. Measure 3/4″ away from top edge and mark. Now cut from the very top corner to your bottom mark.

Button Statment Rings | It’s September and that means it’s time to add another statement piece to your collection…. obviously! I heart almost every piece Nicole Richie designs for House Of Harlow 1960, especially her oversized rings. As amazing as these rings are they’re also an easy DIY. My friend Jenni, from I Spy DIY, did a project a few months back where she transformed buttons into earrings. #SuperFab This got me thing…let’s transform buttons into statement rings! Buttons, buttons everywhere!! Materials: Buttons, Clippers, Glue, Rings With Flat Tops (available at the jewelry supply store) Use your clippers to remove the shank from the back of the button. Once you’ve made the back of the button flat, use an ample amount of glue to secure the ring to the back of the button. Here’s another hint: If you can’t find a flat ring base, Ring Pops are a fun alternative. Once the base has dried, glue on the button. I now thing I have enough new statement rings to get me through the month.

Friendship Bracelets Macraméd friendship bracelets were all the rage when I was growing up in the eighties. All the girls at my school would obsessively make them for one another in a dizzying variety of colors, widths, and patterns. It's amazing, thinking back, that such young girls could make such beautifully intricate accessories. I, of course, tried my hand at making them as well. I would ride my bike down to the five-and-dime store and pick out the most sophisticated color combinations of embroidery floss I could find, but when it came to the actual macramé I never got beyond plain stripes. Fast forward 20 years: Purl Soho started carrying DMC Cotton Embroidery Floss in every conceivable color (including fluorescents! Making friendship bracelets is a surprisingly easy craft, and best of all, in the end you'll have a bunch of cute summer bracelets to give to your pals. Materials Since this is such a free form enterprise the amount of colors of DMC embroidery floss you get is really up to you. Beginning

Make a t-shirt headband Of all the headbands I've made, I think this is my new favorite. It's like wearing sweats on your head, without the dumpy look. It's so cushy and comfortable! And yes, I am wearing the shirt with the bottom cut off in the picture. Scrounge around for an old t-shirt. Fold in half lengthwise and pin in place. Fold the headband right side out. Make a flower or two and hand stitch it over the seam. The Real Deal: It cost me pretty much nothing. DIY Painted Feathers I’ve always loved the idea of painting fake feathers, and with festival season underway it seemed like the perfect time to do it. I originally thought of these purely as decorations but then it occurred to me that they’d be a great finishing touch for a festival outfit. This is a great activity to do outside on a warm sunny day, and once you start it’s slightly addicting! What you need: fake feathers, paint (I used acrylic paint), and a paint brush. I got this paint from Utrecht and I love it. I added a little bit of water to the paint before applying to the feathers, and they absorbed the paint almost like watercolor. After the entire feather was covered I added some dots and lines with white paint. Get as creative and colorful as you want with the feathers! I wanted to add in some of the smaller brown feathers to my arrangement, so for those I kept it simple and painted them in colorful ombre shades. Arrange your feathers on a wall as beautiful spring artwork! Photos by Julia & Brigette.

DIY Chainmail Necklace You’ll need: Start by separating the jump rings into two halves: 175 open and 175 closed. Thread three closed jump rings onto an open jump ring. Close the ring. Spread the three rings apart, with the rings looking exactly as shown below. The bottom ring will be the end of the necklace and the top two rings, which are spread open over the middle ring, will be where the chain mail begins. Keeping the rings in place with your forefinger and thumb, take an open jump ring and hook it through the front side of the two rings. Add 2 closed rings to the open ring and close. Spread the two rings apart in the same way as the first set of rings. Add 2 closed rings and close. To add an optional fourth row, lay the necklace flat and hook an open ring through first and second closed rings on the right side. I stopped at 4 rows but you can continue adding rows for a more bib-like necklace. Connect the two ends with a single jump ring or clasp. Fini! (top image from here, rest of images by HonestlyWTF)

Simple Ear Cuff Tutorial What you've all be waiting for... an ear cuff tutorial! I've been making ear cuffs for over a year, but unfortunately haven't had the time to make some of the insanely complicated designs I've dreamed up. This, however, is a very simple ear cuff that takes only a few minutes to master! Ear cuffs (also known as ear clips, cartiliage cuffs, ear vines, and more) are fabulous for people who don't have pierced ears-- or pair them with other earrings for a "double piercing" look. All you need is pliers and some wire (the pictured wires are 20ga blue silver plated copper and 20ga enameled copper in various colors). Begin with 3 inches of wire. Fold at one inch. Fold again, creating a little zigzag. Twist the ends into swirls and pinch the swirls until they touch the center wire. You will need a mandel to form the ear cuff correctly. Push the ends down... The tips of the ends will still be straight. Tada! This brown ear cuff fits both ears. This ear cuff is for the left ear.

anthropologie knock off vintage lace bracelet The prettiness from Monday and yesterday continues today with a little anthro-inspired bracelet tutorial. In a word, lovely. The lace-and-pearls embroidered on vintage lace is just loveliness. The idea came from Anthropologie (shocker, right?). For Jord’s birthday, I was wanting to give her a present that was lightweight (read- easily packed), and just pretty. The Scalloped Spirea Bracelet fit the bill perfectly. You’ll need--two lengths of 6″x2″ ribbon or lace for the base and the backing (doesn’t have to be vintage, it gets covered)-enough vintage lace/trim to cover the your ‘base’ (see above)-extra lace/trim to tie-embroidery thread-invisible thread-beads, pearls, etc. for embellishing 1. 2. 3. 4. 5. 6.

Popsicle Stick Bracelets So I was looking through my vintage craft book collection and ran across a 1970 Pack O’ Fun magazine. They had instructions on how to take a simple popsicle stick and turn it into a bracelet. I’m always happy to try and take a good idea and run with it. Well, I’m certainly on board for that. The thought of being able to make wood pliable put all kinds of ideas in my head. Are you new to the Sitcom? For this project I used: Popsicle sticks (bought the industrial strength size bag from Walmart because this project might go in future directions)Drinking glass (for forming- use a glass with a top opening that is slightly smaller than you want your bracelet to end up)Emory board or sand paperAcrylic paintStick on jewels (for bling)Mod Podge The instructions in the magazine called for allowing the popsicle sticks to sit in water overnight. I found that I still had to work the wood, warming it with my fingers, to make it pliable enough to fit into the top of the glass without splitting.

DIY Wrap Bracelet There are so many great wrap bracelets out there, but Chan Luu is my fav! But for 220 Euros a piece they are a bit pricy!! Well, not to worry because they are suuuper easy to make yourself! it is a bit time consuming depending on how many times you want them to wrap, but so worth it!! ** updated instructions here** You tie your thick cotton string and a transparent beading line (or fishing line, whatever you have around) to your button. Start by adding a bead to the transparent line, loop it around the left one cotton string, then back through your bead. Hope you are as thrilled by this as me!! Spoon Ring DIY: Nerdy Chic Book Clutch Alright, you nerds, it's time for another 'book'torial. The whole reason I created the first two 'book'torials (here and here) was so that I could create this nerdy chic book clutch. I'm completely smitten with how it turned out. Carrying a library card never looked so fashionable. ;) Wanna make your own? Stuff You'll Need: Book Matte Mod Podge Fabric Needle and Thread Clasp (This is the one I used.) Wax paper Wooden paint stirrer Wood glue Epoxy glue (I used J.B. Note: Make sure the book you choose is big enough to hold the items you'd like to carry. Method: 1. 2. 3. 4. 5. 5. 6. 7. 8. 9. 10. 11. 12. 13. And that's all there is to it. So, will you guys be sporting the nerdy chic look?

DIY Headband

Related: