
DIY Wood-Grain Laptop Wrap When I was wandering through the dollar store the other day I came across this super amazing wood-grain contact paper. and was completely smitten! I knew I needed to find something to cover it with - pronto! Enter, my lapytop. So, I had plenty of photos of the entire process, but my camera is also an old and quirky beast and has taken to randomly deleting photos, which it decided to do half-way through the whole DIY process, so sorry! So, to start, go ahead and power off your laptop and take out the battery so you're free to work on it without any worries. Now, unroll your contact paper, and lay your computer on top with the grain going wichever way you want, then cut around it, leaving a large boreder on all sides (you'll trim it down later). Now, you can decide what you'd like to do about the logo on your cover. After you cafefully remove the backing, lay it gently on top of your laptop, careful to line-up where your logo cut-out is, and smooth the contact paper out.
Lovely Wire Knot Ring Tutorial You can make this lovely ring (or a version of this design) yourself, using just some basic tools, wire and a lip balm! Yes, in this tutorial I am going to demonstrate that just basic beginner tools and a wire from Michael’s can go a long way! Wouldn’t this ring make a great present?? For the purpose of this tutorial I am going to be using the very basic, cheap tools that are available almost everywhere. Instead of a ring mandrel you can just use a tube of a lip balm, like I did. I chose to make my ring from a simple gold-plated wire (20 gauge) but you could also use 18-gauge wire, twisted wire (wouldn’t that be nice?) PLEASE excuse the state of my nails in these pictures.. First thing to do is to cut a piece of wire. Next, wrap your wire around the tube of your lip balm. Cut of the extra bits, if any. Now bend the wire coming from your left to aim away from the ring and then bend again to aim it slightly upwards, as shown on pictures below. Almost done! And it’s done Like this:
FIKS*D: How to Make ... Washi Tape! Are you like me and just can't bring yourself to spend a lot of money on things that even though they are really pretty, will probably just sit there for ages without use? I've always loved the look of washi tape but find it so expensive and hard to justify. So, I decided to get creative and make my own.. All you need is some double sided tape and tissue paper! Too easy!
No-Sew Tote Bag From A Pillowcase I was inspired to make this DIY tote bag after I took a trip to the farmer's market and realized I needed a comfortable and lightweight bag to carry all my goodies. I love the way this DIY project turned out and, more importantly, there was no sewing involved! A pillowcase already has all the stitching you need to create this easy and stylish tote bag. Follow the steps below to make your very own. Materials: • King Size Pillowcase (you could also use a standard size, but the bag will be smaller. • Acrylic Paint and a Dish Sponge (if you wish to add a pattern to the bag) • Long Fabric Strip (for the strap) • Scissors • Lay the pillowcase flat with the open end facing towards you.
the DIY: FISHTAIL FRIENDSHIP (BRACELET) If you know how to do a fishtail braid to your hair, then you pretty much know how to make this bracelet. But for those of you who don't know about the fishtail and those of you who are curious about the logistics of my specific bracelet, well, read on! You will need embroidery/ friendship thread in various colors, some tape and a bead! I used 9 strands of thread in 9 different colors. I twisted this top part so it doesn't get all tangled later. Where you twisted the top part, tie it around your finger. Then tie a knot. I'm now taking one of the strands and tying it around the other, almost like a tie. Then pull the end through the loop you've created and pull into a knot. Tape the top down to keep the bracelet stable. Star by grabbing one color from the right side and pulling it to the middle. Pull the same color from the left side. Add the piece from the right side to the left group of colors. Now take the color from the left side and pull it to the middle (over all the other strands.)
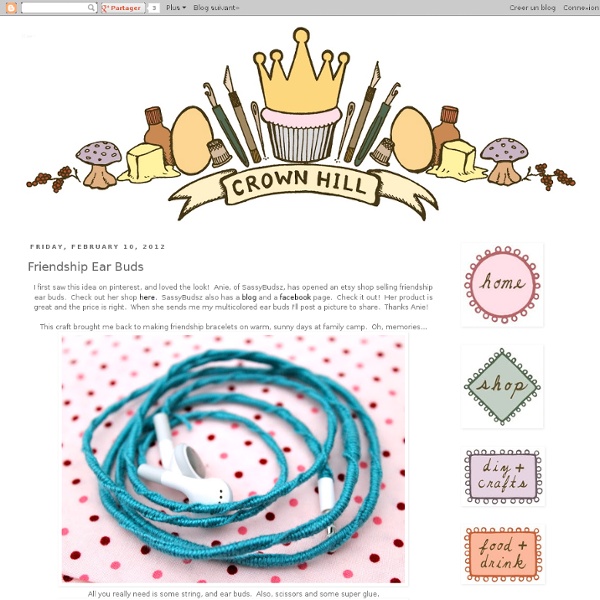
DIY Wire Rings Have you got any wire lying around? Well, then you can make a beautiful ring in less than five minutes. After three rings I started to get the hang of it. Practice practice … DIY Wrap Headphones | I got the idea to make these from the DIY wrap bracelets I made a little while ago. These headphones were all white before, and since I had the coloured string left over from the bracelet tutorial, I decided to try it! To start off, take the string and tie a knot with it around one of the wires. You can use one colour, or as many colours as you want. Once you have the knot set, start wrapping. Make sure you have a lot of string because you don’t want to run out halfway down the wire and have to tie another knot and start over again. If you want, you can add beads along the way to jazz it up a bit. I thought these turned out pretty good, but I didn’t like the look of the knots all over the headphones. Let me know if you are going to try this! Like this: Like Loading...
The 15 Craziest Things In Nature You Won't Believe Actually Exist Mother Nature is beautiful and amazing because we can see many amazing stuff like these 15 things that you won’t believe they actually exist. All these places are real. It is hard to believe in that, but that is true. 1. 2. 3. 4. 5. 6. 7. 8. 9. 10. 11. 12. 13. 14. 15. DIY Washi Tape Laptop Keyboard Look whose little old MacBook got a facelift this weekend! I spotted this idea from minifanfan on Making It Lovely last week and just had to give it my own spin. I purchased my Japanese washi tape from Le Box Boutique on Etsy. There are hundreds of washi tape sellers but I chose Le Box because they allow you to purchase tape by the foot rather than having to purchase the entire roll. I chose these ten patterns but only ended up using eight of them on my keyboard. I first thoroughly cleaned my keyboard with rubbing alcohol to remove any dirt or oil that might keep the tape from sticking. I originally wanted to do all the keys, including the small keys in the top row, but the tape seemed to have a harder time sticking to the small keys. This project was a bit tedious but simple – perfect for a few hours in front of the tv. What do you think? Tagged as: craft, diy, tutorial
15 Amazing Ways to Tie Your Sneakers | Hourlylaff Amazing Way to Tie Your Sneakers 1. The lace is run straight across the bottom and emerges through both bottom eyelets 2. The laces then go straight up and are fed into the next set of eyelets up the shoe 3. 1. 1. 1. 1. 1. 1. 1. 1. 1. 1. 1. 1. 1. 1. Ian’s Shoe Lacing Powered by ScribeFire. Books on Shoe Lacing Welcome to Hourlylaff.com.