
Créer une décoration personnalisée à base de caisses en bois Les caisses en bois, c’est pratique et on en trouve assez facilement de plusieurs formes, différentes tailles, différentes couleurs mais on ne sait pas toujours comment les agencer pour créer une décoration moderne et à notre image. Je vous propose donc de découvrir quelques idées de disposition et d’utilisation de caisses en bois recyclées ou sur mesure. On peut créer un meuble simplement en les superposant et en mixant les matières et les couleurs en version meuble ou en version colonne en les consolidant avec quelques vis ou, comme dans la première image, en ajoutant une sangle pour fixer les caisses. Il y a aussi la version plus classique avec des étagères mais, pour lesquelles, on peut varier les formes (la très en vogue forme de maison ou plus original en forme de bulle) et les tailles. Pour personnaliser les caisses, on peut les peindre ou ajouter en fond des papiers à motifs ou papiers peints… … ou ajouter des roues, des portes, des cadres pour des utilisations plus variées.
Tissue Paper & Paper Flowers Tutorial I debated sharing this tutorial for a couple-o-reasons. Reason 1. It's a craft that has been around since before I was born and reason 2... it's a craft that has been around since before I was born. I feel like I might be a 100 years old at this point. My crows feet asked for slippers the other day cause they were getting cold. Since it's new to me I figure it's got to be new to someone else too so I am doing it anyway! Supplies you'll need to make tissue paper flowers:Tissue paper (seeing as how this IS a tissue paper flower tutorial it would stand to reason that some form of tissue paper will be required)16 HUGS (just checking to see if you are actually reading this)Pipe cleaners or floral wireScissors Extras (for pizzaz): glimmer mist, brads, 2 inch Styrofoam balls, ribbon, more hugs (still checking), a flower girl (seriously), and lastly... As I stated last week, I purchased a Martha Stewart tissue paper flowers kit a few months ago on clearance at Malwart. Let's get started!! VOILA!!
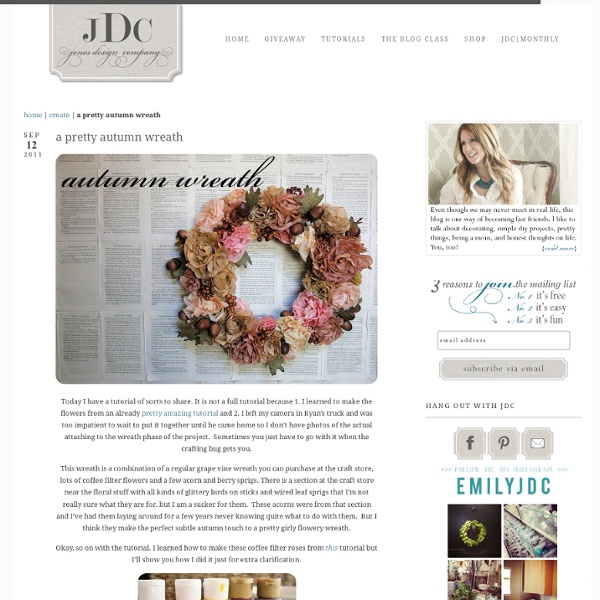
Coffee Filter Flowers Hello lovely readers, Apologies for the delayed post today. This post was originally one sweet little DIY tutorial all set to go live at 9am this morning then I got immersed in the intoxicating world of coffee filter flowers and ended up adding another and another until I was up to my eyeballs in coffee filter tutorials and inspiration! So it took waaay longer than expected but I do hope you’ll find it useful. If you’re looking for a cheap, simple and pretty DIY project for your wedding, coffee filter flowers could be just the thing! photo via Just Simple Designs Who knew coffee filters could look so pretty? The great thing about coffee filter flowers is that they can be used in so many different ways, from decor (they’d make a mean ceremony backdrop) to centerpieces, place settings, wreaths and, if done in miniature, they’d look so sweet attached to escort cards or favor boxes! You could even create a bunch of them, attach them to ribbon wrapped florist’s wire et voila! Dying Coffee Filters
Paper Punched Easter Eggs Tutorial by Nikki In Stitches Some of the best projects are also the most simple, and it doesn’t get much more “back to basics” than these paper punched Easter eggs. Simple and classic, they take just a few minutes to make and will last for many springs to come! Materials: 5/8″ paper punch Decorative paper Styrofoam egg Straight pins Glue Directions: Scroll through the pictures below. ~Nikki Find more from Nikki on her blog Nikki, In Stitches Tagged as: craft projects, craft tutorials, Easter, Easter Projects, How To, nikki in stitches, Paper Punched Easter Eggs Duct Tape Flower What up duct tape? Did you miss us?! For today’s bit of DIY accessory magic, we’ve figured out how to turn 3M’s Scotch Color & Patterns Duct Tape into gloriously neon rosettes. A fold here, a twist there, repeat a few times, and you’ve got a charming rosette to turn into a ring, pin, pair of earrings, or a little hair bling. Materials: - duct tape - scissors - ruler - accessories: earring backs, barrettes, comb clip, pin We used an array of neon duct tape as well as a fun snakeskin pattern as an accent for the hair accessory. We’ll start by showing you the step by step for our turquoise rosette ring. Repeat until you’ve folded all 20 pieces. Twist the first one into itself so it looks like the photo above. Cut off the bottom of the rosette so that you have a flat surface to attach your ring. Don’t worry about being gentle – duct tape is ridiculously durable! To make a ring, simply fold a piece of duct tape over itself lengthwise, roll into a ring and tape.
Turn A T-Shirt Into Pom Poms Learn how to turn old t-shirts into pom poms! T-shirt Pom Poms are so much more durable than tissue paper ones. And I think they look loads better! got an old tee or two {or 20!} Supplies t-shirts, 1 per pom pomscissorscardboard use round objects to trace circles onto cardboard to make 2 templates like those shown above. i used a roll of tape and my camera lens cap…. the diameter of the outer circle is 6.5″ and the diameter of the inner circle is 2.5″. you can play around with different template sizes to get different sized pom poms. cut your t-shirt into 1/2″ strips. i only used from the arm pits down on each shirt. . take one strip and one template and place strips as shown close to the inner circle. sandwich the strip by putting the other template on top. take a fabric strip and place on cardboard with the end even with the outer edge. wind around the template as shown. pull the strip tightly so that it stretches the material. when you get to the end of the strip….
Quelle technique de noeud coulissant pour bracelet choisir? | Art et Perles Voici un exemple de noeud coulissant pour bracelet Si vous souhaitez finir un bracelet en corde avec un noeud coulissant, sachez qu’il existe plusieurs techniques. Nous vous en proposons ici deux : Le noeud plat macramé coulissantLe noeud coulissant simple. Vous pouvez suivre le pas-à-pas dans la vidéo ci-dessous. il existe une autre technique : noeud chinois boule qui fera l’objet d’un autre tutorial. Voyons tout d’abord comment finir un bijou en corde avec un noeud plat macramé. Noeud coulissant plat macramé faire un noeud-plat-coulissant Comme vous le voyez sur la photo, votre bracelet est presque terminé, il est posé sur une plaque de liège avec les cordes côte à côte (parallèle) et les extrémités positionnées l’une en haut, l’autre en bas. Couper un morceau de corde (noir sur la photo) d’une trentaine de centimètres (ajouter 15 à 20 cm si vous voulez en plus faire un noeud à boucles multiples). noeud-coulissant-plat-macramé Si vous le souhaitez, terminez par un noeud à plusieurs boucles.
Tissue Paper Carnations Today is the start of Flower Week on Folding Trees. Every weekday, I will be showcasing different types of paper flowers. You may be surprised at the variety of flowers you can make using different paper craft techniques! When I had the idea for Flower Week, I thought I would kick off the week with some flowers that I made myself. A vase of pretty tissue paper carnations! Want to make your own? This tutorial is Donationware – the instructions are available for free, but if you like it please consider sending me a donation (via my other website, PlanetJune) to show your appreciation: Send me a donation and receive the easy-to-print PDF version of the tutorial as a thank you! Donations of any size are much appreciated. The complete instructions are available below, regardless of whether or not you choose to pay for them You will need: Tissue paperScissors2 large paper clipsPipe cleaners (chenille stems) or floral wireColoured marker penOptional: floral wire, floral tape, wire cutters
Easy Soap Making Recipes | Lotion Recipes | Salt Scrub Recipes Nothing’s more fun than sharing and swapping a good recipe. Here are a few of our favorites for making everything from skin nurturing soaps and scrubs, to solid perfume and more. Share your recipes by using the “comment box” at the bottom of this page. Gardener’s Soap Recipe 8 oz. Melt base and scent. Honey Bee CP Soap Olive Oil 32 oz. At trace, add fragrance and 1 Tablespoon of honey. Easy Shea Butter CP Soap Coconut Oil 16 oz. Easy Lip Balm Recipe – using Lanolin 1 oz. Skin Firming Gel – using CroThix CroThix has a secondary use as a skin firming agent. This makes (4) four ounce containers of gel-crème. Water 13 oz. Heat the water and Glycerin to 170 degrees and set aside. Lotion bars! Easy Lotion Bars 4 ounces Mango or Shea Butter 4 ounces Beeswax, Yellow or White 5 ounces Liquid Oil (Jojoba or Grapeseed are both excellent) 2 teaspoons of Essential Oil or Fragrance Oil Melt the beeswax in a separate container and the butter/oil in another container. Cookie Cutter Soaps by T.J. 1. 2 tsp.
Decorate Flowers Hey all! Here's a fantastic set of ideas from our own Nancy Doren to help you have more fun and get more bang for your buck! Altering Prima Flowersby Nancy Doren The February Passion kit contains beautiful Alabaster Roses from Prima Marketing. Start by separating the flowers into layers. You can try... Stamping Ink your stamp with dye or chalk ink (pigment ink will not dry sufficiently) Press the stamp over the paper flower. Spray Ink Did you know you can make your own spray ink? Spray your flower (make sure you use something to cover your work surface... after it dries, acrylic paint is hard to remove!). Watercolor + Glitter I love to use my Prang watercolors on my scrapbooking projects. Dip a paintbrush in water, then in the paint. Add a sparkly finish by applying Stickles glitter glue (I used the green Ice Stickles from the Renewal kit) along the edges of the flower’s petals. Cutting Snip “V” shapes in the edges of all the petals to give your flower a ruffled look. Love, Rachel