The Burlap Bag - High Quality Handmade Goods Shop - Austin Texas
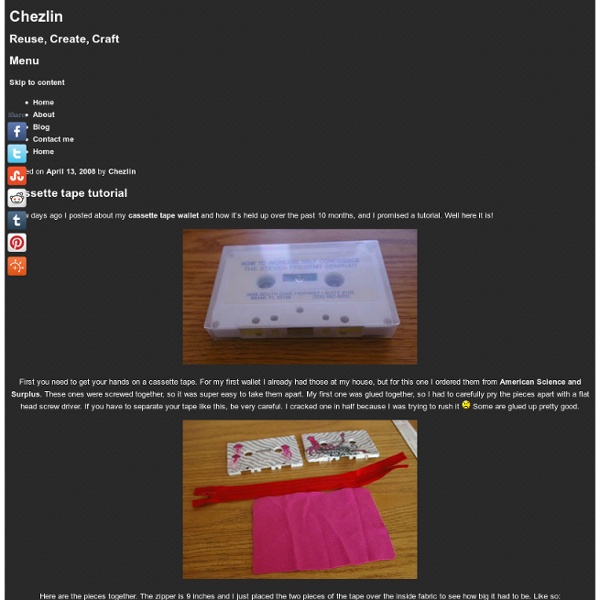
March 1, 2012 by Lauren I saw a "trick" online and thought "Weird! I wonder if that really works!" So I tried it. Yes, you can indeed shave the pills off of your sweaters and jackets and any other article of clothing that is pill-y. Pilly? ***EDIT EDIT! We started with the top part of this jacket… look at how clean it is! Enjoy your pill-less life! EDIT— yes… I know you could just buy an electric pill shaver thing.
page corner bookmarks | I Could Make That
This project comes to you at the request of Twitterer @GCcapitalM. I used to believe that a person could never have too many books, or too many bookmarks. Then I moved into an apartment slightly larger than some people’s closets (and much smaller than many people’s garages) and all these beliefs got turned on their naïeve little heads. But what a person can always look for more of is really cool unique bookmarks. Page corner bookmarks are cute, practical and deeply under-represented in the world.* They’re easy to make, easy to customize, and will set you apart from all those same-same flat rectangular bookmarks. If you like this tutorial, here are a couple others that might be up your alley. If you’re loving the toothy monster vibe, check out these simple monster heating bags, filled with rice or wheat and entirely microwavable, to keep toes or fingers or tummies warm during the chilly winter months. What you’ll need: Putting it all together: 1) Follow steps 2 and 3 from above.
How to make gift bags from newspaper | How About Orange - StumbleUpon
When I bought something at a store recently, the clerk handed me my purchase in a bag made from a newspaper. I liked it very much and had to make some more—thus today's DIY recycled newspaper project: gift bags made from the Wall Street Journal. You can vary the dimensions, of course, but here's what I used to create a bag that's 5" tall, 4.5" wide, and 3" deep. Stack two sheets of newspaper on top of each other. Cut out a rectangle that's 15.5" wide and 8.25" tall. Fold a flap 1.25" down from the top. Cut two pieces of cardstock or chipboard to 4.25" x 1", then glue them on the widest two panels just under the top fold. Put glue on the outside of the 0.5" tab and bring the left-most panel over to form the body of the bag, aligning the cut edge of the panel with the folded edge of the flap. Upend the bag so the 2" flap is now up. Put glue on both flaps and fold them inward to form the bottom of the bag.
Pleated Bow Pillowcase Dress Tutorial | Simply Modern Mom
This was one of those projects where I had an idea in my mind and I just went with it. Then as I started sewing, I realized that I probably should have thought it out more thoroughly. But it worked out in the end and the results turned out be to better than the image in my mind. So awesome! I made this for Elle who is 17 months. And like the Retro Ruffle Pillowcase Dress, I did the ribbon-button closure in the back. Supplies: pillowcasematching threadmatching ribbona buttonbrooch pin, optionalmatching fabric, if your pillowcase doesn’t look like this 1. 2. 3. 4. 5. 6. 7. 8. 9. 10. 11. 12. And done! » Tell me… Do you think bows, especially big bows, are making a comeback? Linked Today’s Creative Blog.
Tutorial |
The Bean bag Cube When your living area is 10 feet wide and to end and you have a sofa and no other place to sit, what do you do? Look for other options. But what ? After a lot of thought I found these beauties. This one is from Crate and Barrel ( No Longer available ) This Is from West Elm I am not sure how much each of them cost as they are not available . For making a square bean bag you will need to decide the measurements for the bean bag. These are the materials I used . The fabric used was thick upholstery material. I started with two pieces of 24 inches X 24 inches and four pieces of 24 inches X 12 inches. Take one 24 X 24 piece and place it correct side down on your work space. Turn the fabric around such that the correct sides face up. Now stitch the adjoining 12 inch sides. Stitch the remaining 24 X 24 inch piece on three sides of the bucket making sure that the wrong side is out. The structure is ready. The structure can be filled with the Styrofoam beans. Lounge on! Love Rashmi 1. 2.
Bird and Text Collage Wall Art
[ Close Privacy Policy ] Privacy Policy / Your California Privacy Rights Revised and posted as of March 4, 2013 Prime Publishing, LLC ("Company," "we" or "us") reserves the right to revise this Privacy Policy at any time simply by posting such revision, so we encourage you to review it periodically. This Privacy Policy will tell you, among other things: Your California privacy rights. ACKNOWLEDGEMENT/YOUR AGREEMENT Company websites are not intended for use by individuals under the age of 18 or those who are not legal residents of the United States. HOW DO WE COLLECT INFORMATION AND WHAT INFORMATION DO WE COLLECT? Distribution Partners Website operators that license our ad serving technology pass information to us so that we may serve advertisements to you. Offer Forms We also collect information about you when you complete a survey or offer form on one of our websites or web pages. Website Registration Forms We collect information about you when you register on one of our websites.