
V and Co. Mini carnet personnalisé Pour bien commencer l'année, un p'tit peu d'origami : ça vous tente ? Je me rends compte que cela faisait un petit moment qu'il n'y en avait pas eu sur le blog : erreur réparée. Aujourd'hui, donc, voici la technique qui vous permettra de réaliser un mini carnet à glisser dans votre petit sac à main. Le matériel nécessaire : - du papier A4 blanc (le classique) - une paire de ciseaux - un mini massicot (en option) - un pistolet à colle - du joli papier : origami, scrap et même du fabric tape ( enfai t, ce que vous avez sous la main). - du papier épais ( selon la couverture que vous réalisez). Les étapes de fabrication : a) Les pages du carnet : 1) Découpez des bandes de papier de même longueur et largeur avec une paire de ciseaux ou un massicot. 2) Prenez une bande et pliez-la en 2 dans le sens de la longueur. 3) Pliez-la ensuite en 2 dans le sens de la largeur. 4) Pliez une nouvelle fois dans le sens de la largeur. 5) Dépliez et positionnez les plis de façon à obtenir un accordéon. b) la couveture :
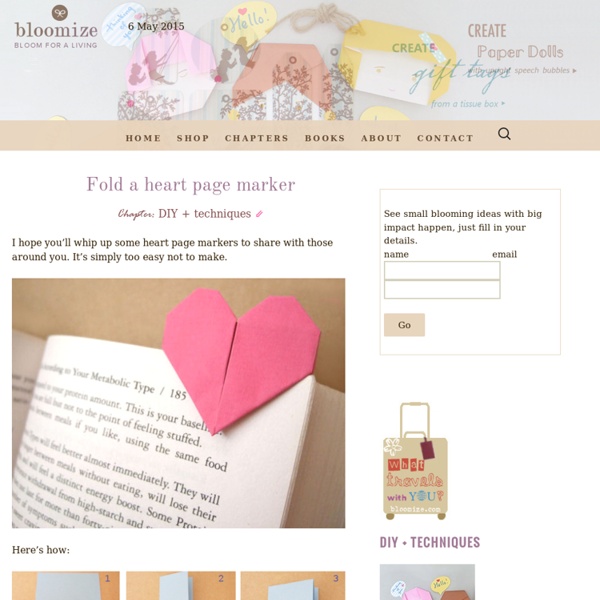
Book Page Corner Heart Origami Bookmark This is another heart tutorial. Is the 'book page' trend over yet? I sure hope not, because I just love the look of this corner bookmark folded from a book page. The great thing about origami is that it is cheap and anyone can do it - with the proper instructions. When I was a kid, my parents bought me an origami book (from Thailand, all in Thai!). I was so excited to get it until I started to attempt to make the figures. I still see origami instructions out there that completely confuse me. I used a book page for this but origami paper would make awesome book marks also. 3D paper diamonds Hello there. Hope you all had a great Easter! We had a lovely relaxing holiday (….well as relaxing as it gets with kids). It would have been great to have another week off ^_^ Before I forget I just want to say a big thank you for all the kind messages you have send me regarding my book (you really are a nice bunch!) I’ve been meaning to get this paper diamond up for weeks now…but it’s taken ages to figure the template out (and I’ve been having breaks between each failed attempt). It’s based on simplified version of Satoshi Kamiya’s origami diamond. These paper diamonds are tricky to make (& require a fair bit of patience) so definitely adults only! When you have made your diamonds you can attach thread and hang them up. How-to 1. 2. 3. 4. Happy Monday all! Edited to add: A few people have had problems printing the templates (the dotted lines do not print).
Oeuvres en papier par Yulia Brodskaya Yulia Brodskaya est une jeune graphiste illustratrice qui a commencé sa carrière en 2006. Rapidement elle laisse de coté son ordinateur pour se concentrer sur ses collages. Son talent n’a pas tardé à émerger et de grandes marques lui ont fait confiance (Hermès, Starbucks,Target, Sephora, Le New York Times Magazine, …). Je vous présente aujourd’hui son travail personnel avec quelques oeuvres inspirées par la vieillesse. Pour en savoir plus sur Yulia Brodskaya, cliquez ici Photos © Yulia Brodskaya Pin It Pin It Pin It Pin It Pin It Pin It Pin It
Holder for Charging Cell Phone (made from lotion bottle) My husband and I both have cell phones. And both of us have phone chargers. And that means lots of obnoxious cords. You never know when one of us may be moving phone cords around, to give our phones an extra charge while we’re chatting away……… or trying to charge our phones up before running errands or something. Needless to say, those phone cords seem to be everywhere…..and are generally in the way and hanging all over the floor. (Okay, and how about when you’re in a hotel or visiting family/friends. I was looking around on the internet for a solution and found this. It made the perfect little holder for my cell phone while it’s being charged. Holder for Charging Cell Phone And no more phone hanging down from the outlet while in this room or that room……..the cord and phone are now up off the ground, and tucked away into the little holder, while the phone drinks up a full charge. If you look closely, you can see that the orange print is fabric. And turns out, it’s pretty useful.
adelynSTONE Création en papier de soie | Nathalie Boutté - Paper art Création en papier de soie Posted by j1m2s3 on 12 avril 2011 · Laisser un commentaire Maryse Dugois- Guillopé réalise de très belles et délicates pièces en papier de soie. J'aime : J'aime chargement…