
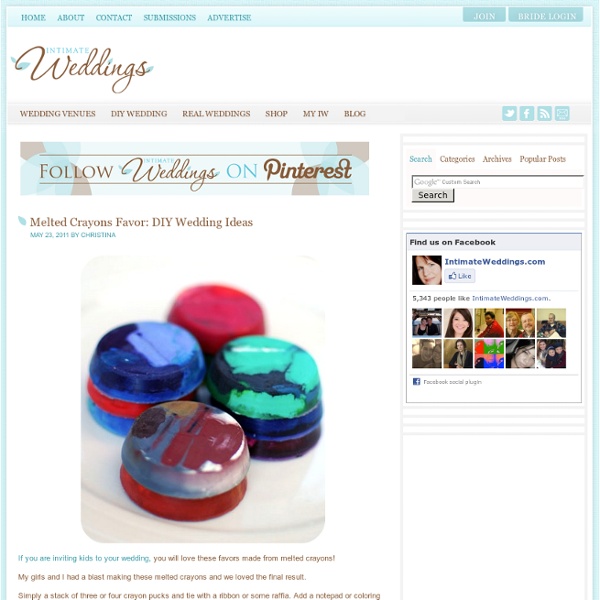
Tie Dye Window Decorations | Wendolonia We’ve been having a lot of rainy weather around here and the kids have been stuck inside for over a week now. The other day, the five-year-old and I stumbled upon an easy activity that kept him busy for over an hour. OVER AN HOUR, PEOPLE! If you’re the parent of a five-year-old, you know how awesome that is. We ended up making these things that I am calling: Tie Dye Window Decorations. I’m pretty good at naming things, don’t you think? All right, so here’s what you need to make these totally easy Tie Dye Window Decorations: A cheap-o kids water color setPaper towels I bet you have those in your house right now! Start off by filling each of the water color thingies up to the top with water. I found an easy way to do this is to fill up a big glass of water and then transfer the water to the paints by doing that thing where you put your finger over the end of the straw to trap the water inside and then let it go over the paints to get it out. Fold your square of paper towel in half.
Amazing Kids Rooms By Handmade Charlotte | Need a little inspiration for your kid’s room? Here’s a collection of amazing rooms for kids from around the web. nggallery id=’121161′ A Colorful Corner This modern kids room manages to be both stylish and whimsical (check out the Swiss-cheese storage!). Shaping Up Bright colors lining the built-in bunks provide visual contrast to the minimalist white interior of this bedroom shared by a Berlin-based architect’s sons, ages 3 and 1. Slide 2 [via] Slides 3 and 8 [via] Slides 4 and 5 [via] Slide 6 [via] Slide 7 [via] Slide 9 [via] Other posts you might enjoy: • Fresh Ideas for Outdoor Play • Rooftop Airstream Hotel • Inspired Kids Rooms: Hidden Nooks Want a quick change for the kids’ room? Check out other articles by Rachel here! For more from Rachel, check out her beautifully curated blog: Handmade Charlotte. More on Babble About Handmade Charlotte Handmade Charlotte Rachel Faucett is the author of the well-loved DIY crafts blog Handmade Charlotte.
Make your own jellyfish in a bottle. & BhoomPlay ~ Note for Thai fans ~ เป็นโพสเก่าที่มีแฟนบล๊อกจากต่างประเทศขอมาให้เขียนเป็นภาษาอังกฤษนะคะส่วนแฟนบล็อกที่ยังไม่เคยอ่านเรื่องนี้เลย ฉบับภาษาไทยดูที่นี่ค่ะ The other day, while I was thinking to get something to put in the water bottle for Bhoom to shake for fun. I saw a plastic grocery bag next to me and then this idea popped up. With some trials and errors, my little jellyfish comes alive just like I thought it would be. : ) When daddy and son first saw it, they’re surprised with their jaws wide open. Things you need to make your own jellyfish (Hope you can find all these in your kitchen) : 1. Instruction: • Flatten the bag and cut off the handle and the bottom part (see picture 1) • Cut along both sides (see picture 2) to split into 2 plastic sheets – by the way, we only use just one of them. • From the center of the plastic sheet, fold it like a tiny balloon to make the head part and tie it with the thread – not too tight (see picture 3). Like this: Like Loading...
Chore Chart for multiple children Are you ready for this?… This is going to be the LONGEST tutorial you’ve probably ever seen, but don’t fret…it’s going to be worth it! An organized classy chore chart is headed your way. We’ve included a free pdf template for the chores too! It also has a subliminal message for my kids to read all week, “Chores are fun”…one day they will agree… If you missed the ever exciting tutorial on how to use a miter saw you are in luck…I just posted it earlier today. Okay, on with the show: I cut with the miter saw 5 blocks of wood 4 of them were 3.5 x3.5 squares 1 of them was 8 inches long I drilled one hole into the top of each of the 3.5 by 3.5 blocks. I ended up sandwiching the block I was drilling in-between 2 others just so I didn’t end up with more band-aids. Then I had to put a little shoulder into it because I hit a knot and I had to make it work. I finished the 3 holes in the three 3.5×3.5′s (there is a picture below). The next hole I needed to make was a bigger one. Here is an action shot.
Tot Treasures: SLIME Don't you LOVE it when your little one is over the moon about an activity you shared together?! I do!! This morning we made RAINBOW SLIME and Biscuit was beside herself with excitement. There are a few ways to make slime, however I found this recipe works best ~ 1 1/2 cups of CLEAR glue and 1 1/2 cups of liquid starch. You mix it all together, separate the slime into a few small bowls and add food coloring to each bowl. You only need a few drops of food coloring!!! Making her slime All ready to go! "Stretchy" "Eeeeeew." "I squish it!" Deep in thought.... By the end there was just one big ball of slime. She played with this stuff for thirty minutes ~ uninterrupted. *High-fiving myself* Happy Playing & Exploring!!
15 of the Coolest Chore Charts for Kids By Jaime Morrison Curtis | Isn’t it great the day you realize that you can put those kids to work around the house? HA! But seriously, we want to teach our kids responsibility and visual cues like charts often help them understand and remember better than nagging from mom ever could. nggallery id=’121807′ Noah's Ark The animals in the ark make this one extra fun. Polka Dot Love this modern and simple check box chart. Panels Love this "mom's command center" - modern and so functional. Jaime Morrison Curtis is author of the bestselling book Prudent Advice: Lessons for My Baby Daughter (A Life List for Every Woman) and founding co-editor at Prudent Baby, the premier DIY destination for crafty moms seeking ways to make their lives even more stylish and beautiful.
How To Mix Chalkboard Paint in Any Color We love using chalkboards as backdrops for displays and parties (like this one here!). So we were super excited to learn that you can create your own custom colors-and it's really easy! We first learned how from Martha Stewart whose tutorial you can read here. She recommends that you use latex paint, but we tried it out with acrylic paints with much success. Supplies: 1/2 cup acrylic paint (choose any color you like, or mix colors together to make the perfect shade!) 1. 2. Once your chalkboard has fully dried be sure to slate the surface before using it for the first time. Have fun creating any color combination you like!!
Make your own Magnetic Paper Dolls (and a fabric cover for your metal base) Thank you for such kindness and sympathy towards my last post. My grandmother will be greatly missed. And we’re all doing perfectly well. She’s one happy lady right now. :) I have been a little set back with holiday prep, due to my trip to CA. Anyway, I was walking through some store, some day (haha…..I can’t remember specifically because I’ve seen them several places), and a set of magnetic dress up dolls caught my eye. So while at Hobby Lobby, I saw a little book of paper dolls (over by the coloring books) and decided that $4 (plus a bit more for the other supplies) was way better than $30…..if I just took the time to make them myself. And before I explain any further…….my original plan was to find some cute boy paper dolls and make one of these for my little guy too. Anyway, the book of paper dolls worked perfectly for this project. And I don’t want my little lady to lose any of her pieces……so I made a little fabric cover. My little girl loves to imagine. She’ll love this. Supplies:
- StumbleUpon Posted by: Cathy on May 22, 2012 Tagged in: Untagged I just loved this Paint swatch chandelier! These are the materials you'll need: - paint swatches in the same tones or you can use multi-colored if you prefer - wire frame from old lampshade (this will hang upside down) - large circular hole puncher - cellotape - cotton thread - scissors Start punching your circles from your paint swatches. Lay out your paint medallions, coloured side down, in the desired order. Turn your lamp shade upside down and fasten it somewhere where it can hang freely. The full tutorial can be seen here. For tutorials on how to market yourself online, click here.