
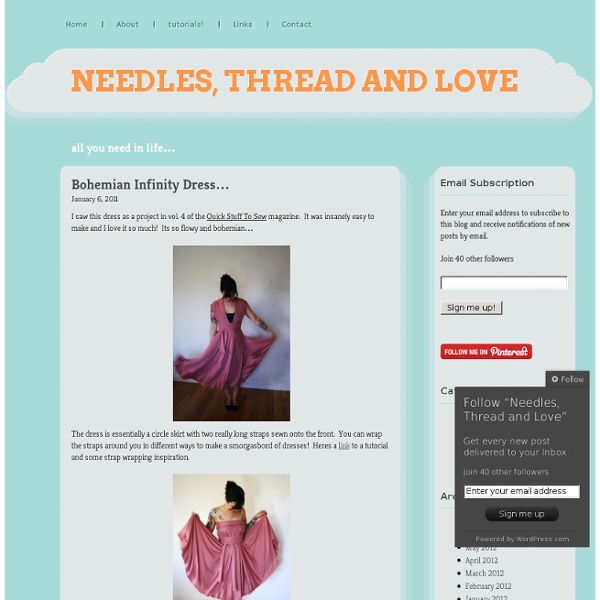
how to sew a circular skirt My apple green bedsheet dress had a circular bottom. This is how you make one. 1. Measure your waistline, or where you want the waistline of your dress to fall. 2. 3. 4. 5. 6. 7. 8. The final product would be worth all the trouble. And please please let me know if the instructions are clear. The Square Circle Skirt (20-ish minutes to make Sometimes I buy too much fabric. I admit it. Just don’t you dare email my husband and tell him that I’ve admitted it. ;) If he ever notices that I have purchased new fabric and he happens to ask what it’s for……..I just mumble and laugh myself through some crazy explanation like, “oh, it’s for this one thing that I’m going to make next week to try out a new technique and I really needed this particular fabric to test it out, and, yeah……..isn’t it great?!?! So, lately, I have really been trying to just use what I have. And experiment I did. But half the trick of making it quickly, is that I used knit. To me, it kinda looks like a ballet dancing skirt. And because of the “circle-cut” method, it’s the twirliest type of skirt you can make. Okay, experiment over. But remember, if you don’t care for the uneven edge, ditch it. **Since I used knit fabric, the only sewing I had to do was to attach the skirt to the waistband. Wanna give this skirt a try? And then cut out that circle. See? -Ashley
Fleece Dog Bed Tutorial | Erin's Blog - Dog Under My Desk - StumbleUpon Loki got a new bed today and the weather held out for photos, so you all get a new tutorial! Read below to learn how to make this cute fluffy fleece dog bed! I’ve made… four of these now? You’ll need 1 1/4 yards of fleece. I cut the 26″ square first, then folded in it fourths. (If you buy 1 1/3 yards, you can squeeze out 28″ circles, but not much more than that.) Now, sew the long pieces together on the short side, right sides together, to make once long piece. Now mark the halfway points on both circles. Now take one circle and place it right sides together with the long piece, matching the center seam to the center point. Sew in both directions starting from this center point/seam to 4″ from the other center point. This diagram will help: Sew the other circle in the same manner. Now pin the seams all the way up to the center point, then fold the excess back and pin it in place. This should give you a finished bed with a hole in the middle where you will turn and stuff the bed. Keep sewing…
Patterns Seven Essential Sewing Skills & Sew,Mama,Sew! Blog Tasia from Sewaholic and Sewaholic Patterns wows us with her incredible style and sewing skills. Her blog is one of our favorite daily reads! Have you seen all of the gorgeous versions of her Lonsdale Dress out there on Flickr, Pinterest and your favorite blogs, all sewn up this past summer? Tasia inspires, and teaches along the way too; she is a fabulous resource for sewing techniques and more on her blog. We asked for some of her favorite tips for essential sewing skills and she shares them here today. Enjoy! Hello, everyone! 1. Helpful Links: 2. 3. Some great posts on pressing: 4. Here’s a great list of seam finishes to get you started! 5. There are plenty of zipper tutorials out there, but here are some great ones: 6. 7. « Hooded Tunic Tutorial Announcing: October Holiday Sew-Alongs + Giveaways »
How to Make a Fork Bracelet I've always loved taking everyday items and making them into something interesting. Ever since I was a little crafty kid I loved devouring books that taught me how to make little dolls from clothespins, beads from rolled up magazines, and little fairy ornaments from wire and fake flower petals. The first time I saw my friend wearing a bracelet made from a fork a few years ago, I knew I had to try it (*ahem Carly ;)). (Please excuse my intro, if you can't hustle your website on your Youtube channel, where else are you supposed to do it? What you need:♥ A fork. I think these forks are the easiest to use, and I've used a lot of different forks. :)♥ Pliers, 3 pairs. 1 jewelry pair, 1 regular pair or needle nose, and an adjustable wrench.♥ Piece of thick fabric like denim or corduroy.♥ Strong hands. I've always really liked layering bracelets. The other wrist. Forks and wolves go together, right? They definitely go with feathers. If anyone needs help, just leave a comment. :)
Clear Toy Storage Bags (with drawstring closure) Why do kids like toys with so many itty bitty little pieces? I guess it increases the fun factor. Tiny brushes. Tiny shoes. Tiny tea pot sets. So that’s what I did. I made a clear vinyl cinched-up pouch……that she can easily tote around with her little rubber-clothed dolls inside. No more anxiety, wondering where all the little pieces of your children’s toys will go. Just bag it up and make it fun for them to put all their pieces back into their special bag. See? Now, just imagine a whole collection of these……filled with all sorts of things. A perfect way to keep things organized. Would you like to customize your own clear toy storage bags? Supplies: Main Fabric (The amount you need will depend on the size bag you make…….make your calculations below to decide how much you’ll need)Thicker Clear Vinyl (At Joann’s, I bought 17 gauge vinyl I think. First, choose what size bag you want. Bottom Circle Piece: whatever size you want your circle to be Turn the tube right side out. Now you’re all set.
Jewellery T-shirt to Toddler Dress Tutorial | All That Is Good Last winter I made my first forays into refashioning cast offs into clothes for my daughter. I posted about it in “Rags to Riches, the tale of a favorite t-shirt” . Several of you were interested in a more detailed how-to of that little project, so here we go… Remember! Step 1 – your pattern.When sewing for Claire, I choose a favorite article of clothing she already has (perhaps something she’s growing out of and we know we’re gonna miss) to be my pattern. Step 2 – your cloth.The whole fun of this kind of project is taking something old and making something useful out of it again. Step 3 – cutting out. Front and back views of the waist seam and gathers Step 4 – Waist seamGather the top edges of the skirt to fit the bodice. With this dress, the arm holes extend partly beyond the tiny yoke, so I made a little angled cut into the sides of the skirt to make sure my arm hole was big enough for the sleeves. Step 6 – SleevesLast step! Sew the armholes, trim your threads, and you’re done!
pieced jersey pants for celebrate the boy! It’s that time of year, y’all… time to Celebrate the Boy! Can I tell you a secret? I think this is my favorite series in blogland. Dana and Rae are geniuses! Since I always kind of saw myself as a ‘girl mom,’ I’m much more comfortable making dresses and accessories and goodies for GIRLS (just ask my sister/sister-in-law who receive way. too. many. dresses for my nieces). Which brings us to today’s tutorial! And I love the way they turned out! To make a pair of pieced pants for a little man in your life, you’ll need:-a pile of thriftstore bound t-shirts (when they’re pieced together, the rectangle they make is just short of a yard)-fabric pen -sewing machine and sewing supplies 1. 2. 3. 4. 5. 6. 7. 8. 9. Thanks for joining us to Celebrate Boys! While you’re here, want to check out a few other fabulous boy projects? 1- Burke and his friends LOVE his hanging tent! Cheers, friends!
Wearable Blanket for Baby The weather outside is really chilly here in Colorado. And the heater has been inching upward. And we’re in a basement……so it’s extra cold. The two bigger kiddos keep their blankets on…..but our littlest one (who turned 8 months old yesterday) wiggles and turns and flops all night long. I’m sure you have seen those little zippered blankets in the stores. Well, you know me, I am always trying to save a few bucks and make something myself. (okay, let’s be honest……even if I don’t save a few bucks, I still like to figure things out and make things I see in the store. And since I want to make several of these (so that one can take a turn in the wash), it actually saves me some money by just making them myself. It adds a nice layer of warmth over some jammies (yeah, that’s just a long sleeved onesie……but generally I put this on over fleece jammies). Since it’s fleece……it’s nice and warm yet soft. And because she’s so warm and comfortable, she wakes up less. Supplies Needed: (Need help with snaps?
Free Diaper Bag Pattern with Complete Instructions Use this diaper bag pattern to sew your own perfect diaper bag! Use fabrics you love and add as many or as few pockets to create you own ultimate carry-all. These basic instructions will help guide you in creating a very sturdy and cute bag. Increase or decrease dimensions to find the size that suits you. You might also like the Free Detour Diaper Bag Pattern that is a bit more advanced, but the pattern is very complete. The instructions and example shown is for a medium to large sized diaper bag with several extra pockets for sippy cups, mama's water bottle, keys, wallet, cell phone, etc. Click here to download the body pattern pdf shown above and here to download the pocket examples pdf if you would like to print the these out. Diaper Bag Pattern Instructions: Wash & Cut - Pre-wash your fabric since you will want to be able to wash your diaper bag and you'll need to allow for shrinkage before you cut. Press edges down and then position and pin zipper behind the window and then sew.