
DIY Entry #36: Toggle Necklace Happy Thanksgiving everyone! I hope that no matter where you are or whether or not you celebrate the holiday that you are having a wonderful day! Amanda sent us a gorgeous DIY toggle necklace, which would be perfect for a bridesmaid gift! You will need: - chain (14″-16″ depending on how long you prefer) - crystal bead - rings (those tiny metal circles used in jewelry) - wire (for wrapping the bead, but you can also use a ring instead)) - toggle clasp - jewelry pliers Cut the chain in 2 pieces (one that is 1.75″ long and other 15″ long) With the help of pliers, open up the ring and connect the long chain and one piece of the toggle.
On the Cheap: Scrapbook Paper iPhone Covers I found this clever trick on Pinterest the other week from Oops I Craft My Pants and had to try it for myself: iPhone covers using scrapbook paper! Now when I had my first cell phone in high school (the old Nokia), I probably had about 15 different cell phone covers that I would switch out to match my clothes everyday! I figure this scrapbook paper iPhone phone cover is an easy way to update my phone without spending all the cash! First thing I did was purchase a couple sheets of scrapbook paper from Michael’s. I also purchased a clear iPhone 4 cover from Best Buy. First thing I did was trace the scrapbook paper around the iPhone cover to get the basic shape. I cut out the main section just using a pair of scissors. For the camera hole I used a pencil to sketch in the hole that I had to cut out using an exacto knife…. and that’s about it! I’m really digging these fabric scrapbook pages! Oh, and that iPhone cover below? This is also a great way to get festive for the holidays!
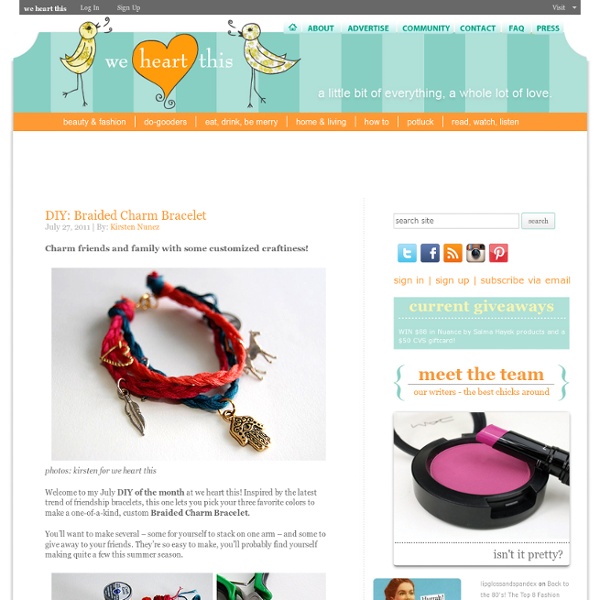
Joyful braided bracelet tutorial So I wrote this post 2 weeks ago but I’ve been trying to think of a way to make tutorials easier for me and for you, that’s why I had it on hold. And this weekend the idea came to me! I made a techniques and parts-of-tutorials-I-use-often page, so that way I can refer to them instead of making that part of the tutorial each time. I love bracelets and I am always looking for bright colors and unique looking bracelets, so last time I visited Joann’s I bought 6/8″ ribbon ends and lobster clasps to make fabric bracelets. I also wanted to share that this tutorial is for very light-weight fabrics, since I didn’t have much of it, I could not just roll 4 big pieces and make the braid, instead I made little straps and run pieces of cord on the inside to give them volume. First I cut 2″ wide of my fabric. After that I folded the traps with the wrong side of the fabric facing out and sewed them, you can see the details of how to turn the straps inside out here
Triple Stud Ring – a little tough, a little sweet, a lot cool We’re so excited to continue to add to our amazing crew of writers at we heart this. Today, we want to give a big welcome to Kirsten, who will be sharing her crafty ways with the lucky wht readers every month. A fan of vintage everything (but especially shoes) with a love of art, music, beauty, fashion, she’s a wht chick after our own hearts! And make sure to check Kirsten’s blog, Studs and Pearls for tons of inspirational photographs, musical fun and loads more tutorials. ~ wht As many of you creative ladies know, studs and multi-finger rings are some of the most well loved fashion trends right now. My love of studs and my love of jewelry making crossed paths (along with inspiration from high end, designer multi-finger rings) – and the triple stud ring was born. all photos: kirsten for we heart this Supplies: • Glue gun (or an industrial strength glue such as E6000) • 3 pyramid studs • Jewelry pliers • 2 adjustable rings** ** Any kind of adjustable ring blank will do. Instructions:
Amazing Glaze: Pet Tag Memory Pendants & Other Decal Charms My Decal Penny Pendants project has become one of the all-time most popular posts on JSIM. To extend that project a bit further, I thought creating pet memory pendant charms would be really lovely. I still had our late dogs’ tags tucked even after 10 years, I guess you just don’t throw those sweet little things away. Based on the instructions of the Decal Penny Pendant project HERE, I made various charms today. using keywords such as: vintage decals, Meyercord decals, flower decals, water-slide decals, etc. I keep a tiny salt spoon handy to use with my Amazing Glaze Enameling Resin, which also comes in bulk. And this one in memory of Annie. I think these would make such thoughtful gifts for someone who has lost a pet. I also had some vintage tool-check tags picked up at flea markets which also made pretty pendant charms. You can color the stamped areas by spray-painting the tag and later sanding away the surface, leaving the color within the stamped numbers and letters. Share
Tiny Polaroid Magnets | { Ambrosia Girl } Hi there! It’s felt like forever since I’ve last blogged, and has felt like an eternity since I’ve done anything crafty and nifty. Since my morning sickness has gone into full speed (yes, we’re expecting our third this fall!) I haven’t felt like myself. But nothing like inspiration to wake one out of a reverie — or nightmare, in my constantly sick state. I came across these DIY Pantone chip magnets on How About Orange and wanted to do something similar. You will need: Cardboard (mine was the backing of a sketchbook — much thicker than the back of a regular spiral bound notebook) or 2-3 sheets of white cardstock or poster board spray-mounted together to use as a sturdy backing to the magnetsOpaque white marker (necessary only if your cardboard is not white) Craft knife Metal straight edge/ruler Clear packing tape or frisk film. Step 1: Download a Photoshop file of the Polaroid frames below. Step 2: Print out photos onto photo paper. Step 4: Trim out photos with craft knife. 487 Comments
Country Living Shrinky Dinks Jewelry I’ve been beyond excited about the new March issue of Country Living magazine coming out this week! I, along with three other DIY bloggers, was asked to share a craft project with their readers. (Uhhm, twist my arm!) If you are a new visitor of JSIM, Welcome! They favored a past Shrinky Dinks project I posted on my blog so I created a special craft just for the March issue and included free digital images for you to download from the Country Living website. The images are modified scans of vintage flea market ephemera I’ve collected, most of which I’ve shared with you on my blog. Once the images are downloaded , (don’t worry that they look faded, they will burst with color once baked), print to 8 x 10″ Shrinky Dinks sheets made specifically for ink jet printers. Trim out the individual pieces. If creating a linking bracelet, punch two holes- one on each side of the images you want to link. Bake as directed to shrink the images. Finish with a toggle or clasp. An ID card. Share
Re-purposing: Tshirts into 5-strand-braided-headbands I was walking through Target a few weeks ago and noticed this little knit fabric headband that was not just braided together…….but woven. I decided they were charging way too much for something that could be made with t-shirt scraps. And that means free. So there you have it. (Or you may need one for working out. I kinda love it on my little girl . She always has little hair fly-aways that get into her face…….and this helps with that problem. It even works great with her hair down…..and keeps that hair tucked behind her ears. And yep, good for me too. Thanks little t-shirt scraps. Want to make your own? First, find some old t-shirts. Then, cut your fabric into long strips. Next, stack your 5 strips on top of each other and sew together at one end. Now, pull on each strip of fabric so that they kind of curl on the edges. Now, to create this 5 strand braid……..you’ll kind of be braiding on the left side and then braiding on the right. But let me explain a little better. And that’s it.
Easy Button Earrings Tutorial Did you know...that you can make new earrings with a button and a paperclip? True story! I've been trying to think of a way for us to make some earrings without having to buy supplies. Buying the beads and all the findings can really add up. :o( Sad. But-oh, what? That still leaves the findings. Clip the top of the paperclip off with wire cutters: Snap off the button shanks: Glue the paperclip to the back of the button. Open the loop at the bottom of your earring hook by bending it outward and hook it onto your paper clip. And...pretty new earrings! Walmart was out of gold sparkly ones (I like gold.) but here are some cute ones I found on Walmart.com(about $1-$2): And some cute ones on Etsy: This Etsy shop has infinity cute buttons, you have to see it. (click photos to see where to buy them!) Of course, you may have some on hand just waiting to use! Hope you enjoy. Have a great Sunday! Have a great Monday!! Love you, Disney