
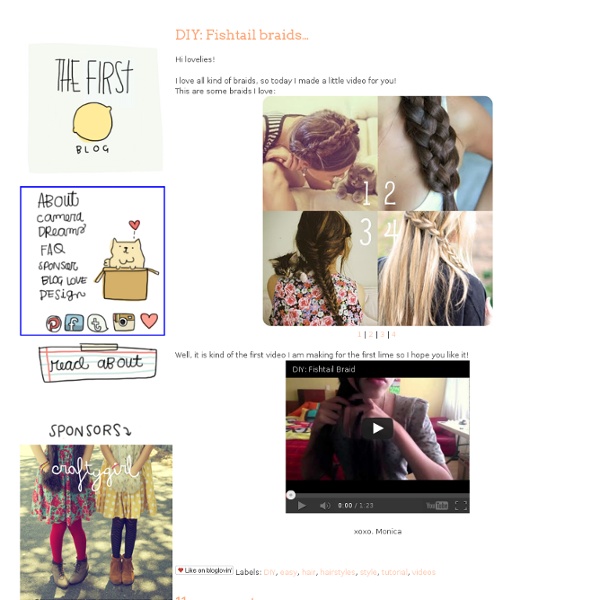
things we make, bake and photograph: DIY fun: Pretty, pretty hair Lindi took these photos of her newly discovered pretty hairstyle, and I immediately said, 'We have to put this on the blog!' So, here's Lindi, explaining how to do this sweet and easy hairstyle yourself. I have been looking for an alternative to the ponytail for a while. When it comes to managing dirty hair on those mornings I don't want to immediately hop into the shower, I still want to look presentable if someone stops by. This style is really easy and works best with slightly texturized hair. I used a dry shampoo (we just have the store brand) at the roots after running a brush through my hair. After that, I made a deep side part and separated a small chunk of hair near my forehead on each side. Once I had secured the twists with hairpins, I took the braids and twisted them over and around the buns.
Bridal Hair: Vintage Waves Oh I do love vintage waves for special occasions…especially weddings! {I’d wear my hair Rita Hayworth style everyday if my hair could handle it!} A bride with glossy, vintage waves just screams Hollywood glamour. No prizes for guessing what hairstyle I went for on my wedding day! For the past few years, celebrities have really embraced vintage curls and waves on the red carpet. I personally feel that this style is so dramatic that it’s best to keep hair accessories simple ~ no big statement pieces. Birdcage or Mantilla veils would hide those beautiful, defined curls around the face so I’d go for a flyaway, pouffy veil or longer chapel veil ~ if any. The image below was in my inspiration folder when I was planning my own wedding ~ I think this model bride looks absolutely stunning in her Louise Selby vintage esque, slim fitting, lace dress with her soft waves styled to perfection by Sev of Hepburn Collection. Onto the tutorial… {Tutorial images via The Beauty Department}
Obsession : Ombre Hair (with DIY) I'm currently seeing Ombre Hair everywhere on the web. The trend has not come to my country yet, so I've never seen it in person, but I really think I'm going to give it a try. Do you have Ombre hair, or are you going to try it, or do you hate this trend? Tips & Tricks: How to Grow Out your Hair I know it sounds pretty strange, because hair-growing is pretty much a built-in function for most humans. But what I really meant was that if you ever made the decision to go Claire Danes/Michelle Williams/post-Harry Potter Emma Watson, and you’re thinking of growing it out again, here’s an illustrated guide that will make the transition less like an awkward year book photo that goes on FOREVER. Also, I’m against hipster beanies (unless they have pandas on them but those folks will never truly get pandas), so this is *really* a selfish hair tip. {Drawing by Kim Pertinent. P.S.
Naptural85's Channel HD ME!! I'm in 1080!My 25 Minute CoWash and Detangle Routine, from Start to Finish, in UNDER 25 Minutes! XoXo!! My Favorite Unrefined Coconut Oil Here! How-To: The Cascade/Waterfall Braid - StumbleUpon The waterfall braid also known as the cascade braid recently exploded as the new "trend braid" of the season. The waterfall effect looks cool and complex, but it's easier to style than you think. Give this beautiful braid a try when Beautylish takes you through the how-to! Section Off The waterfall braid works best on straight or loose waves. Braid As Usual Braid your strands regularly three times, beginning from the right strand. Drop the Strand This is where it gets tricky. Step and Repeat Repeat this process—French braid the left strand, drop the right strand, and pick up an adjacent new piece. Pin and Secure Once you've reached a comfortable point to stop your braid, secure it to your scalp with bobby pins. Fishtail It! Braid the remaining piece of hair left from your cascade into a fishtail braid. Accessorize Add a cute bow or flower to hide your bobby pins and give this look some extra hair flair.
A Lady's Imagination: Easy DIY Hairstyles I love these pictures that show step-by-step how to do some hairstyles, so through time I've collected a few of them and I want to share with you. I don't think they are the most flattering hairstyles around (vintage looks are prettier), but they are more to add a nice touch in you common everyday look. Hope it's useful to everyone! I still have to try most of it... But I'm pretty sure it'll work. Have fun! How To Style Maiden Braids - A Beautiful Mess - StumbleUpon Last month I did a makeover story with Kelsie and had many requests for a maiden braid tutorial. Yesterday she came in and we photographed these simple step by steps. Kelsie has extremely long and thick hair, but anyone with shoulder length or longer can do these braids (see my photo below for an example). Steps 1-2: Braid two strands on each side of a center part. Steps 3-5: Wrap braids around the crown of your head and pin in place with one pin each. Step 6: Arrange braids so that they cover the front of your head like a headband. Steps 7-8: Pull the rest of the hair into a ponytail and pin it into a cute messy bun. Step 9: Add final pins and spray.
GUEST POST - thebeautydepartment.com - StumbleUpon photos by: Kathleen Bly post designed by kristin ess Mad love for our first guest post winner, Taylor Nick!!! I am fully obsessed with this bohemian-inspired-braided-goodness! Even though Taylor had some SERIOUS competition, there’s no doubt that this little lady took the cake in our hair tutorial contest. She created a beautiful, textured, easy hairstyle that will work with almost any hair type. Congratulations Taylor, and thanks to ALL of you who entered this post contest. Xx Kristin “My look is inspired by all of the bohemian braids on the 2011 runways. Tools: 2 Claw clipsBobby PinsHair tie, preferably matching your hair colorFine tooth combHairspray Steps: 1. 2. 3. 4. 5. 6. 7. 8. XO Taylor Tags: congrats, congratulations, contest, hair, kristin ess, lauren conrad, taylor nick, the beauty department, thebeautydepartment.com, tutorial, tutorial contest, win, winner Related posts:
How To Use A Sock To Get Beautiful Curly Hair Without Heat | A Spotted Pony - StumbleUpon If you are a mom on the go with long hair you HAVE TO try this. It will knock your socks off and have you wrapping your hair up in them! This is all about how to make your hair beautiful with no heat and no time. Yup, you heard me right. I was on Pinterest a while back and spotted this post about the sock bun which links you to her video on YouTube. Why? Because: It literally takes a minute to doNO heat at all – just a soft little sock in your hairNo product (for me anyway)You can sleep in it very comfortablyIt works Marvelously and is simple beautiful This is the sock bun before and after of my hair. Here are the step by step instructions on how to make this work. First steal a sock from your husband’s dress sock collection (that is what I did anyway). Now roll the sock into a ring. Put your dry hair into a high ponytail. Now spritz just the hair in your ponytail with water. Now grab your rolled up sock and put your ponytail through the hole. This is my new go-to styling technique.