
Heart Jeans D.I.Y. If you haven'tnoticed, I have a bit of an obsession with hearts. I even designed a pair of high waisted jeans with hearts on the knees recently. This got me thinking... it would be super fun (and easy) to add hearts to the knees of almost any pair or jeans! I'm enjoying gathering new pieces for my fall and winter wardrobe, including a few DIY pieces like these jeans. I'll share how I printed mine below... Outfit Details: Jeans c/o Levi's, Blouse c/o ModCloth, Shoes/Jeffrey Campbell, Necklace/My design for ModCloth. Here's how I hand printed the hearts on my jeans... 1. How To Mix Chalkboard Paint in Any Color We love using chalkboards as backdrops for displays and parties (like this one here!). So we were super excited to learn that you can create your own custom colors-and it's really easy! We first learned how from Martha Stewart whose tutorial you can read here. She recommends that you use latex paint, but we tried it out with acrylic paints with much success. Supplies: 1/2 cup acrylic paint (choose any color you like, or mix colors together to make the perfect shade!) 1. 2. Once your chalkboard has fully dried be sure to slate the surface before using it for the first time. Have fun creating any color combination you like!!
DIY suede and gold leaf business card holder | Lovely Indeed I can’t stop looking at this gilded, magical thing. Seriously. I made it, set it on my desk for a few days to see how it held up, and couldn’t stop saying to Mr. Lovely, “Look at this thing!!” That’s how much I love this little business card holder. For starters, gather your materials: Martha Stewart’s business card templatea piece of suede that’s at least 7×7 inchespenscissorsleather punchModPodgetwo paintbrushestweezersgold leafbutton-stud (found mine at a leather store; any trimming or craft store would also probably have them) Print out the template, cut it out, and trace it lightly onto your suede. Cut out the suede and punch holes in the designated corners. Next, lay down a layer of ModPodge. Working quickly, use the tweezers to set down a piece of gold leaf. Allow the glue to dry completely, and fold the holder into its intended shape. Boom! Now. Update: We have a winner!
DIY jr: Mod Flower Hairpiece hi there! i'm excited to share a cute & simple Do-it-yourself project with you tonight! Here is a set of mod flower patterns that you can print and use as a template... Download Mod Flowers step 1: print and cut out some cute blooms. step 2: stitch on a large button using embroidery floss. step 3: use super glue to adhere a hair clip to the back of your bloom. :) this project is easy and so cute! i hope your Saturday was wonderful!
Easy and Unique DIY VasesInspiring Pretty Everyone loves vases, but it’s difficult to find one that is unique and not the same old run of the mill vase you’ve seen 1000 times before. As the most prominent centerpiece, you always want a vase to be special, just like the rest of your decor. Whether it is empty, holding flower, a candle pebbles or anything else, a vase can be boring or the perfect accent you’ve been looking for. This lovely vase is simple and its beauty is its simplicity. For this cozy yet stylish vase, pick up some clear craft glue and yearn and collect a few pop bottles, beer or wine bottles. For some true vintage charm, these are the way to go. courtesy of sjarmerende-gjenbruk.blogspot.com This is simple, whimsical and somehow elegant. For this ornate design, either buy punch paper or create your own with sturdy poster board paper, stock paper, card paper, construction paper or something else you know of. courtesy of witandwhistle.com For those who want light, but don’t want fire, this is the vase for you.
28 ready for a new DIY that’s perfect for winter? dress up your iPads with a sweater from your own closet! shop vintage or maybe you already shrunk a sweater you love? time to use it in another way… what you’ll need: • sweater made of wool or with at least 50% wool content • piece of heavy drawing paper • ruler • pencil • scissors • pins • yarn • yarn needle • toggle button • iron with steam setting what to do: • lay the smaller piece on top of your longer piece with the right sides facing in. align at the bottom and pin together. • this step is optional, but we find it helpful to use a ruler to lightly draw a line around the three edges to be sewn 1/2 inch from the edge with a marking pen on both pieces. that way when you’re stitching it’s easier to maintain a straight line. • using yarn and a yarn needle and starting in the top right corner stitch along the side, bottom and the other side 1/2 inch from the edge using 1/2 inch length stitches. presto!
10 Ways to Make a Garland I love pretty garlands and buntings! They are a great way to decorate for a party or spruce up your home with a little seasonal magic. I've gathered up my top ten favorite ways to make garlands in this post... enjoy! Here are a few details about these pretty garlands... 1. Follow this simple photo tutorial to make a pretty yarn pom pom. by Clover. To make a mini paper pom pom, or flower, follow this simple photo tutorial. I hope you've gathered a few fun ideas for your next party or celebration! How to Make Clothing Buttons from Shrink Plastic... This tutorial is an old one of mine that’s too good not to share again. Since posting the first time, I’ve had lots of questions about these buttons which will hopefully be answered in this revised post. Equipment Some handy notes: 1. single hole, hole punch (like this one here). 2. 3. Okay.. lets get started! Tracing tips: You can use either coloured pencils or permanent pens. Words must be writted backwards in order to be readable. Shrinking the buttons: To shrink the buttons, you can use an oven or a heat gun (the kind used for embellishing). After the buttons have twisted and twirled, and are LYING FLAT, it’s time to take them out. Note: If the skrinking is taking too long, you may need to turn your oven up. Here’s a short little stop-motion to make sure you’ve got the gist of how easy this is! Shrink Paper {here} Circle Punch {here} Hole punch {here} Pens {here} Update: I’ve made a video to show how to shrink the buttons using a craft embellishment heat gun. Kimanh Hi my name's Kimanh.
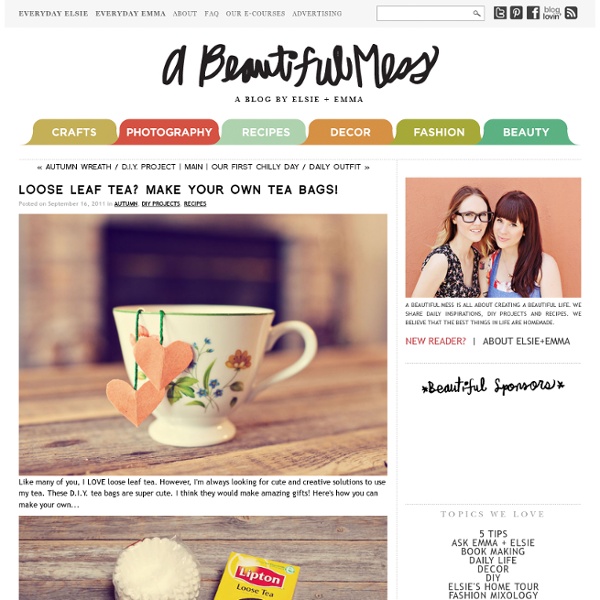
How to Make Tea Cup Candles Skip to Content October 19, 2011 How to Make Tea Cup Candles Almost two years ago now we took our first try at making Soy candles in baby food jars. Today we will take it a step further by making soy candles in beautiful and unique tea cups. Find out how to make tea cup candles after the jump… Depending on where you go tea cups can be very expensive. There are two options when starting to make candles. Hot glue your wicks to the bottom of the cups. I did not have a double boiler so I made my own homemade one. Gradually melt the wax, adjusting the stove temperature if needed. Melt the wax until it reaches the temperature specified on the bag. Allow the wax to cool to 135-140 degrees Fahrenheit (or lower depending on the wax you use). Wait for the wax to cool and cut the wick down to about 1/4 inch. They would also look great at baby showers, tea parties or even just a little extra light when you are enjoying your favorite book. Posted By Colleen | 9 Comments Share: Tweet Share 9 comments [ Reply ]
Make Your Own Red Saddle Shoes We had the best time making these red saddle shoes. I've been wanting a red pair for years, so this was the perfect opportunity to try it out! Here's what we did... 1. Have a wonderful weekend! Perfect Summer Bangle Here's a fun tutorial on how to make a message bangle that's one-of-a-kind, done in the sun, waterproof and weatherproof. Even after several trips to the beach, it won't fade or wash off! Essentially, it's the Perfect Summer Bangle. Used in this tutorial: Inkodye Red Prepare. Transcribe. Perfect. Pour. Brush. Wipe. Wrap. Tape. Expose. Develop. Cut. Reveal. Wash. Enjoy.
How to Make a Wine Gift Bag Oh wine, how I love thee. And how I love the anthropologie-rumpled look of this cotton-linen blend Heather Ross fabric for a gift like this. I imagine toting it to the park for a picnic where all the ladies are wearing forties-inpired high heels while casually sipping Malbec as the sun sets. Or you know, a last minute dinner party gift, maybe with a few pretty wine glasses. Learn How to Sew a Wine Bag after the jump… And remember to leave a comment, because our favorite commenter is winning that super cute key fob set! Isn’t this fabric so amazing? to your project. Let’s start by making the strap. Then fold the whole thing in half (so the unfinished edges are enclosed in the fold) and iron again: Sew the open edge with a straight stitch: Then sew the opposite edge with a straight stitch: On the sides of the strap, sew with a zig zag to finished the edges and keep them from unravelling: Now let’s make the bag. Then sew one short side closed and finish the edge: Sew across the lines you drew:
Magnetic Spice Storage: Weekend Project Today we wanted to share a cute idea for organizing your kitchen spices. With every new recipe we end up collecting a new spice or two. Having all these options available is perfect for adventurous cooking but it can leave your kitchen cabinets looking cluttered! We decided to make our new spice storage magnetic so it could adhere to the side of a refrigerator, and we found these cute clear containers so you can easily see how much of each spice you have on hand. Here's a before + after comparison. Step 1: Trace your container (we got ours here) onto a sheet of magnetic paper.