Wiggle It Crochet Trivet and Dishcloth Set
What goes around comes around, and wiggly crochet is definitely coming around again! It’s popping up on Pinterest and Ravelry, in rugs and afghan squares. Usually worked in squares and rectangles, with a base mesh and ruffles worked on top, it’s got a great 3D big pop look. I found a great way to get the wiggly crochet look, but in the round! The trivet and dishcloth are essentially the same pattern; the trivet just keeps getting bigger! Add this pattern to your Ravelry QueueThe Base Mesh is made all in one color, but then each round of ruffles is added separately – make them all the same color, alternate two colors, make each one different… it’s up to you! US – G, 4.00mm hookWorsted weight kitchen cotton, in 2 – 9 colors (small amounts on up to 90 yds for base of trivet)Dishcloth: 5.5″ finished diameterTrivet: 11″ finished diameterClick HERE for the Video Tutorial! Base Mesh Instructions: Round 1: Make a magic circle, and sc 6 times in the ring. Round 3: Ch 4, dc in the same ch sp.
Les récrées de fabjan
modèles crochet gratuits : Tous les messages sur modèles crochet gratuits
Défi Snood Vanille fraise chocolat - dernière étape Bonjour à toutes, Voici la dernière étape : Sur la partie 3, faire un rang de mailles coulées en rose entre les 2 premiers rangs (comme vous avez fait sur la 2eme partie) Une fois que vos 3 parties sont finies : - les tresser très lâchement, il ne faut pas que ce soit raide, juste que cela les mélange entre elles. - coudre les extrémités ensembles (le début et la fin de la même bande) avec les fils qui restent à chaque extrémité - rentrer les fils restants. - Puis, enfiler le snood en faisant 2 tours et prendre une photo pour nous le montrer ! Et voila, un autre défi terminé ! A plus tard, Amicalement, Sophie www.crochet-laine-et-tricot.com Défi Snood Vanille fraise chocolat - 3ème partie - suite Vous êtes toutes rentrées de vacances ? Voici la suite : avec la couleur beige (la même couleur que le R2) faire : 1MS, *12 Mch, 1MS dans la maille suivante* répéter tout le rang. Si ça se tortille au fur et à mesure, c'est normal. Qui met la 1ère photo ?
Rectangular, 2 color, never ending granny square! | crochetjim
I have been making some granny square blankets recently. I had seen Mikey’s pattern for the never ending granny square but his pattern required an odd number of strands. I wanted to use 2 colors. I figured out how to modify Mikey’s pattern to use 2 colors and finished my first blanket, adding in a third color towards the outside. I realized that the regular square granny square wasn’t ideal for a blanket. When you got the blanket long enough it was too wide. Once I had my rectangular granny square pattern I took a look online for other rectangular patterns to compare. So here is how I made it. This pattern starts with a chain. For example the picture above I chained 8 (4×2) then added 2 for a total of 10. The total length of the chain is important too. Here is my chain: Here I have chained 12 (4×3) then added 2. Make a half-double crochet into stitch 11 (correction - 4 stitches from the hook). Continue this pattern down the chain. Then chain 2 and TURN. Like this: Like Loading...
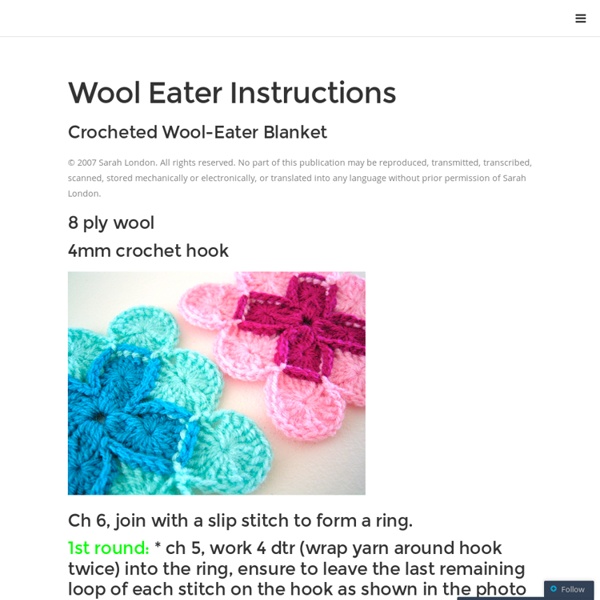
Crocheted potholder | Free patterns
Crochet potholders, you can use the remainder of yarn. 1 Round- crochet 9 Chain Stich, Make a ring. 2 Round — 18 crochet stitch : 3 Round — Create nine petals. — *23 Chain Stich, 1 Sleep Stich, 1 Crochet Stich* : 4 Round — Each petal — 25 Crochet Stich : 5 Round — Each petal — *12 Crochet Stich, 3 Crochet Stich from the central Stich, 12 Crochet Stich* : 6 Round (Yarn orange) — Each petal — *13 Crochet Stich, 3 Crochet Stich from the central Stich, 13 Crochet Stich* : 7 Round (Yarn orange) — Each petal — *14 Crochet Stich, 3 Crochet Stich from the central Stich, 14 Crochet Stich* : 8 Round (Yarn light orange color) — Each petal — *15 Crochet Stich, 3 Crochet Stich from the central Stich, 15 Crochet Stich* 9 Round (Yarn light orange color) — Each petal — *16 Crochet Stich, 3 Crochet Stich from the central Stich, 16 Crochet Stich* 10 Round (Yarn purple) -Turn the work. 11 Round - 8Crochet Stich, *8 Crochet Stich, 3 Crochet Stich from the central Stich, 8Crochet Stich*8 Crochet Stich
Petite sittelle | Tricot, crochet, modèles, points et autres bricoles…
Modèles pour Bébé au Crochet - Partage de modèles gratuits , trouvés sur le net . Tout l'univers de bébé autour des layettes , des bonnets , des chaussons , des robes , des modèles pour filles .... Bon crochet et excellente journée à toutes !
Crochet Stitch: Playblocks
Click here to zoom (colors A, B, C, D, E, F, and G) Stripe Sequence2 rows A, 2B, 2C, 2A, 2D, 2E, 2F, 2G FPtr (Front Post treble)Yo twice and insert hook from front to back to front around post of stitch two rows below (first row of previous color), yo and draw up a lp, [yo and draw through 2 lps on hook] 3 times. (ch a multiple of 10 sts + 12) Row 1 With A, 1 dc in 5th ch from hook and in each ch across. Rep rows 2–5, continuing stripe sequence. Stitch directions reproduced with permission, from Vogue Knitting Stitchionary: Volume Four, Sixth & Spring Books, 2007
Mitered Granny Square | Crochet Again
Update: I now have a diagram for this.Update: Link to Sliding ring tutorial, if you would like to start your squares the way I do.Update: Link to Join As You Go tutorial, if you would like to check out how I like to join granny squares. These are the directions for the blanket I first showed in the Crochet in Progress post, here is a better photo (the colors look a bit washed out, the sun was bright): And a closer look, remember it is posed on a chair, instead of lying flat so the squares look less than square. I’m sure that there are variations of this kind of square out there. Here is another one I did, I really like the off centered square, definately going to make something with these! Ok, back to the subject at hand…these are easy to do and have many possibilities with different color combinations. Start with a basic Granny Square Round 1 Round 2 Ch3, in the next chain 3 space {3dc, ch3, 3dc} {3dc, ch3, 3dc} in the next 2 ch3 spaces. Now, the Mitered Part 3dc in next space. Like this:
du tricot et des jouets