Book Bag & Apple Cozy
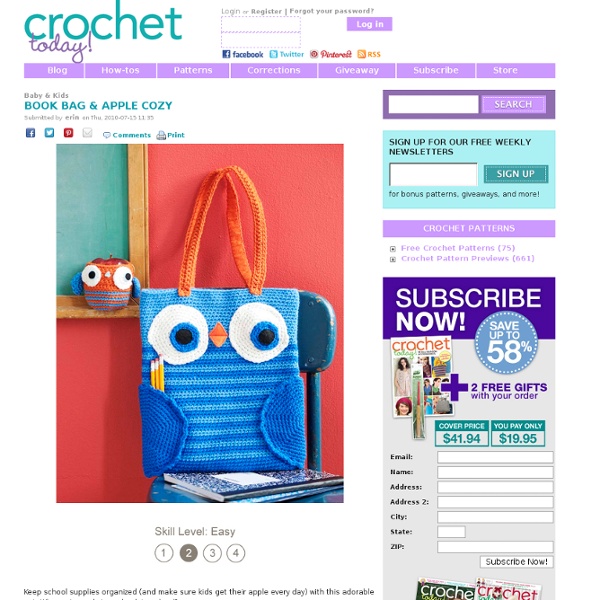
Keep school supplies organized (and make sure kids get their apple every day) with this adorable set. Whoooo’s ready to go back to school? By Ana Paula Rimoli YARNRED HEART Super Saver, 7oz/198g skeins, each approx 364yd/333m (acrylic)• 1 skein #886 Blue (A)• 1 skein #885 Delft Blue (B)• 1 skein #316 Soft White (C)• 1 skein #256 Carrot (D) CROCHET HOOK• Size J/10 (6.0mm) crochet hook (for book bag) or any size to obtain correct gauge• Size G/6 (4.0mm) crochet hook (for apple cozy) or any size to obtain correct gauge NOTIONS• Felt: orange, black and light blue• 7/8"/2cm diameter button• Sewing thread: orange, black andlight blue• Sewing needle• Stitch marker• Yarn needle Note about patternsThis is a pattern preview only. Buy the issue and the supplies to make this pattern here!
Dachshund Amigurumi Crochet Pattern
Supplies One skein Red Heart Super Saver in Black Small amount of Red Heart Super Saver in Warm Brown Size F or G Crochet hook (depending on your tension) Polyfil or other type of stuffing Tapestry needle Small amounts of black and white felt Black embroidery floss and embroidery needle All parts of this pattern are worked in the round. Dachshund Body (in black) Row 1: Ch 2, 6sc in first ch. (6 sc) Row 2: 2sc in each st around. (12 sc) Row 3: *sc, 2sc in next st* around. (18 sc) Row 4: *sc in next 2 sts, 2sc in 3rd* around. (24 sc) Row 5: *sc in next 3 sts, 2sc in 4th* around. (30 sc) Row 6: *sc in next 4 sts, 2sc in 5th* around. (36 sc) Rows 7-40: sc around. (36 sc) Row 41: *sc in next 4 sts, sc2tog* around. (30 sc) Row 42: *sc in next 3 sts, sc2tog* around. (24 sc) Row 43: *sc in next 2 sts, sc2tog* around. (18 sc) Row 44: *sc, sc2tog* around. (12 sc) Row 45: sc2tog around. (6 sc) Finish off, weave tail through remaining stitches and pull closed. Dachshund Front Legs (Make Two) Dachshund’s Head
Wallet-to-Tote On the Go ~ Tutorial
Lorraine from ikat bag is a favorite around here… She has tons of fun tutorials on her blog and she’s joined us before with this wonderful Back to School Pencil Case tutorial. Today Lorraine shares a tutorial for a new summer essential, the On the Go Wallet-to-Tote! Construction includes three main parts: Assembling the Wallet, Assembling the Outer Bag and Making the Lining. From Lorraine: Hello, Everyone. These little bags have been around for as long as I can remember, and I thought they’d be a useful addition to the arsenal of summer gear I stash in my car and/or purse. I have three little girls, aged 3,4 and 6, and we’ve found that summer always takes us on adventures we hadn’t planned for– detours to farmer’s markets, dancing in the rain or treasure hunting en route to the park. We always appreciate an extra bag or two for our loot (and wet clothes)! Part One: Assemble the Wallet:You will need: Note: Please see Part Two & Part Three for a full list of supplies. The bag is completed!
Knitting Gallery - Kimberly Chapman's Knitting
When I found out I was pregnant in early 2005, I decided to try knitting some baby hats. I looked up free patterns online and didn't understand a single one of them, but they seemed to often use double-pointed needles. So I bought some, learned how to use them (see my double-pointed needle tutorial to learn how they work), and started experimenting with my own hat patterns. These are the two that were worth keeping, after many others that got pulled apart because they were wonky or badly sized. The yarn is Bernat CottonTots Confetti, which is by far the softest 100% cotton yarn I've found in craft stores. I didn't record a pattern as I made them. The one on the right was started wide in standard knit stitch, then reduced at a regular rate counting around the needles so it wouldn't form reduction lines (I think it was about every five stitches, but I can't remember exactly).
Related:
Related: