background preloader

Feeling geometric

Feeling geometric
Good evening! My hex nut jewellery has been neglected in the past few days, even weeks, but now I got back to it. I decided to make a very basic geometric form: 9 small brass hex nuts which are held together by small gold plated jump rings. It looks quite massive n the picture, but because it's the smallest size of hex nuts, it is actually quite discreet. I'm planning to add a little geometric collection to the shop, so maybe also some triangles and I'll see what else I can come up with. Aren't they just cute?

Shrinking Snowflake Necklace I made these for party favors for my daughter’s birthday, but I’ve been wearing one of them around myself so I don’t think this is just a kids’ project. But it does involve shrinky dinks! If you haven’t worked with shrinkable plastic before, you can buy it online or at your local craft store. Supplies: Shrinking plastic (frosted, not clear)Small, sharp scissorsSnowflake template (see link below)Mini hole punch (1/8″)Toaster ovenNecklace chain with jump ringPliers 1. 2. 3.

A long way to the top, part deux: DIY metal statement necklace Here it is! As promised, here's how I made my Chrysler Building inspired necklace. What you need: Some sort of pliable flat metal. Estimated time: 1 episode of Law and Order. More of the how-to after the jump! I created and cut out paper templates of the shapes I wanted to cut from the metal. Next, mark where you want to put the holes for the jump ring to connect the pieces. Use the file to remove sharp edges around the hole. Clean off the Sharpie marks with nail polish remover. I'm also imagining you could decorate the metal pieces with perforations and cut outs using a drill bit, smaller tin snips, and some dexterity.

Teeny Tiny Leather Spell Book Tutorial Was it just me that as a kid thought that the Macbeth Witches speech went as follows: Hubble Bubble Toilet Trouble? what a dufus hey! Ok finally got round to posting this in time for you to make a cute mini spell book for Halloween. What you'll need:Small piece of scrap Leather, the more wrinkled and aged the betterSmall scrap of Cardboard (Hard back of a notebook would do fine)1 piece of printer paperScrap of decorative Paper1 O RingGold Sharpie Pen (permanent marker)ScissorsHot Glue GunBull Dog clip/Bag clipNeedle (to punch a hole)Yellow Pages (to lean on) 1. 2. 3. 4. 5. 6. 7. 8. 9. 10. 11. 12. Hope this was worth the wait, an enormous 6 month pregnant belly and a grumpy Potty training Toddler has been slowing me down these days, oh and the foot is still in a cast but not for long.

DIY Chainmail Necklace You’ll need: Start by separating the jump rings into two halves: 175 open and 175 closed. Thread three closed jump rings onto an open jump ring. Close the ring. Keeping the rings in place with your forefinger and thumb, take an open jump ring and hook it through the front side of the two rings. Add 2 closed rings to the open ring and close. Spread the two rings apart in the same way as the first set of rings. Add 2 closed rings and close. To add an optional fourth row, lay the necklace flat and hook an open ring through first and second closed rings on the right side. I stopped at 4 rows but you can continue adding rows for a more bib-like necklace. Connect the two ends with a single jump ring or clasp. Fini! (top image from here, rest of images by HonestlyWTF)

Tassel Necklace There's probably no better time than the holidays to try your hand at a little do it yourself gift making. Don't let dwindling finances stop you from showing a little extra love towards your friends. Here's a simple accessory tutorial that could be used in many ways, and in many colors to suit your needs. Supplies: strip of leather chalk or white pencil heavy duty snips or leather scissors extra tacky glue clamp or elastic thrifted chain Cut your rectangle of leather to the size you require. Mark a chalk line approx 1" from the top of your leather piece. Snip an extra strip to use as a loop on the top of the tassel. Apply glue evenly above the chalk line. Start to roll your leather tightly. Secure tassel with a binder clip or a tightly wound elastic. If you'd like to add extra dimension, trim some of the fringes shorter than others. Using this simple technique, you can create both pendants, key chains, earnings, and charms to add to any bag or belt. love Jill

Anthropologie Inspired Gumball Necklace | That's What {Che} Said... I love browsing the Anthropologie site. Love it. It’s inspiring and eclectic and I want one of everything please! What I don’t love, the price tag! I came across their Gumball Necklace and fell in love. Here is my inspiration: Anthropologie Gumball Necklace in Purple/Gold and Brown/White (photos courtesy of Anthropologie website, click photo to be taken to site) Here is my version: Items Needed: (1) 1” round wooden craft ball(1) 3/4” round wooden craft ballpaint in two colors18” length chain5/64 drill bit with drillsuper gluescissors First off, I drilled holes in the wooden craft balls. A helpful hint: If you want to make sure you drill the hole deep enough or not too deep, wrap the drill bit in a piece of painters tape at the depth you are shooting for. Next I painted the wooden balls. Another Hint: to paint your wooden balls, put them on toothpicks then you can paint the whole sphere without smudging a side by laying it down! c

Color wheel pendant Yes, I have been making a lot of pendants lately. And this one makes me feel like a huge art nerd...I love it! I used that as my inspiration. But I actually put the colors in the correct order. What kind of art teacher could bear to wear an inaccurate color wheel necklace?! (Although I'm thinking about trying another version using a washer shape like the inspiration piece. Anyway, you want to make one? You'll need... wooden disc - mine's 1" drill & 1/16 drill bit craft paint - at least white, red, yellow, & blue tiny paint brush dot sticker masking tape dimensional magic jump ring chain or ribbon Drill a hole at the top of your disc, then paint it white and let it dry. Next, place your dot sticker (you can get them in the office supplies section) in the center of your disc. (The tape is mostly covering my dot, so it's hard to see in the pic.) Paint each section according to the color wheel below. Here's some color mixing tips in case your art education growing up wasn't up to par... Etc. Tada!
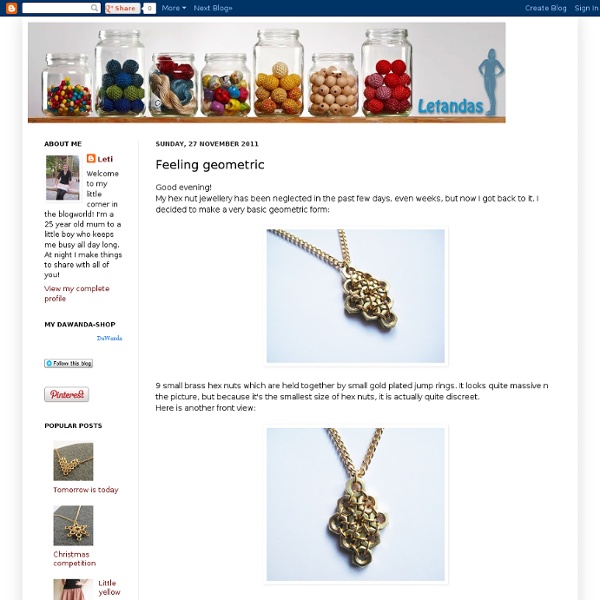
DIY Box Braid Necklace The moment we saw Phillip Lim‘s Box Braid Collar Necklace, we were immediately overcome with a wave of nostalgia. Our memories of a neon, plastic box braid lanyard was suddenly transformed into a sophisticated leather jewelry component. Honestly, brilliant! Inspired by our fondness of Lim’s necklace and our love of utilizing hardware, we made our own interpretation of a box braid necklace. Start by cutting the suede in 4 three-yard pieces. Repeat the box braid until you are ready to add washers to the necklace. Once the necklace is finished, trim the ends. Wear it as a necklace, wrap bracelet or even a headband! (top image via Ssense, rest of images by Honestly…WTF)

Hex Nut Pendant I bought a couple packs of hex nuts from the hardware store, hoping to make some of those bracelets I saw on Honestly WTF. See the DIY on those bracelets HERE. Instead, I made a pendant out of the hex nuts. You will need: hex nuts flat leather cord, or necklace chain link pliers jump rings Arrange the hex nuts in whatever shape you'd like your pendant to be. Using your pliers, connect each adjacent hex nut using some jewelry jump rings. I could have used a regular chain link, but chose to use a flat leather cord instead. covered bead necklace tutorial - reader submission I host a monthly crafting group at my home each month for my friends from church. Last month a friend was working on a copy of a gorgeous necklace she saw at Ann Taylor. She graciously offered to let me take pictures so we could share it with you (she knows me too well!). We'll just call it this week's reader submission. It's similar to the covered wooden bead bracelet we posted last summer, with a little twist. Covered Bead Necklace Tutorial Supplies*Chiffon or other fabric*Plastic or wooden beads*Needle and coordinating thread*Decorative beaded chain*Sewing machine (optional--you could hand sew!) 1. 2. 3. To wear, tie around your neck and be prepared to look like the most elegant, and craftiest, girl in the room!

Tutorial: Leather Chain Necklace | Cucumbersome I must really have a thing for soft, fabric jewelry. First, the t-shirt necklace, now this. I have been admiring these leather necklaces by Handle & Spout for quite some time. Can I use the “imitation is the sincerest form or flattery” line again?What you need: Leather piece – approximately 12″ x 12″(if you are in Vancouver, check out Dressew for cheap leather in various sizes. I got a 24″ x 24″ piece for $7) This template, printed out on heavy cardstock (The image is 300dpi, and when printed will be 3″ wide) Utility Knife (like an x-acto knife) Scissors Needle & thread (matching your leather)Instructions: After you have printed out this template on heavy cardstock, cut it out with your exacto knife. Now on the back side of the leather (the rough side) trace your template in pen, like so: Cut the shape out of the leather with scissors, making sure to cut just inside the pen marks so you don’t have any lines showing. Continue cutting out the leather shapes until you have a bunch.

Articles: DIY: Walnut Heart Necklace — By Johnie Gall — Foam Magazine Articles Erica and Lauren are a designer and stylist who always have our crafting fingers itching to recreate the fun and easy DIY projects posted on their blog, Honestly...WTF. For Valentine's Day, they volunteered to show us how to make an organic DIY gift you can give to anyone (or stash away for yourself!): "Happy Valentines Day! Did you know that if you cut into a walnut you get a perfect heart? What You'll Need: A walnut, drill with 2 drill bits, sharp kitchen knife, nail polish, and a necklace. How to Make It:1. 2. 3. 4. Check out the DIY Color-Block Moccasins Honestly WTF created just for Foam here.

Related: