
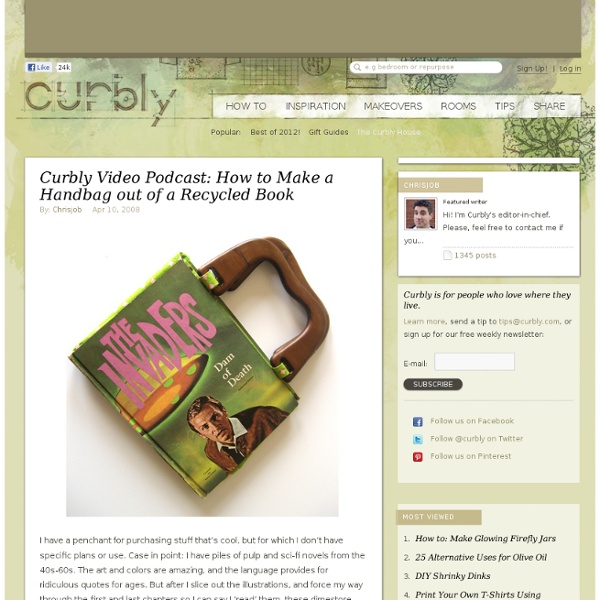
Tutorial: Shabby Chic Dangly Earring Display This fun little shabby chic earring stand, made from an altered picture frame, is a great way to hang and display all your beautiful, dangling earrings. I had the idea for this project after we talked about my love affair with dangly earrings and how to display them. I don’t know about you, but I just love seeing them all hanging in a row! The next day I made this earring frame, and it was so quick, easy, and inexpensive to put together, I knew I had to share it with you! Cost: Less than $10 Time: 30 mins Supplies: picture frame, 12′ of picture wire, acrylic paint & brush, staple gun (or nails/tacks, etc) I started out with a black 8×10 picture frame from Walmart, $3. Since the frame wasn’t real wood, I was a little concerned with how it would turn out once I painted it. But as you can see from the above images, this little inexpensive frame did great! I gave the frame a couple coats of paint with this almost-but-not-quite white acrylic paint using the brushes pictured. And that’s IT!
No Slip Bookmark Tutorial I have so many books requested at the library right now! I love books they may be my favorite thing, but bookmarks I have an issue with. I've always been a dog ear person (you know, folding down the top corner of the page to mark my spot). Bookmarks always fall out then I have no clue where I was. But I don't like to dog ear books that don't belong to me (or even some that do). I love it because it fits all different size books. Sew a length of ribbon around a hair tie, attach a button on the other end (I gathered the ribbon under the button for interest) and your set! By using our thomas sabo chains and dental insurance facility, you can carry your anne klein watches anywhere along with you.
Braided Headband Tutorial It's chilly outside here today and I'm loving it! I enjoyed every minute of reaching into the closet and pulling out soft cozy blankets, snuggling up on the couch with my blanket and laptop to check my e-mail this morning... Don't get me wrong, I'm not a fan of temps below 40 degrees, but a high of 65, I'll take it! Anyway.... on with the tutorial. Here is what we are making today! What you need- Thick hair tie Six 1" strips of fabric Bulldog clip or safety pin Sewing machine (or needle and thread) Fabric tac I ripped my fabric strips so they were a bit frayed on the edges, personal choice. Tack each end of the braid just enough that it doesn't come undone . Then tack both braids together on each end, be careful not to twist the braids. Cut your hair tie so it's one strip of elastic. Sandwich your elastic ends between the ends of your braids on each end, again, careful not to twist the braids. Sew over the elastic so that it's secure. Your done! Enjoy!
lace & tea » another magazine s/s 2008… Posted on February 9th, 2010 The whimsical setting of this editorial is gorgeous. They paired the background with the clothing so well (and using one of my favorite dresses – the Alexander McQueen butterfly print gown, later on in the editorial). Photographed at the enchanting Sacro Bosco/Villa Orsini garden. The photographs look like they were inspired some-what by Alice & Wonderland, which is never a bad thing. scanned by Ed via thefashionspot Double Knitting - Knitting Community Double knitting is the exception to many knitting rules. You can double knit a stockinette scarf, and it will lay flat instead of curling. Color knitting will be reversible, showing a negative of the image on the back of the work instead of floats. How is this possible? Cast on Cast on with double the number of stitches The cabled cast on is great for double knitting because it creates a flexible edge. Cast on with yarn held double You could also use the cast on of your choice, but with the yarn held double. How to Double Knit Single color double knitting instructions This is the easiest way to do double knitting Cast on an even number of stitches *Knit 1, slip 1 purlwise with yarn in front, repeat from * across the row Repeat stitch pattern on each row Bind off (using any method) Double knitting with one color in the front and one color in the back Bring both yarns to the front and purl the next stitch with only the contrast color Repeat these two stitches across the row
how to transfer a photo to fabric Did you know you can transfer photos to fabric without using iron-on sheets? I love this technique. It's simple to execute and the end results are really pretty. It's another method for hand printing! I made some fabrics the other day and used them to add pockets to one of my wool skirts. Do you want to learn to transfer photos to fabric? Supplies Needed: Fabric (I used white quilting cotton), Gel Medium (I used this kind from Liquidex), Paint Brush and the image you want to transfer. How to transfer a photo to fabric: 1. Note: Don't be alarmed if your transfer isn't completely perfect. Well there you go! Rick Rack Rosettes A friend gave me this flower ring and necklace, when she handed them to me I thought they were porcelain–there’s a very vintage feel to them. From a distance you really can’t tell that they’re made out of rick rack! Yes, rick rack! She shared how to make them with me, and now I’m sharing with all of you readers! First, cut 2 strips of rick rack. Then twist the two pieces of rick rack together, like this. And then run a stitch down one side to hold it all together. Like so. And to make the flower, you just start from one end and roll it up. Keep rolling. Until you have this–and then tuck the little tail under and hot glue it down. You’ll notice all of the petals are closed, so to open them up you just peel them back one by one. And here it is on my finger. Awesome. (Please excuse my hands, my hand model moved to Indiana, so I’m left using what I’ve got
saucydwellings: String tree how-to In the past I've had people request instructions on how to recreate the string tree I made in my living room. While I don't have a full tutorial, I do have enough to get you going so you can hopefully recreate this fun project at home. Here's the tree in my living room that started all the trouble: I apologize in advance for the quality of the photos, when I took them my camera's screen had died- so I could take pictures but I couldn't really aim or anything or be sure the photo had come out. Start by putting pushpins into the wall in the general shape of the tree you're hoping to create. I generally have a photo of a tree printed out to give me a basic guide as to the shape I'm going for. Any good drawing teacher will tell you that the rules of trees are thus: Don't be too symmetrical or regular with the branches, trees are not ladders.Generally odd numbers of things look better than evenDon't try to make it too perfect. Other pointers I would give you would be: Don't be too linear.
Ten minute no-sew recycled t-shirt bag! Tutorial time! I got a gig teaching a recycled t-shirt project at the library a few months ago, with a request for a recycled tee bag – the only bags I’d made from tees in the past had required sturdy sewing, and I didn’t want hand-sewing to be the only thing holding the bottom closed in a class version of the bags, so I started brainstorming about some kind of hand-sewing-friendly or no-sew bag idea…. and here’s what I came up with! The simplest version of these bags is great for smaller tees, or the more light-weight kind of girl-tees – just turn the bottom of the shirt into a drawstring and tie it closed! As you can see, even with a not huge tee, this will still leave a significant hole in the bottom of your bag, but for purposes like grocery shopping, this size hole shouldn’t really matter… But to make smaller holes, just make more than one of them! And now for the actual tutorial – for this one, with the step-by-step, I will be making the bottom with 3 holes. My finished Sonic bag!
» The first lime «: 5 tips for new Etsy sellers Hi there! I hope you all survived to the christmas dinner chaos! (hopefully I did) Today I wanted to talk to you about something I know you love... HANDMADE. 2. Which size is it? After doing this you can have a better description that will answer possible customer's questions. 3. 4. This is something you have to keep in mind if you want customers to remember your shop. 5. Well, if you are going to sell anything you would need to write carefully your policies and fulfill all what you say. I hope this works for you! Love, Monica
Zip-up Earbuds I love to have my music with me everywhere I go, but I hate the tangled mess my wires become when I toss them in my bag or pocket. Last night I whipped up a fun and functional solution by adding a zipper to my earbuds. This project took me around an hour to do (perfect for catching up on some t.v. from hulu.com). The supplies are few; basic sewing supplies, a pair of headphones, and a nice long zipper. I happened to have this crazy purple and gold nike zipper I found thrifting a while ago, it seemed perfect for this project. The first step is to pull the earbuds apart, to separate the wires all the way down to the plug. Next, take one side of your headphones and one side of the zipper tape and start stitching the wire into the tape. It’s as easy as that! Then unzip them to the length I want and put them on so much faster than having to untangle the mess!
boy belt tutorial February 15th, 2010 My middle son is jumpy and crazy and skinny and tall–all of which make his pants fall down quite often (if he is wearing pants that is), so I thought I’d make a belt for him. In honor of Celebrate the Boy month at Made and Made by Rae I drew up a pattern to share with all of you. The finished belt is 1 1/2 inches wide and adjusts to fit waist sizes of about 20 inches to 24 inches. Materials: one piece of fabric cut 30 inches long and 4 inches wide, preferablly cut parallel to the selvege, but as long as it’s not cut on the bias it will work out just fine.one strip of canvas or denim (or something that is a similar weight) 29 inches long and just shy of 1 1/2 inches wide.three snaps and snap setting toolone 1 1/4 inch D-ringscissors, pins, iron, sewing machine Steps: Find some pants with belt loops and try that sucker out! Variations: To make a skinnier belt, your fabric strip should measure 30 x 2 1/2 inches and the lining should be 29 x 3/4 of an inch. Buttons! Go Boys!
How To Make An Easy Dress (For Cheap!) Two facts about me: I'm cheap. I love dresses. I wear dresses probably 6 days out of the week. Back in November when I really started Talk2thetrees I kinda just wore pajama pants and sweat pants. Dresses are so comfortable, I can sit around the house and feel comfortable and cute. The only problem.. they are expensive! Here is a tutorial on a High Waisted Dress: For under 6 bucks! First you will need a ribbed tank top. I got mine from Walmart for 2.50 You could also use a t-shirt 3 yards of matching fabric. Clearance section is my favorite. Cut the tank top almost in half. (I cut mine a little too short.. oops!) For the bottom part of your dress take the fabric and wrap it around your waist about 1 and a half times, and cut in a straight line. I never measure, I never use patterns... Next you fold your fabric in half. You have kind of a big blocky rectangle skirt. (You are sewing the raw edges, not the bubble hem) This is where I didn't get pictures.. awesome. We are going to create a ruffle.