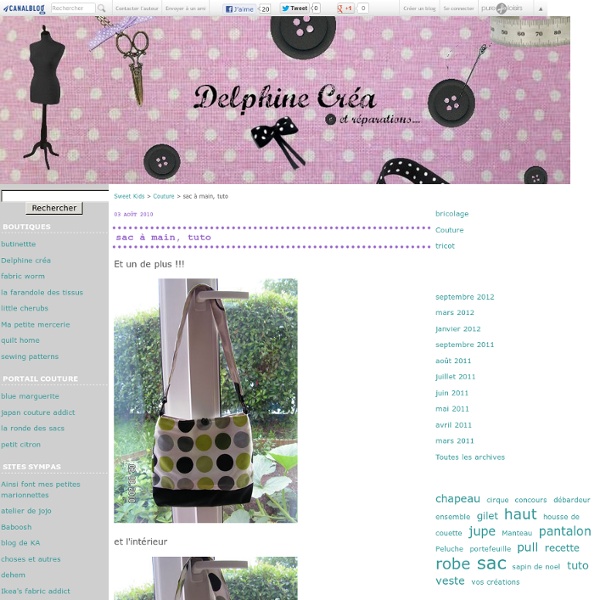
un sac besace de ville hyper-facile à faire
Voilà le sac que je viens de faire pour une amie, sachant qu'elle aime ces couleurs là, j'ai assorti de la toile et du liberty. Il vous faudra : 0,60m de tissu en toile uni 0,60 m de liberty assorti fil assorti, grosse pression ou pression aimantée - ouatine facultatif Réalisation : Je vais reproduire mon patron à petite échelle et le rajouterai à cet article pour celles qui seraient tentées de le faire. Après avoir épinglé les gabarits sur les 2 tissus (2 devants et 2 dos sur chaque tissus), découper à 1cm tout autour pour les coutures. Commencer par la doublure en liberty ou le contraire ('jai choisi le liberty pour l'intérieur.) Coudre, sur une face, une poche avec l'autre tissu pour trancher, à vous de choisir ses dimensions. Coudre, endroits contre endroits, les deux côtés larges de la bande 1. Coudre la poche extérieure sur le devant avec le tissu intérieur. Thermocoller la ouatine sur les faces., ansi que sur les côtés et le fond. Insérer la doublure dans le sac, envers contre envers.
Tutorial: Paisley Necktie Schoolbag
Hey girls, It's back-to-school time and time for a new schoolbag. Sure, backpacks and messengers are great but how about something new? Okay, you'll need a bunch of ties. Let's start with the gusset/handle: you'll need four ties: Lay them out like this. Join each pair side by side with a super-wide triple zigzag stitch. Just feed the ties through side by side, no "right sides together" or pinning or anything. Stitch each pair together side by side halfway up. Now you have have two pairs of ties sewn together. Just do another triple zigzag over the center of each tie following the center seam on the wrong side. Now place the fat ends of the ties right sides together and stitch across with a regular straight stitch. Your gusset/strap piece is now complete! Now we are going to make the pattern for the front and back of the bag. Now mark a dot at the inside points between the ties. Remove the ties and connect the dots. Cut this pattern out. Unfold paper - Voila! Add remaining ties.
Résultat du concours - Tuto Sac
Sans plus attendre, je vous livre les résultats du concours ! Comme Melle Petite Sœur est partie en vacances, je suis contrainte à faire moi même la p’tite main innocente ! J’ai choisi de procéder différemment de la dernière fois … écrire vos 65 noms sur des bouts de papier … non trop long ! J’ai donc adopté la méthode “je-rentre-le-mini-et-le-maxi-sur-Random.org-et-je-regarde-qui-a-gagné” ! C’est parti ? Voyons voyons … le N°5 est : Alexine ! J’attends ton adresse et je t’envoie ton sac ! Et pour la surprise toutes les autres : le tuto en image pour que vous puissiez le faire ! Il vous faut : environ 40 cm en 150 de toile rayée (55*25 cm pour le fond + 60*6 pour les anses)deux carrés de 27*34 de toile unie (pour le haut du sac) 1. 2. 3. 4. 5. N’oubliez pas de m’envoyer vos photos (via Contacter l'auteur ou dans un commentaire) ! Bonne couture !
Je vous offre un tuto trousse de toilette ou pochon pour fêter 2012 !!! - AURVAL
Dimanche 1 janvier 7 01 /01 /Jan 11:19 Après de longs mois d'absence, je profite de la nouvelle année pour vous faire partager un nouveau tuto. Ma fille part en classe de neige pour 15 jours alors, j'en ai profité pour lui faire une trousse de toilette "fait maison". Pour la réaliser il vous faudra : Tissu extérieur (ici simili cuir noir) : 73 cm de long X 34 cm de haut + un rond de 24 cm de diamètre Tissu intérieur (ici à pois) : idem tissu précédent + 1 morceau pour la poche devant 10 x 14 cm Bande de tissu "passant" pour le lien (ici carreaux vichy noir) : 73 cm x 5 cm 70 cm d'élastique cordon ou lien quelconque pour la fermeture (si vous souhaitez modifier la taille de ce pochon, déterminer le diamètre du fonds dont vous avez besoin puis multiplier ce diamètre par Pi (3.14), ça vous donnera la longueur nécessaire pour le tissu du "corps" du pochon. C'est parti... Poser ensuite la poche au milieu du tissu noir, à 7 cm du bas, vous obtiendrez ceci: Bises.
Little boxy pouch tutorial « three bears
My latest favourite thing to make, little boxy pouches. It took me almost an entire morning, lots of paper and sellotape and countless cups of tea to figure this out. I’m here to save you the bother. This little bag is 4.5 inches long, 3 inches high and 2 inches deep, just right for a lipstick and a compact (or better still, lots of sweets). 1. 2. 3. 4. 5. 6. 7. 8. 9. 10. 11. 12. I hope these instructions are clear. Do let me know if you use this tutorial, I’d love to see how it works out for you. ***How I add lining*** There may be a quicker way but this is how I add a lining. Like this: Like Loading...
Tutorial: fabric bins featuring fort firefly by christina mckinney {a Pellon® & Birch Fabrics partnered project}
Bringing you guys a super quick and super useful tutorial today. Made from the dreamy new collection by Teagan White, Fort Firefly, these nesting bins are equally cute & functional! I don’t know about y’all, but I’m always on the lookout for a cute way to bring a little more organization to my crafty chaos. These would also make an adorable baby shower gift - I can just see them filled with tiny baby socks or as a diaper caddy on a changing table. So many uses!! Notes before you get started: There are two ways to make this bin, both are equally simple! Finished Dimensions: Small: 5x6in base Medium: 6x7in base Large: 7x8in base All bins measure 8in tall before folding down. Supplies: 3 outer fabrics, 1/2 yd of each (You may need more, if your fabric is directional) 3 lining fabrics, 1/2 yd of each (You may need more, if your fabric is directional) 1 1/2 yrds fusible Pellon®, I used Décor Bond 809 for this. Templates I used Fort Firefly Fabric for all three bins. The two methods explained:
Angela's Diaper Bag
Hi, my name is Melissa Mortenson and I’m very excited to share the tutorial for this fun diaper bag! It is made from 1 charm pack and 1 layer cake… that’s it! No other yardage required … just some interfacing and fusible fleece! I made this for a friend, Angela, thus the name. I hope you enjoy it! I loved making it. 1 Charm Pack- I used Santorini by Lila Tueller 1 Layer Cake Fusible Fleece Timtex/Peltex (fusible) Heavy Weight Fusible Interfacing (I used fuse-a-shade) Wide ribbon 1 pkg fabric lamination sheets- I used Heat n’ Bond Iron on Vinyl Matte. 1 hand towel 1/4″ wide elastic This bag uses 1 layer cake and 1 charm pack. First lay out the pieces for the front and back of the bag. These are charm pieces. (5″ pre-cut squares) You will need 8 uncut charms for the front and 8 for the back You will then need 4 additional charms for the top border. Cut these pieces in half so that you have 8 2.5×5″ pieces. Stitch together bag front and back pieces. Set aside. *note : I have an embroidery machine.