
DIY Fringe Scarf | Lakeland Local Everyone needs a go-to fringe scarf in their fashion repertoire. Here’s an easy way to make your own. What You Will Need: -Old T-Shirt -Good Scissors Step 1: Go through your old T-shirts and find a daring print or color combo. Step 2: Cut horizontally across the shirt, just below the armholes, to create a rectangular tube. Step 3: Working your way around the tube, make a series of vertical cuts that extend from the raw edge upward. Step 4: Tug down on each strand to elongate it. photo credit: Cathy Hayes for Lakeland Local
Manicure Mondays - Essie LuxeEffects & Fab Fatale Essie LuxeEffects is a gorgeous collection of five shimmer, glitter and flakies top coats. I can’t remember the last time a brand came out with an entire collection of top coats, so this was really fun to review. I swatched one coat of each LuxeEffects over a neutral nude polish to showcase the difference between each topper. Sand Tropez (not included in the collection) is a beautiful khaki tan creme polish from Essie’s Spring 2011 A French Affair collection. Pure Pearlfection is a gorgeous white silver micro-shimmer. As Gold As It Gets is a gold flakies and micro-shimmer top coat. Shine Of The Times is an iridescent holographic flakies top coat that looks completely different over any base color and in any light. A Cut Above is a pink sequin and glitter top coat. Set In Stones is exactly like A Cut Above, but in silver. How I Wore Essie LuxeEffects This week, I’ve already tried a couple of variations of LuxeEffects to get an idea of how they transform over different base colors.
Get Yo’ Nails Did Okay, so we’re only three weeks in to this whole thing and I’m already showing you a tame look after I totally promised some of you that I’d do a newsprint nail tutorial this week. Newsprint we can do next week, but for right now I wanted/needed a manicure by a professional. As I told you in the first “Get Yo’ Nails Did”, it’s important to include real manicures in your nail routine if you’re not comfortable cutting your cuticles and getting into the real work at home. I am not. I’m willing to shell out $20 bucks to have the dirty work done right, but I’m not going to splurge on nail art at the salon most of the time. That’s another thing: Remember that, while you should always be extremely polite to your manicurist, you shouldn’t be afraid to ask for exactly what you want and to tell him/her if it’s not done correctly. For your own mental health, try to avoid those nail salons that feel more like cattle farms. The last thing I’m afraid of (beside death) is a little bit of contrast.
nails 520 214 516 278 567 107 831 1006 920 762 1273 472 570 715 1160 567 828 778 293 261 459 700 688 181 901 1206 1010 844 1145 641 824 308 174 53 300 63 830 4063 168 292 677 358 638 173 361 203 528 191 112 904 144 335 477 746 148 419 280 585 We Heart This - DIY: Triple Stud Ring – a little tough, a little sweet, a lot cool We’re so excited to continue to add to our amazing crew of writers at we heart this. Today, we want to give a big welcome to Kirsten, who will be sharing her crafty ways with the lucky wht readers every month. A fan of vintage everything (but especially shoes) with a love of art, music, beauty, fashion, she’s a wht chick after our own hearts! And make sure to check Kirsten’s blog, Studs and Pearls for tons of inspirational photographs, musical fun and loads more tutorials. ~ wht As many of you creative ladies know, studs and multi-finger rings are some of the most well loved fashion trends right now. Double and triple finger rings are such significant statement pieces, and can really bring an outfit to an entirely new level. My love of studs and my love of jewelry making crossed paths (along with inspiration from high end, designer multi-finger rings) – and the triple stud ring was born. all photos: kirsten for we heart this ** Any kind of adjustable ring blank will do. Instructions:
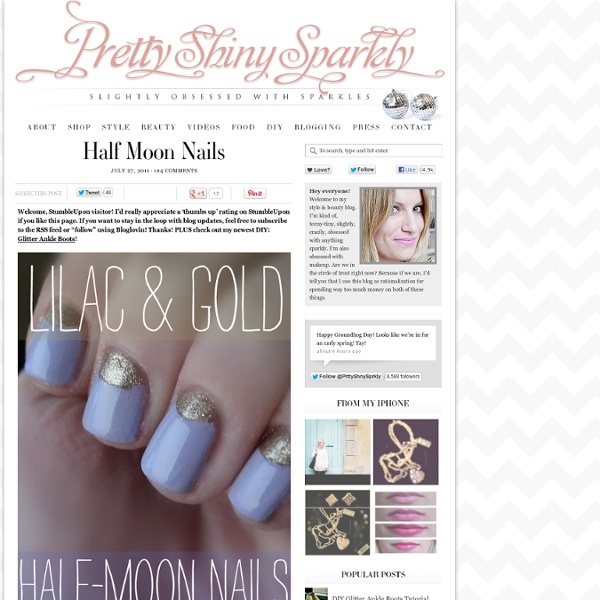
DIY Vena Cava Crescent Moon Nails This fall Vena Cava sent their models down the runway with show-stopping nails. Their new take on the forties half moon nail is a fun twist on the ever-popular french manicure. This style looks just as clean and polished but has a fresh new graphic twist that is fashion forward. Start with clean, dry nails Paint nails with base coat and then with the solid color you’ll be using. Now is where the time component comes in to play. Now take your blue painter’s tape and cut small half moon shapes in it. Carefully apply blue tape to each nail and press firmly down using a wooden manicure stick. Once you have applied the tape (I did one nail at a time so I wouldn’t stick to everything) paint the black polish on the top portion of your nail. Repeat on each nail and finish with a glossy clear top coat. Like this: Like Loading...
tutorials We get a lot of emails asking how to use brushes correctly so I hope this helps you out a little! A brow brush is designed to be stiff and angled for a reason. And we use the slanted edge to shade and the tip of the edge to outline. Put those components together and a brow brush is quite frankly a thing of perfection! Here’s how to use it properly: READ MORE… Last week we explored four different ways to wear Spring’s biggest Cobalt blue trend. This method has been around for centuries! A nod to the Uptown Girl, this look is very put together and polished. Highlighting Pencil — Try Too Faced Instant Attitude Highlighting Pencil.Taupe Pencil — I used Le Metier de Beaute Pencil in Champagne. Note: This is a really light nude lip so to keep it as chic as possible, add a hint of blush to the cheek so you don’t get washed out.
>How-To: Newsprint Manicure « A Pretty Penny I saw this newsprint manicure over on The Daily Nail and thought it was adorable (especially for bookworms and word lovers like myself). I did a little Google detective work to see how to recreate it, and was surprised at how easy it is! All of the tutorials I found called for vodka or other clear distilled spirits, but we were fresh out. I used isopropyl alcohol instead, and it seemed to get the job done. I tried a quick and dirty version this afternoon to share it with you: Like this: Like Loading...
DIY Bookshelves...made with Books! You gotta love Real Simple for all of their easy, breezy DIY projects and organization tips! All you need to complete this clever little project are some old books (pretty ones are a plus!), some hardware and a drill. I love the colorful books they used and all of the interesting "found" objects neatly displayed. In case anyone would like to take a stab at this project, I've included the instructions below. Find some cloth or leather-bound books with beautiful spines that will work well together as a grouping. Buy two sets of brackets, using one set for below the books and a single bracket for above. Slide each book between the top and bottom brackets before placing light-weight objects on it. Voila!
Nail Art: Zodiac Signs Nail Art is our new obsession and who doesn’t love reading their star sign on a daily basis? We love how horoscopes make us feel, they kind of guide us through life — give us hope, make us realize certain things that maybe we didn’t realize before… Items in main photo: Dannijo Finnegan Ring, Bracelet coming soon So we thought why not celebrate our zodiac signs with nail art? It adds a certain cosmic feel to your look… it’s perfect for late summer nights and even a summer solstice party. We met up with a local nail artist Kibby — check out her Instagram here. The product: Gold nail polish, gold glitter nail polish, a black nail art pen and a clear coat Step one: paint all the nails gold Step two: add the glitter coat Step three: with a steady hand start drawing the Zodiac signs (templates below) with the black nail art pen Step four: after each sign paint on top a clear coat to seal the art Step five: done! Check out more of our beauty trends here Tags: beauty, nail art
How To Use A Sock To Get Beautiful Curly Hair Without Heat | A Spotted Pony - StumbleUpon If you are a mom on the go with long hair you HAVE TO try this. It will knock your socks off and have you wrapping your hair up in them! This is all about how to make your hair beautiful with no heat and no time. Curl your hair in your sleep with a sock. Yup, you heard me right. I was on Pinterest a while back and spotted this post about the sock bun which links you to her video on YouTube. Why? Because: It literally takes a minute to doNO heat at all – just a soft little sock in your hairNo product (for me anyway)You can sleep in it very comfortablyIt works Marvelously and is simple beautiful This is the sock bun before and after of my hair. Here are the step by step instructions on how to make this work. First steal a sock from your husband’s dress sock collection (that is what I did anyway). Now roll the sock into a ring. Put your dry hair into a high ponytail. Now spritz just the hair in your ponytail with water. Now grab your rolled up sock and put your ponytail through the hole.