
Crafty Habit: Anthropologie Inspired Tuxedo Scarf Tutorial I saw this scarf on anthropologie.com and loved it so much that I decided to make one. It isn't too pricey for non-college students working for $$ (its just $38.) but I thought it would be fun to make my own especially since I've been wanting to sew a scarf since forever. Follow the tutorial to make your very own tuxedo inspired scarf. Materials: 2 yards of knit fabric (It required less than 2 yards but that is what I had, maybe more like 1 and 3/4 yards. Instructions: Using your groovy scissors cut a long strip of your fabric measuring 20 inched wide x 66 inches long (the length of the fabric I bought). Cut smaller strips of fabric 6" wide and long enough to make ruffles to fit scarf (I joined 2.5 66" strips to cover my scarf.This will depend on how tight/loose you want your ruffles to be) (Join the smaller fabric strips to each other by stitching seams at ends to form one long continuos strip. Fold long, wide strip of fabric in half (length ways) and determine middle of this piece.
Summer is Coming!!! FREE Pattern! Crochet Watermelon Coasters These simple watermelon coasters will look so special on your summer tablescape!!! You will love how easy the pattern is and how great they look! My set includes four coasters, but you may want to keep making many more to keep or give to family and friends!!! Crochet Watermelon Coasters (Perfect for Summer Hostess Gift) The photographs and patterns included in this document are the property of Lakeview Cottage Kids. Lakeview Cottage Kids Copyright 2014 Skill Level: Easy Finished Size: Approximately 4 ½ inches in diameter Materials Needed: 1 skein “Sugar and Cream” Cotton Yarn in Pink (Color A) 1 skein “Sugar and Cream” Cotton Yarn in White (Color B) 1 skein “Sugar and Cream” Cotton Yarn in Lime Green (Color C) Small amount of Black Cotton Yarn Size G/4.35 mm Yarn Needle (Used for working in loose yarn ends.) Watermelon Coaster (Make 4) Round 1: Using Color A. Round 2: Ch 1. Round 3: Ch 1. Round 4: Change to Color B. Round 5: Change to Color C. Fasten off and weave in all loose ends.
And I Went With . . . . . . none of the options I was considering in this post. Instead I made this giant crocheted flower for the center of my table. I used this vintage potholder pattern and just kept adding rounds until it was the size I wanted. It's definitely bright and cheerful! And this pattern is really fun to work with not to mention, a great way to use up scraps of yarn. Blooming Flower Cushion Here is my tutorial showing how to construct this wonderful layered flower and then make it into a Blooming Flower cushion/pillow. First of all I would like to say that this pattern is not my own. I found it via Two Butterflies blog. Before we begin, a little summary of the basic stitches. sl st [slip stitch] :: insert hook, yarn over, pull the loop back through the stitch, then through the loop on your hook. dc [double crochet] :: insert hook, yarn over, pull the loop back through the stitch (two loops on hook), yarn over and pull through both loops on hook (note :: this is equivalent to the US sc stitch) htr [half treble]:: yarn over, insert hook, yarn over, pull the loop back through the stitch (three loops on hook), yarn over and pull through all three loops on hook (note :: this is equivalent to the US hdc stitch) To begin :: ch 6 and join to form a ring. Round 1 :: Ch 1, then work 15 dc into the ring. Round 2 :: Ch 3 (counts as 1 tr), then work 1 tr into the same st (as above)
3-D Butterfly [ Close Privacy Policy ] Privacy Policy / Your California Privacy Rights Revised and posted as of March 4, 2013 Prime Publishing, LLC ("Company," "we" or "us") reserves the right to revise this Privacy Policy at any time simply by posting such revision, so we encourage you to review it periodically. In order to track any changes to this Privacy Policy, we will include a historical reference at the top of this document. This Privacy Policy will tell you, among other things: Your California privacy rights. ACKNOWLEDGEMENT/YOUR AGREEMENT Company websites are not intended for use by individuals under the age of 18 or those who are not legal residents of the United States. HOW DO WE COLLECT INFORMATION AND WHAT INFORMATION DO WE COLLECT? Distribution Partners Website operators that license our ad serving technology pass information to us so that we may serve advertisements to you. Website Registration Forms We collect information about you when you register on one of our websites.
{ WIP Wednesday } Here are my Work In Progress projects this week… Well I have plenty to work on as far as crochet and Christmas projects! First off, I am making some Christmas colored Woman’s Hats. I caught Hailey trying one on last night. Next I am making two more ear warmers. I love making these! **Speaking of this pattern, I have been getting a lot of comments and emails about it. Lastly, I get to make three awesome sock monkey hats! I made this one for my older nephew last year. I also have some other projects I hope to try when I get some orders done. Have a great day everyone Link up! Crochet Bag Pattern Way back in July, you may remember me making this bag. It's my own design, made on a whim and I was/am absurdly proud of it. It has received much admiration when I jaunt about with it on my shoulder, and it has proven to be a very practical bag for stashing yarn in. Very Crochety indeed.I've had countless emails and requests for this pattern, and in truth I have been putting it off a little. Well more than a little, seeing as it is now more than three months down the line. I find writing patterns so daunting, but I will try to do my very best for you, to share this woolly baggy goodness with you all. First some yarn info :: I used Debbie Bliss yarn, called Merino Aran. Now before we begin, can we just clarify the difference between UK and US terms :: this bag is made using a UK treble crochet (tr) stitch, which is equivalent to US double (dc). For the very first round you will work out of the central ring, but for all other rounds, work out of the stitches. And there you have it.
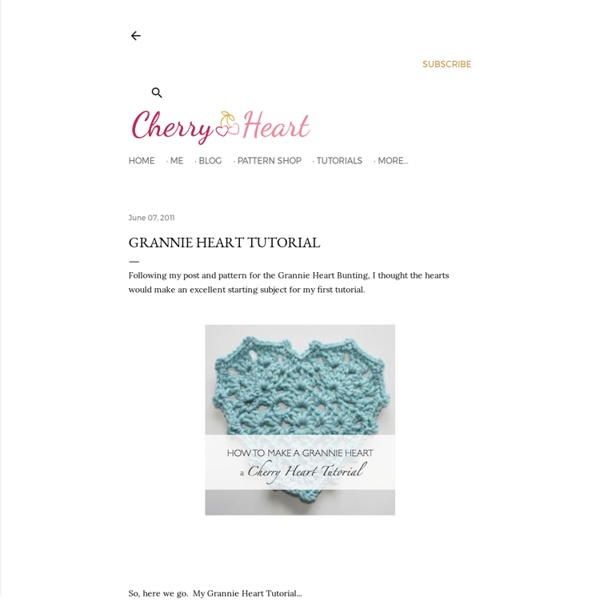
Hearts and Twigs Awwwwwwww teeny tiny little hooky hearts, so cute you gotta love 'em! I've made dozens of these hearts in the past week or so, I think I've developed a slight addiction to be honest. The thing is that they are so quick and easy to make, it's near impossible to make just a few. You start out with just a few but before you know it you've made a small stack, then a handful, then a whole heap. They multiply in front of your very eyes. They are very dinky look...I made mine using Rowan handknit cotton DK and a 4mm hook, and they came out measuring about 4cm across and 4.5cm from top to bottom. ........I've had a play with little crochet hearts a few times in the past...you may remember this one from way back last year? So off I trotted to find out more at Meme Rose blog, and discovered a lovely happy place where lots of happy hooky happens. Wheeeeeeeeeeeeeeeeeeeeeeeeeeeeeeeeeeeeeeeeeeeeeeeeeeeeeeeeeeeeee!!!!!!!!!!!!!!!! Cutesy, dinky, sweet little teeny-tiny itsy-bitsy hooky hearts!!! Go on!
Patterns : Coasters and their Basket thank you for all the enthusiastic replies to the first viewing of the new coasters and their basket ! very encouraging so here they are, the patterns ~ I hope you enjoy making this cute set as much as I did ! might be a perfect make for this weekend, right in time for Easter ? the patterns should be doable for the experienced as well as beginners among you please let me know if you have any questions or if you find mistakes in the pattern it would benefit us all yarn the yarn I used for this set is 3 balls of Martha Stewart's cotton hemp yarn : 65% cotton, 35% hemp that gives it the nice matte finish and little rough look - to me a perfect combination with the girly style of this this design. I used hook size 5mm (8 US) for this yarn and it is washable on 40C, not unimportant for coasters I figure. The colors I got from Molly are blue icing, sour cherry and picnic green, but there are many more combinations of three colors possible. stitches used chain - yarn over and pull through loop on hook
Crochet Link Love: Terrific Crochet Blog Posts This is where you can find the links to all of my favorite crochet blog posts from around the web this week. Smart Words About Crochet Which Yarn Diet is Right For You? Great Crochet People Are Making Made In K-town is participating in Beyond the Square and I love the ying yang twist she put on this crochet motif @twinkiechan made this crochet painting of steamed dumplings; visit her site to see how the drawing became a crochet piece. @elevenhandmade was commissioned to make several items for New York Fashion Week for designer Leila Shams. Helpful Tips and Tutorials and Crochet Patterns video shared by FaveCrafts How to Wear a Long Scarf. Other Fun Crochet Posts Crocheters, Knitters Doing Essential Work. And some special thanks this week Inside Crochet for mentioning the Favorite Craft Blog awards on their blog which I was honored to be a runner up winner of. Tagged as: crochet blog, crochet blogs, crochet link love
MemeRose