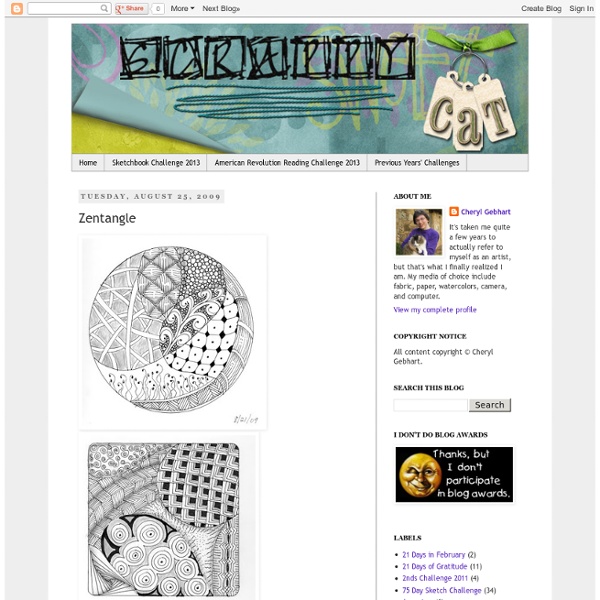
background preloader

Zentangle

Zentangle
I have a new obsession - Zentangles. Basically, it is like doodling, but with intention. It looks much harder than it is. I made myself a little book, just for my zentangles. It is 6 inches square, made from Strathmore Bristol smooth paper, bound with my bind-it-all.

ZENTANGLES and STUFF Adding Colour to Zentangle... | ProMarkers and Letraset Fineliners What is Zentangle®? Well… according to the Zentangle website, “Zentangle is an easy to learn method of creating beautiful images from repetitive patterns. It is a fascinating new art form that is fun and relaxing. A further look through the Zentangle® website reveals an exciting new abstract form of art that encourages creativity, embracing your mistakes and discovering patterns. An Example of a Zentangle by Maria Thomas Image Source: Adding colour to Zentangle®… Zentangles are predominantly black and white, but we discovered the blog of avid Zentangler Sandra Strait who has been using ProMarkers to add colour to her designs. ‘Thunder Unleashes the Storm’ by Sandra StraitImage Source: Sandra has also put together a Zentagle style ProMarker colour chart using the colours from ProMarker Set 1 and this is extremely useful for reference. About Letraset

TangleTangleTangle's blog How to draw a free-form bird and fill it with tangles In this 19-minute video CZT® Suzanne McNeill demonstrates how to draw a free-form bird and fill it with six tangles from Zentangle 8. This title in her Zentangle® series focuses on Zentangle-inspired monograms and alphabets. (See the BOOK REVIEWS tab for more information.) You might remember the newest book I posted about last week, The Beauty of Zentangle also has a tangled bird on its cover. In this video Suzanne talks about her process for drawing birds and decorating them with her tangles. The tangles Suzanne demonstrates are: Fins (3:43)Maize (6:07)Ocean Spray (7:05)Pinball (8:59)Chatter (11:28)Coral Seeds (16:16) This looks like it might be a fun summer project for introducing children to Zentangle. For your Zentangle® library Visit the BOOK REVIEWS tab at the top of the page for details on any of these great Zentangle® books. <A HREF=" eBooks available from TanglePatterns.com You might also like:

Watercolor Painting - Beginner's Guide to Basic Watercolor Materials If you prefer tubes pre-packaged tube sets will also give you a good starter selection of colors for watercolor painting. Start by using brand name "academic" or "student" grade watercolors until you can commit your resources to buying "artist" grade watercolor supplies. I suggest the following palette of colors for beginners: This selection is a bright balanced palette of warm and cool colors containing pure transparent and semi-transparent organic and inorganic pigments. My personal palette contains eight additional colors. Use any watercolor pad, block, or loose paper with a weight of #140 or higher. You can even find servicable beginner's watercolor pad (for learning) near the Crayola rack at your local drugstore. Cake and Pan watercolor sets usually have built-in fold out palettes that are useable in varying degrees depending on their size and orientation. A covered plastic palette makes for the least waste and most convenience if you are using tube watercolors. Make some art!

Before You Buy Watercolor Painting Supplies If you're about to start painting with watercolors, you'll need to get a basic set of good-quality paints, a range of papers (so you can test for yourself how each works), and a few brushes. If you're wanting to experiment, try out some mediums. • Watercolor Art Supplies List Watercolor Paints Paints come in tubes or pans (small blocks). Watercolor Paper Watercolor papers come in three surfaces: rough, which has a textured surface; hot-pressed or HP, which has a fine-grained, smooth surface; and cold-pressed (or NOT), which has a slightly textured surface and is the paper used most often by watercolor artists. Watercolor Brushes Sable brushes are considered the ultimate in watercolor brushes because of the fine point the hairs reach, their ability to spring back into shape, and the amount of paint they hold. Watercolor Mediums Mediums are added to watercolor to create special effects.

36 ways to use alcohol inks You are viewing a post in my archives!Visit my current blog at: Hi there! I am revisiting Jennifer McGuire’s free 9-week class at Two Peas in a Bucket called Thinking Inking. This week I will be revisiting Week 5 of Jennifer’s videos, about Ranger alcohol inks, which come in 48 translucent colors and 4 metallic mixatives. Techniques in each Thinking Inking video Each week in Thinking Inking, Jennifer shares at least 3 videos – but this week there are FOUR jam-packed full of techniques. Here is a list of at least 36 ways to use alcohol inks, plus other techniques: Week 5 – Part 1: Basic Backgrounds Part 1 1. Part 2 10. Week 5 – Part 2: Alcohol Ink on Clear Products 20. Week 5 – Part 3: Alcohol Ink Embellishments 39. REVIEW: If you haven’t tried Ranger Archival ink, I would suggest you give it a try. Have you tried alcohol inks? I have made alcohol ink backgrounds and I’ve customized the look of embellishments using alcohol inks. What about you? Thanks for stopping by!

Craft Project: Alcohol Ink Tiles Part 4: Sealing and Protecting Tiles (2/5/2014--EDITED TO ADD) The gloss spray didn't work for some people. There have been a lot of comments on this post. There are a lot of things various people have tried. We have now reached my least favorite part of this project: sealing the tiles. I found this process in the comments section of Aimee's "Fun with Alcohol" post. Here is what you will need: ---Krylon Workable Fixatif ---Krylon Matte Finish (though I wonder why you couldn't use Gloss...I may try that next time) ---Pledge Vinyl & Tile Floor Finish with Future Shine ---a foam brush ---a well-ventilated area I had a bit of a tough time finding all of these products easily. Step One: Spray a light mist of the Fixatif over your tiles. Step Two: Spray a light mist of the Matte Finish over your tiles. Step Three: Using a foam brush, apply a layer of the Pledge Vinyl & Tile Floor Finish to each tile. Your tile will have a matte finish in the end. --It is important to wait for all steps to dry properly.

How to make easy foam stamps My grand *babies* Julian and Alexia arrived late Sunday evening. They will be living here with their dad (my oldest son Jono), going to a local school for the next year. I am always delighted to have them here. Until school starts in a couple of weeks we have planned a lot of crafty time together. So earlier in the week Julian and I decided to do a little fabric stamping. And we thought we’d share a little of that process. For this technique we used craft foam. We cut up pieces of packing Styrofoam to glue our craft foam onto, but you can use any material you like, such as blocks of wood. In our case, the patterned craft foam did not have an adhesive backing, so we hot glued our pieces to the pieces of Styrofoam. The plain craft foam does come with an adhesive back, so we just cut our pattern and adhered it to a piece of Styrofoam. We also found small shapes of craft foam. To stamp the designs you can choose to use fabric paints, markers, or inks. We chose to work on two pieces.

Beauty Incognito: Craft Foam Obsession Alisa also makes stamps by cutting out pieces of foam and gluing them onto other pieces of foam. This was also fun but the trick was finding a glue that would hold right off the bat and not let the pieces smoosh out of place. Sobo glue did the best at holding the foam pieces on and dried the fastest as well. Finally, I followed the instructions in "Creative Embellishments" to make some pieces and parts to use for pendents and possibly items of interest for fabric books. Anyway, not bad for a days' work! Hope you are having a wonderfully creative weekend! BTW, click on any of the photos above to be taken to a larger image.

Related: