Handmade Eco-Friendly Wedding Favors Soy Wax Candles
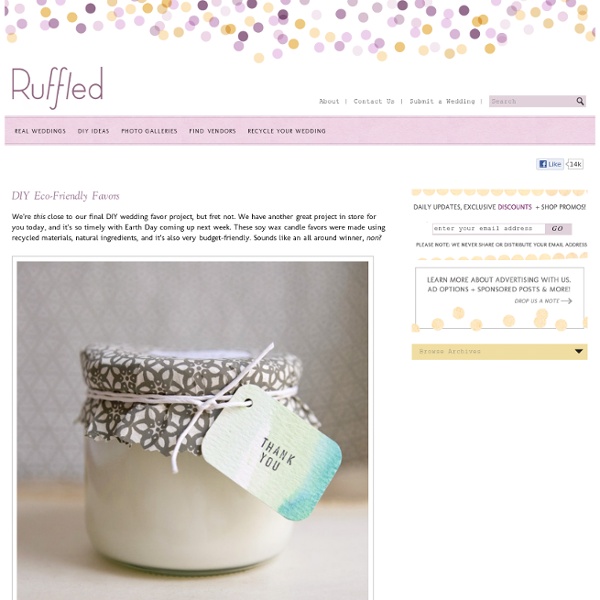
We’re this close to our final DIY wedding favor project, but fret not. We have another great project in store for you today, and it’s so timely with Earth Day coming up next week. These soy wax candle favors were made using recycled materials, natural ingredients, and it’s also very budget-friendly. Sounds like an all around winner, non? What you’ll need: - Soy wax flakes (can be purchased in bulk in places like here…or at your local candle supply shop since we’re talking green) - Wick (here + here) - Containers. Melt soy wax flakes in a double boiler, add in your favorite scents and dye. For the packaging, we used recycled handmade gift wrap and watercolor tags. We added a label on the lids of the jars for guests to easily find their favorite scents. You can use the leftover unscented wax to make tea lights for your reception tables! View all step-by-step photos
mustache mug tutorial
A fun, easy and silly gift to give the cute men in our lives this Father's Day. First, draw a mustache on the top of your mug with a sharpie marker. As you can see mine took a couple times to get right. Second, trace around the edges of the drawn mustache with your Pebeo pen. Next, fill in the mustache with your Pebeo gel stain. This is a picture of one coat. Be patient because it will take a couple of coats to get the look you are going for. Lastly, follow the directions of the stain. Ta Da...the cutest little mug I have ever seen. Fill with a favorite drink or candy and pass it on to the men in your life. Happy Father's Day! As you can tell, I might have a hard time giving mine up.
DIY Succulent Terrarium
I put together a succulent terrarium and it's the cutest thing ever. As such, I had to share it with you ladies! They can be used as table centerpieces or perhaps favors if you have a small guestlist. I had been seeing these little succulariums on Etsy where people are charging something like 30 bucks for them. The cast of characters: Lowes had a great selection of succulents. If you use the same sort of succulent I did, you just need to water it once a week by using a spray bottle to spritz the dirt portion a bit. It will enjoy the sun on my kitchen window sill :D
The Hipster Home » Blog Archive » How to Make a Tiny Terrarium in a Light Bulb
Ahoy there Hipster Homers! I’m Julie and I’m the very first guest blogger on this fine site. Today’s project involves breaking stuff, plants, found objects, and miniatures. Let’s get started! Dos and Don’ts: Do use sand or small pebbles; these are good because water drains through them easily. How To: You’ll need a few tools to make a tiny terrarium but nothing complicated to get started. Needle-nose pliersScissorsLong tweezers or chopsticksFlathead screwdriverGlasses or goggles Let’s start with the light bulb. We will be removing the inside parts of the lightbulb. First, remove the metal tip from the bottom of the bulb. Then, when enough of the sides are raised to get a good grip on them, hold one of the sides with your pliers and yank out the metal tip. Next remove the black glass. Now you will be able to see the interior parts of the light bulb. Using the flathead screwdriver as a sort of lever, snap the interior tube from the side. Pull out any remaining wires with the pliers.
Mason Jar Key Hook
Hey guys! Hope you all had a great Wednesday I have a fun project to share today! I started with a 1×8 board from Lowe’s that I cut to about 2′ long. I used a different paint method on this board and I love how it turned out so I am going to share it with you in my next post. So for now… Here is my board after it is painted and ready to go. I also purchased 3 hooks and a pipe clamp from Lowe’s. My next step was attaching them to my board. Then it was time to attach the clamp. I used a 3/4″ wood screw to attach it to my board. Finally, I added to picture hangers to the back of it and hung it up. I love it. I’m thinking these would be super cute hand towel hooks for the bathroom. Thanks for stopping by! I will show you my new paint method in my next post so stay tuned. ~Whitney
Planting A Pineapple
Did y’all know that you can take this and turn it into… This? And that this will eventually produce… This? Yes, I’m talking about turning your average, ordinary grocery store pineapple into a tropical showpiece within your home. Planting a Pineapple 1. 2. 3. In 24 months (sounds better than two years) it will look like this. You will have an actual, large, utterly delicious pineapple in 24-36 months. The thought of growing my own pineapple always makes me smile and giggle just a little bit. Now what am I supposed to do with all of this leftover pineapple? I see something sweet coming soon. While you’re waiting for me to make something yummy with the leftovers, go ahead and plant a pineapple. Be adventurous plant a pineapple. Hugs, Tickled Red *Please bear in mind that I am not a hortoculturist. Tagged as: Gardening, Pineapple, Tropical Fruit
Related:
Related: