
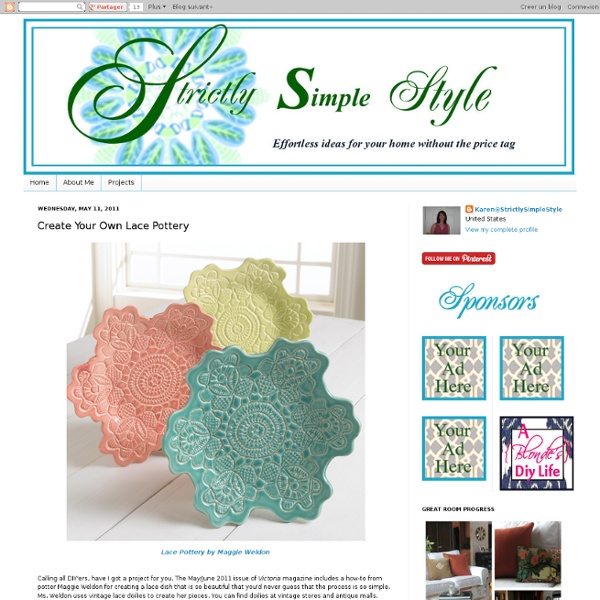
Make a Pink Ruffly Umbrella Home » $5 and Under, cheap crafts, From Our Readers, Headline, Tutorials 22 June 2010 56,461 views 12 Comments by heather In addition to choosing a winner of the CSI Dollar Store Project, I was also able to choose my top 10 projects. How to Make a Ruffly Pink Umbrella by Becky Waldrop, It's finally here! Project Materials: Umbrella, $1Plastic tablecloth, $1Double-sided tape, on hand or $1Rotary cutter and mat, on hand Total: $2 and up Go to page 2 Disclosure: this article may contain affiliate links or other forms of sponsored content. Pages: 1 2 3 4 5
Flokati Rug Tutorial I really love flokati rugs. I have two that are safely tucked away in my parents basement awaiting our reunion. When I learned that I would be having a child and building a nursery for him, I wanted a flokati. A gray one. I’m going to show you how it’s done, but let me warn you- while this rug was super inexpensive to make with the resource of money- it was very costly in the resource of time. And now, this is how to make your very own latch hook rug. Supplies: Latch hook canvas latch hook tool old t-shirts scissors or rotary cutting tool/mat seam binding masking tape dye (optional) All of these things should be available at your local craft store, with the exception of the old t-shirts. On to the making! Once you’ve gathered all of your shirts, use a rotary cutting tool and mat (you can certainly use scissors but the results are less precise) to cut the shirts into 1 inch strips. Once you have all of the strips cut, it’s time to dye them if you’d like. Now you’re ready to hook! xo elle
Make a Beaded Chandelier Welcome to Dollar Store Crafts - the internet's original site for all Dollar Store Crafts! Keep track of us and never miss another awesome dollar store craft idea: Follow us on Pinterest!Dollar Store Crafts on PinterestBecome a Fan:Dollar Store Crafts on Facebook Subscribe for weekly Dollar Store Craft-Inspiration You might also enjoy our most popular posts:Pottery-Barn Knockoff Mirror for $11Mind-Blowing Cake Decorating Tip I made a beaded chandelier from dollar store stuff, and I'm so happy I get to reveal it today. Well, two months later, the beaded chandelier is here. Project Materials: Hanging wire basket, $16 packages of Mardi Gras-style metallic beads (about 48 necklaces), $6Light gauge wire (floral wire will work), $1Spray paint, $1Wire cutters, on hand or $1Hot glue gun & sticks, on handAdditional embellishments, as desired Total: $9 and up To Make:To prepare the beads: paint with white spray paint. Prepare the wire basket: spray paint the wire basket and chains.
Repurposed Hardcover Book to Notebook Tutorial I’ve told you before I’m a bit obsessed with books. I love all books where I intend to read them or not. A local library has a huge book sale every year where you can pick up a grocery bag of books for $3! What you need-Hardcover bookPaperDecorative paperSmall bit of ribbonPaper cutterWhite glueHot gluePadding compound (optional)Clamps or bulldog clipsFirst you need to cut the pages out of your book so your just left with the cover. Slather on a nice layer of white glue to the inside of your cover. Apply your decorative paper. Also cut a piece of thin recycled cardboard the size of your notepad and a piece of decorative paper about 3 inches by the width of your notepad (this will be used to wrap the top edge of the pad). Once dry, fold your decorative paper around your pad to create the creases, then apply glue to the paper, wrap the pad, and allow to dry. While all that is drying, grab the scarp of ribbon and a writing utensil to use as a spacer. Enjoy!
Craft Recycled: Cell Phone Charging Station from a Lotion Bottle by Becky Striepe on March 14, 2012 Ashley over at Make It Love It was tired of leaving her cell phone on the floor while it charged. The phone got grungy, and it was sort of an eyesore. She decided to get crafty and do something about it! Her solution? An upcycled cell phone charging station made from a plastic bottle. In her tutorial, she shows you how to transform an old plastic bottle into a cute cell phone charger that hangs right from the outlet! What I like about this charging station is not only that it's upcycled, but by hanging the phone right by the plug, you'll be more likely to remember to unplug that charger when it's done powering up your phone. About the Author: Becky Striepe is a green blogger and independent crafter with a passion for vintage fabrics.
It's a good idea to use free paint chips: - StumbleUpon Check out the 31 ways paint chips are used in all kinds of projects!! Some of these you may have seen around blogland others are from Etsy. 1.PaintswatchWall2.SnowmanOrnaments3.cut leaves 4. 7. 10. 13. gift boxes 14. 16. 19. 22. 24. 26. 29. 31. Hi my sweet bloggie friends!!! The 30 Minute $6 Dress Tutorial | papernstitch Guest post by Rachael at Talk 2 the Trees. The perfect dress is hard to come by. I like my dresses to be cheap, and long enough. Here’s Your Supplies List: 1. Here’s How you Make it: 1. 2. 3. 4. 5. 6. 7. 8. 9. 10. 11. 12. Here’s the tutorial in pictures… Believe it or not, this dress only took about 30 minutes to make. About the author.
I feel melty. | Light&Spoon EDIT 11/5/2012: We are no longer selling custom crayon pieces in our Etsy shop. We are now focusing on a new jewelry project, so please check that out and we hope you enjoy the tutorial below! Edit: We are now selling custom crayon pieces in our Etsy shop! Here’s our contribution to the melted crayon craze on Pinterest. Anyway! He filled in in with marker, and then we taped some saran wrap around a piece of cardstock to make a run-off barrier for the top of the umbrella. We pulled out all the blues and greys from three boxes we got on sale for $2.50 each at A.C. Then it was just a matter of putting the crayons through the gun–the pretty-but-stupid impulse-buy glue gun that barely works, so I didn’t ruin my good one. The hardest part was removing the guard and fixing the wax around it. Yay! Like this: Like Loading...
eight-day-of-christmas-8-maids-milking I had such a great response when I asked about Aprons I am thinking about doing "Apron week" the first week in January. If you like this idea let me know AND email me a picture or link to any aprons you would like ot see made and I will tackle it! I love a challenge! Would you guys like to do this? I love love love pretty aprons and I actually think this is the one area where Anthropologie prices aren't that bad. (It was SUPER windy, and then down poured, while I was trying to get these pics so the ruffle wouldn't lay straight) Unlike Anthro's I lined mine. I did a triangle pocket like the original but didn't do a large bow (you totally can if you like). I like to have some pictures with what I make actually on a human (because not all of us have awesome unproportional bodies like the mannequin) I told my friend if she would let me take pics I would let her choose an apron to keep and I promised not to get her face in the pics as she claimed not to be camera ready :) Totally easy right?
Better Late Than Never....Anthro Knock Off Lamp Tutorial As I mentioned in an earlier post, I have been slightly obssesed with lamps as of late.So, when I came across this lamp at Anthropologie, I knew I had to try and recreate it. I made a teacup clock a while back and ever since then have had a little preoccupation with teacups and saucers. I can't go to the thrift store without browsing the dish section and as a result have acquired quite an assortment. I was excited to come across this lamp so that I could put my growing collection to use. Here's what you'll need to make your own lamp. One bowl I just found a cereal bowl from the thrift store that had a fairly wide base. One teapot I found mine at Ross for $4.99. An assortment of saucers(three) and teacups(two) I found all of my cups and saucers at the thrift store for $.50 to $.75 a piece (except for one that I found at TJ Maxx for $1. 1 lamp kit I used this kit from The Home Depot. Gorilla Glue Epoxy You can buy this at any home improvement store or at Walmart for around $4.
How to make an Outdoor Candle Lantern Inexpensively Last week I made a candle chandelier for my deck. It looks so pretty when lit, but the rest of my yard was looking kind of neglected. I was determined to find a way to spread some more candle light around the yard to balance the light and provide more ambiance. I used to have Tiki torches, but they unravel and have to be filled up with oil that makes a mess. I remember years ago seeing candle lanterns at a wedding that I thought were pretty clever and decided I could try to make them myself, but I needed to find some glass hurricanes. A trip to the thrift store was in order yesterday. Usually when I go on my weekly thrift store excursion I run in and do a quick cruise around the store to see if anything pops out at me. Total cost of my glass haul – $2.70. Here is what I made with the hurricane. It was very quick and easy to make. How to Make a Tuna Can Lantern I used a tuna can, wood screw, copper adapter, and an old paint stick. Screw the screw into the stick. The top will look like this.
Creative Guest: Nike from Choose to THRIVE Is it just me, or does guest posting on Ucreate seem a little like sitting down on the couch with Oprah? I’m just a bit excited to be here people, and am trying my darndest to keep the couch jumping and fist pumps to a minimum… Anyway, I’m Nike. That’s Neekah … … the lady behind Choose To Thrive and stay-at-home-mom of six kids age nine and younger. I wear flip flops rain or shine, put my makeup on in the car and survive on caffeine-free Diet Pepsi from the drive-thru at the corner gas station. My crafting adventures have taken a hard left the last few years since the Layoff Fairy visited our house--twice. Case in point: Recognize these beauties from the Ballard Designs catalog? I adore them. So I made my own. May I introduce my amazingly strong Ballard Designs inspired wall pockets made using only materials I had on hand. Cardboard + Fabric = Catalog awesomeness for $0! *Swoon* Want to make your own? For the base and pockets you’ll need: For the covering, you’ll need either paint or fabric.
A bit of green :: Crafts :: Plastic Cup Lamp Now that my university is closed for winter holidays, I finally have more free time to do all the crafty things I’ve been wanting to. One of these is a lamp made from plastic cups I’ve seen at taf, the art foundation, in the Monastiraki region in the center of Athens. When I first saw it at taf, I was amazed; I looked closely and I couldn’t believe my eyes! The object itself is so peculiar, modern and alien-like it could be in any design exhibition. With my best friend’s birthday coming up, I decided to make it myself and give it to her as a gift. It turns out it was the easiest craft I’ve even done, the epitome of DIY objects! Disclaimer: There have been some concerns about the safety of this construction (see the comment of user “when” below for example). I only needed a couple of things: 200-250 large plastic cups (recyclable, at least )600-700 staplesa staplera lamp socket, lamp cord and plug – mine came from a broken IKEA lamp! That’s all you will need. …to this! You might also like: