
Ribbon Crafts - Make Ribbon Crafts And Projects Hello, readers. It’s a stormy Monday, or at least it is here in New York, and my outlook has taken a nosedive as a result. It’s the kind of day that’s really only good for a few things, but since an afternoon nap isn’t in the cards for me, crafts it is! I just came upon a stash of assorted ribbon that I’ve socked away from hair accessories, gift wrapping, clothing and other crafty endeavors. I think this colorful ribbon centerpiece by Victoria Hudgins of A Subtle Revelry was meant to be hung over a party table, but I’d absolutely hang it over my kitchen table. Just when I thought I’d seen every possible way you could style a mantel, I found this setup by Yelena Johnson of The Stylish Soiree from an elegant San Francisco wedding on Green Wedding Shoes. If you’re the kind of crafter that has a whole table or room dedicated to projects, you probably also have tons of leftover ribbon. There’s no such thing as too many throw pillows, as far as I’m concerned.
Lace lamp – DIY | DosFamily We are at our little cottage in Dalarna and we are fixing it up. So we are able to use it even in the winter. (Dalarna is in th middle/north of Sweden. To me and Jenny it’s north but Sweden is a very tall country so I guess we are not even in the middle). Anyway it’s great cause I have the time and space to do lots of DIY projects. Starting with this lamp. First we used a huge baloon that I bought at a party store. Then you collect all the old Dollys (?) Paint them with lots of wallpaper glue so they are soaked. Hang the ballon on a string and put the soaked lace on the baloon. Then wait for a while. Pop the baloon when the glue is dry. Update 1:Some of you asked how to get the bulb into the shade. You mos def want to use a LED lamp or a energy saving bulb because it’s cold and it will not affect the glue either. I bought a nice looking iron wire in pink but when I opened the box it was red. Update 2: Problems making the lamp?! 1. 2. 3. 4. 5. 6. 7. 8.Good luck! xxx Isabelle
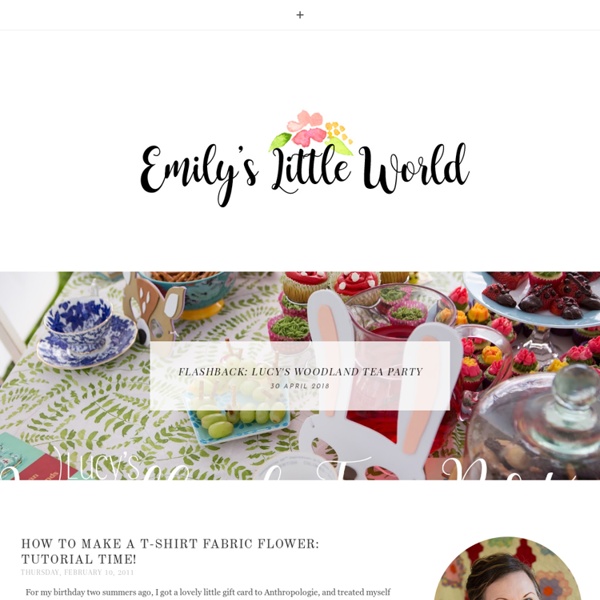
Fabric Basket Thanks for those of you who asked for a tutorial on the fabric basket project I updated yesterday! This is gonna be my second tutorial on my this blog. If anything isn't clear, feel free to leave me a comment and ask me for help. Remember that all seam allowances are 1/4" throughout the process, and seam allowances are included in all the fabric pieces used in this tutorial. ::Materials needed::Fabric: Natural Linen: 1/4 yard for Basket Exterior and Handles Pink Polka Dots Print: 1/8 yard for Basket Exterior Pink Geometric Print: 1/8 yard for Basket Exterior Flower Print: 1/8 yard for Basket Exterior Green Rabbit Print: 1/2 yard for LiningOther Materials: Fleece Batting: 1/2 yard First of all, cut out 2" squares from 3 different kinds of fabrics: 8 squares from each. (1/4" seam allowance is included, so your finished square will be a 1 1/2" square) Sew together two squares, making sure those two are different fabrics. Now Sew together pieces to create 2 6x2 patchwork layer. Trim excess.
Crafty Ribbons | Hello wednesday - taggie bib Don't you just LOVE wednesday's? Say hello to wednesday "hello wednesday" It's all downhill from now on to the weekend - yippee!!! Hello everyone, it is me Rachie. Ali asked me to be a "guest designer" for this weeks Hello wednesday project. Ooooh that sounds so grand - me a guest designer!! It all came about because I have fallen head over heels in love with this NEW baby washing line ribbon here . But this time just for play................... As soon as I saw the ribbon, I knew what I wanted to make - a taggie bib. I used a simple shop bought white bib and sewed the ribbon tags around the outside edge. Ali stole all the Challenge boxes and envelopes and we have not seen all the creations yet, but I am sure other challengers will have made a form of taggie. Phew that's my posting and "guest designer" status over, it was rather fun. Enjoy what ever you have planned for today. Rachie x x P.S.
mad in crafts: DIY Fire & Ice Lanterns - StumbleUpon The old becomes new: A new variation on the outdoor lantern. We have had an unusually warm winter in Michigan this year, and while the temps have been nice, I have had to hold off on this project idea until we got a cold snap. We finally got some snow and cold earlier this week, so I was able to try out this fun winter project. I had pinned a product called Globe Ice Lantern Kits a few months back recognizing that I could DIY them at home. To make DIY Fire & Ice Lanterns, you will need: a package of 3 punch balloons from the dollar store a package of 3 LED tea lights from the dollar store bowls small cylinder (shot glass, pop bottle, etc.) water freezer or below-freezing outdoor temps You are getting a glimpse of my less-than-sparkling kitchen sink in this post. First, stretch the opening of one punch balloon over your faucet. Turn on the faucet and let the water pressure fill the balloon to your desired size. If you were to freeze the balloon as it is, you could make a lovely ice orb.
DIY felt projects for the weekend A list of cute felt tutorials from around the internet...Felt-covered tape measure at Poppy Lane, aboveMini teacup pin cushion by Tasket Basket Crafts, aboveFelt business card holders at Smila's WorldFelt waffle cone by Hannah HoosierFelt floral wall mural by Mariana Leung at Design SpongeFelt bows at Sew GorgeousFelt rosettes at Mrs. Priss (Images from Poppy Lane and Tasket Basket Crafts ) Handcrafted Hitching Post: Chronicles Of A Shoe-Obsessed Bride, Part 5 (Ribbon Flower and Shoe Cuff Tutorial) So I know my over-the-top flowered shoes aren't for everyone (but I love them, so that's what matters, right?). However, the ribbon roses my mom made for them could be used for a ton of other projects too! For bouquets, boutonnieres, on a dress sash, in your hair, grouped together to adorn pews... there are a lot of possibilities out there! A while ago I searched the Weddingbee blog for a tutorial on ribbon flowers, but could only find clay and fabric flowers, so I asked my mom to take step by step pictures of her making the flowers. Here are the instructions: Cut the ribbon to desired length. Roll the ribbon five or six times and sew a few stitches to secure it. Fold the ribbon at about a 45 degree angle. Roll the ribbon along the fold until the fold disappears. Secure with a few stitches. Fold again at 45 degree angle. Roll again along the fold until the fold disappears. Continue folding and rolling to the end of the ribbon. The ribbon roses are now ready to decorate with! {Source}
Glass Tile Pendants Want to know how to make a glass tile pendant?? They're super easy - you can do this! Here's a brief tutorial. They can end up costing less than $1.70 each - wow! First gather your supplies - you'll need: --a glass tile, --a bail (that's the hook that goes on the back), --paper or fabric design, --diamond glaze and a small paintbrush, --superglue, --and a chain to hang it on. Some ideas for your glass tile pendants: --Use fabric and paper - here's a post with great idea tips. I bought all my supplies from CandyTiles and was really impressed. ** update - 10% off at CandyTiles if you enter "sugarbeez10" in the coupon code area ** First take your tile, and trace it onto your paper. Next squirt your diamond glaze on the back of the tile - about pea size. Then while the diamond glaze is still wet set your paper face-down onto it. Let dry for 5-10 mintues or longer. We had a great time making these - and so will you! Go make some!!
Recycle Tutorial – Making Of T-Shirt Yarn Another tutorial to help save our Mother Earth by turning unwanted items into something useful. This is the yarn ball I made out of an old T-shirt which I have been wearing for 10 years day-in day-out, wash-in wash-out. It finally broke down and tore at the collar and sleeves. Waste not, want not, I decided to recycle it. I have finished making the drawstring bag as shown above. {CLICK HERE to get the Recycle Tutorial – Making Of T-Shirt Yarn.} Pages: 1 2 Print / Download PDF {go make me} bejewelled flower headband / diy project - Go Make Me {go make me} bejewelled flower headband / diy project Flowers in the hair, how girly! You can increase your eostrogen levels too by making these jewel encrusted fabric flowers in minutes and glue to a headband for the latest look (see Fashion Designers below). Here's how 1} Gather some fabric scraps, preferably ones that don't fray (although I like it fraying too), felt, buttons and a headband. 3, 4 & 5} Adhere to one felt circle with fabric glue or hot glue gun. Who's got the look (l to r)BHLND Del Sole Comb, Alannah Hill Hair Accessories, Chanel, Alannah Hill Hair Accessories, BHLND Marguerite Halo, Mignonne Handmade Pink Carnations Halo Cate Holst on 30 January 2012 | Permalink {go make me} bejewelled flower headband / diy project <a href="?
Tutorial: Homemade Sidewalk Chalk | oh my! handmade goodness - StumbleUpon by Michelle Vackar, Modern Handmade Child One of our favorite outside activities at our home is drawing with chalk on the driveway. You can play hopscotch, four-square, and of course draw and create silly stories. What you will need: • Toilet paper or paper towel tubes • Scissors • Duct tape • Wax paper • Small bucket or disposable container to make the recipe • ¾ cup of warm water • 1 ½ cups Plaster of Paris • 2-3 tablespoons of tempera paint • Paper bag or a “mess mat” ** we made six tubes of chalk – we simply doubled the above recipe Step 1: If you are using paper towel tubes, cut each tube in half, so it is roughly the length of a toilet paper roll tube. Step 2: Cover one end of each tube with duct table to hold the contents within. Step 3: Cut as many pieces of wax paper as you have tubes. Step 4: Pour the warm water into your bucket. Step 5: Next you will want to pour the tempera paint into the Plaster of Paris mixture and stir so that it is mixed thoroughly.
Recycle | Woven Rag Rug Thank you for all the great feedback for liking my Braided Rag Rug. I understand that not everyone has a sewing machine or/and able to sew, so I created this no-sew version for the non-sewer who like to recycle their bed sheets or de-stash their fabrics to make this feet cozy Woven Rag Rug. This tutorial doesn’t require any loom for weaving; just use a sturdy corrugated carton box from your recycle pile. I hope everyone can do their part on greening the Earth again and reduce the rubbish that loaded the landfill. By the way, I gave the braided rag rug to my mum and she loves it so much, she is going to dig more old bed sheets out from her storage, which means I will have another bunch of supply to recycle. {Get full details on next page.} Pages: 1 2 Get all updates via email: Highlights from Our Partners