background preloader

DIY Pop Up Cards

DIY Pop Up Cards
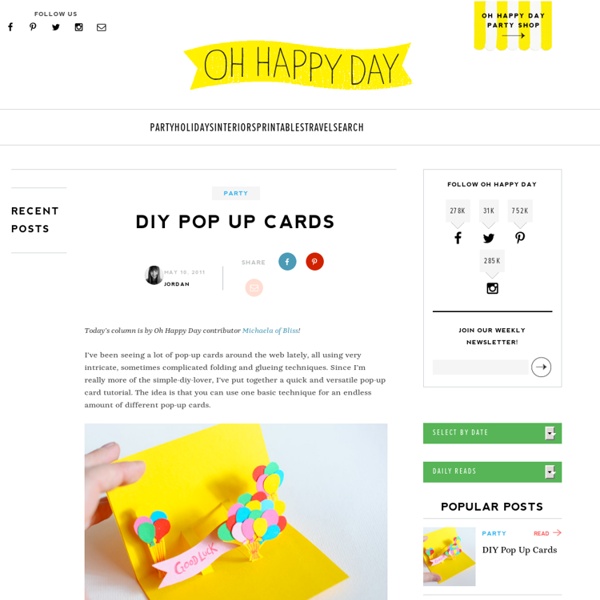
Today’s column is by Oh Happy Day contributor Michaela of Bliss! I’ve been seeing a lot of pop-up cards around the web lately, all using very intricate, sometimes complicated folding and glueing techniques. Since I’m really more of the simple-diy-lover, I’ve put together a quick and versatile pop-up card tutorial. The idea is that you can use one basic technique for an endless amount of different pop-up cards. Start with a simple card and fold it in half. Now start crafting the bits and pieces to display in your card. Stick some more balloons, or whatever it is you’re crafting, onto the flaps and voilà – you’re done. In the same way you can also create text cards (Happy Birthday), fields of flowers or rows of trees. All photos by Michaela for Oh Happy Day.

Mother’s Day Breakfast + Free Printable May 3 Mother’s Day is on Sunday (so soon!) here is a sweet little way to personalize the breakfast in bed ritual. Materials: Printable PDF, toothpicks, glue and tape. Step One: Print out pdf and cut out the shapes. Step Two: Fill out the blank tags and glue or tape them to toothpicks to make little flags and signs. Step Three: Surprise Mom with Breakfast in Bed! Just right click on the image below to download. Sorry, the comment form is closed at this time. Easy Craft Ideas - Accordion Book This easy to make accordion book is a personalized way to organize all of your small odds and ends. Each envelope page can hold something different such as- "to do" lists, stamps, tickets, coupons, and business cards. Also a fun craft idea for a gift - fill with photos, tickets, and other keepsakes and share with a special friend. Materials: Chartreuse A2 Envelopes Glue Stick Bone folder Labels Gel Pens Step-by-Step Choose your envelopes. See our How-to Video to learn about a similar accordion project.

How to Make a Golden Alligator Pinata Sep 9 I have a really fun pinata tutorial to share today. This is the second in the Oh Happy Day pinata series (the first is right here.) Materials: Metallic Gold Crepe paper in folds. Step 1. Step 2. Step 3: To decorate your alligator make one sided fringey garlands (which means you follow these directions but only shred one side of the strip instead of both. ) Then starting at the bottom of the alligator lay down a line of glue. Step 4. Step 5. Step 6. Step 7. Step 8. Step 9. Step 10. Step 11. Step 12. Sorry, the comment form is closed at this time.

DIY Easy Crepe Paper Garland This post was brought to you by T-Mobile. America’s Largest 4G Network — Now faster than ever. Click here for more details. Today I’m doing a project on how to make party decorations on a budget. Materials Needed: Crepe Paper, Thin Gauge Wire, Scissors, Wire Cutter, and String Step 1: Cut out the petals and the leaves. Step 2: Make the Flower. Step 3: Attach the flower to the string. All photos by Oh Happy Day. A special thanks to Katy Culver for assisting me today! Paper Flower Key Holder / Mark Montano Difficulty Rating: Beginner Tags If you need a quick 'just because' gift for someone, this is it! Here’s how: 1. 2. 3. 4. 5. 6. 7. 8. 9. 10. Supply List Wire hanger Needle nose pliers with built in wire cutter (most are made like this) Hot glue gun and glue sticks Stapler Book pages Fiskars Scissors and Pinking Shears Krylon Clear CoatSmall piece of cardboard

Letterfu - Letter-writing without envelopes, cutting or glue Tweet Treats | Easy Crafts for Kids -- Quick Arts and Craft Ideas -- Kids' Crafts This photo originally appeared in FamilyFun Magazine Total Time weekend projects Ages all-ages Regardless of the season, this easy-to-make feeder will be appreciated by your neighborhood birds. It features seed treats to provide them extra energy--particularly suitable during the colder months of the year. What you'll need 1/4-ounce package of unflavored gelatin 2 cups of your favorite wild birdseed Three 4-inch mini bundt or fluted pans Colorful ribbon How to make it To make a batch, bring 6 tablespoons of water to a boil. Do-it-Yourself DIY String Wedding Lanterns Yarn Chandeliers Jessica of Wednesday Inc shows us how to make those gorgeous twine chandeliers from the inspiration shoot she shared with us this morning. Using balloons, glue and twine, you can also make these lanterns for your wedding – and then bring it home and use it as your very own mid century lampshade. What you will need are: balloons, glue, yarn, tray for glue, corn starch 1/2 cup of Corn starch, 1/4 cup of Warm water, clear fast drying spray paint, hanging lamp cord or fishing line (depending on your desired final product), and a lighting kit if you’re looking for a fully functional lantern. Jessica recommends using a sharpie to mark on the inflated balloon how much room you need to leave for the lighting cord. She also recommends coating the balloon with vaseline prior to wrapping the yarn coated with glue so it doesn’t stick on the balloon once it’s dry. Are you getting excited to try to do this at home as much I am? Instructions: 1.

I feel melty. | Light&Spoon EDIT 11/5/2012: We are no longer selling custom crayon pieces in our Etsy shop. We are now focusing on a new jewelry project, so please check that out and we hope you enjoy the tutorial below! Edit: We are now selling custom crayon pieces in our Etsy shop! If you have questions about commissioning your own artwork, please see the shop or email us at lightandspoon@gmail.com. Here’s our contribution to the melted crayon craze on Pinterest. Anyway! He filled in in with marker, and then we taped some saran wrap around a piece of cardstock to make a run-off barrier for the top of the umbrella. We pulled out all the blues and greys from three boxes we got on sale for $2.50 each at A.C. Then it was just a matter of putting the crayons through the gun–the pretty-but-stupid impulse-buy glue gun that barely works, so I didn’t ruin my good one. The hardest part was removing the guard and fixing the wax around it. Yay! Like this: Like Loading...

25 clever ideas to make life easier Via: amy-newnostalgia.blogspot.com Why didn’t I think of that?! We guarantee you’ll be uttering those words more than once at these ingenious little tips, tricks and ideas that solve everyday problems … some you never knew you had! (Above: hull strawberries easily using a straw). Via: apartmenttherapy.com Rubbing a walnut over scratches in your furniture will disguise dings and scrapes. Via: unplggd.com Remove crayon masterpieces from your TV or computer screen with WD40 (also works on walls). Via: athomewithrealfood.blogspot.com Stop cut apples browning in your child’s lunch box by securing with a rubber band. Via: marthastewart.com Overhaul your linen cupboard – store bedlinen sets inside one of their own pillowcases and there will be no more hunting through piles for a match. Via: realsimple.com Pump up the volume by placing your iPhone / iPod in a bowl – the concave shape amplifies the music. Via: savvyhousekeeping.com Re-use a wet-wipes container to store plastic bags. Via: iheartnaptime.net

How to make gift bags from newspaper When I bought something at a store recently, the clerk handed me my purchase in a bag made from a newspaper. I liked it very much and had to make some more—thus today's DIY recycled newspaper project: gift bags made from the Wall Street Journal. You can vary the dimensions, of course, but here's what I used to create a bag that's 5" tall, 4.5" wide, and 3" deep. Stack two sheets of newspaper on top of each other. This will be a two-ply bag for extra sturdiness. Cut out a rectangle that's 15.5" wide and 8.25" tall. Fold a flap 1.25" down from the top. Cut two pieces of cardstock or chipboard to 4.25" x 1", then glue them on the widest two panels just under the top fold. Put glue on the outside of the 0.5" tab and bring the left-most panel over to form the body of the bag, aligning the cut edge of the panel with the folded edge of the flap. Upend the bag so the 2" flap is now up. Put glue on both flaps and fold them inward to form the bottom of the bag.

Inspired Entertaining: DIY Chalkboard Wine Glasses Last month I got an email from one of those "deal of the day" websites featuring a very cute set of wine glasses with chalkboard stems from a company called Chalkboard China. I've seen chalkboard glasses before, and always thought them to be a fun and chic way for guests to keep track of their glass throughout the night so you don't end up with mixed-up glasses or dozens of half-full glasses left around the house. But all the ones I've seen in stores feature a strip of chalkboard paint across the bowl of the glass, which I've always felt looks awkward and takes away from the beauty of the wine or beverage in the glass. What I like about this version is that the writing part is at the bottom on the stem and foot of the glass, so it doesn't compete with the beverage. I also like that the simple black foot on the glass is in itself an elegant design element, and would work just as well with no writing on it. So I figured, "I can totally make that myself!" Materials 1. 2. 3. Method Step 1.

Paper Fortune Cookie Favors by La La Laurie 10 Anime Series To Watch! // Also available in French With a huge amount of anime series produced each year in Japan, it’s easy to be lost! You’re wondering what you should watch, this list will help you out: • Plot: Female cyborg Major Motoko Kusanagi and her fellow police officers of Section 9 hunt down a host of criminals in both the real and online worlds. • Why? • Plot: Each of the stories in the series involves several unrelated plots intersecting and crossing each other as events spiral farther and farther out of control. • Why? • Plot: Satou, a 22 years old hikikomori (meaning acute social withdrawal), meets Misaki; she claims she will cure him of his hikikomori ways. • Why? • Plot: In a future where the world has been ravaged by a nuclear apocalyse, there exists salvation in a domed city named “Romdeau”, where humans and their android servants, the autoreivs, live in. • Why? • Plot: A man wakes up in a broken room with no memories. • Why? • Why? • Why? • Why? • Why? • Why?

Related: