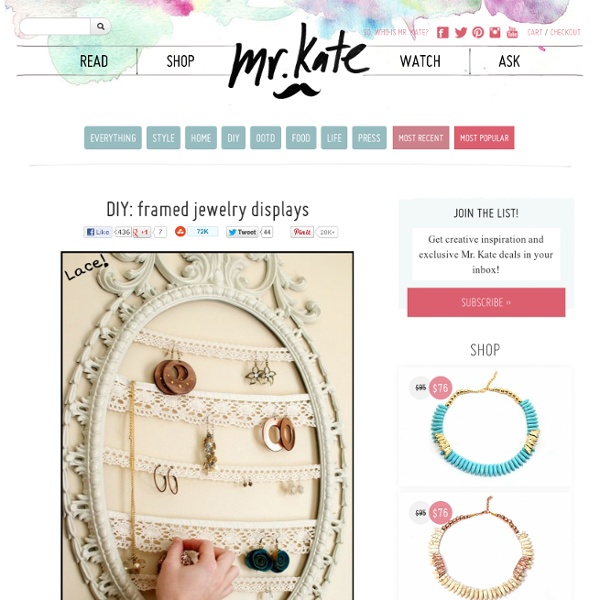
DIY: framed jewelry displays
5 Ways to Turn Zippers into Awesome Arm Candy
UPDATE: By popular demand, Zipper Bracelet Kits ($15) and readymade Zipper Bracelets ($20) are now available in the Brit + Co. shop! You know we love turning unconventional materials into wearable accessories. Today, we’re tackling zippers! We figured out 5 simple, beautiful ways to create bracelets, cuffs, and bangles out of metal, plastic, and repurposed zippers. Materials: - zippers - E-6000 quick hold contact adhesive - velcro or snap buttons - leather crimps + clasps - Tools: needle nose pliers, sharp scissors First thing to do is get your zippers! 1. These bangles are sweet, and have a definite friendship bracelet vibe. Use colored zippers for these, in whatever colors you like. Attach cord ends so that you can add a clasp and loop. 2. For this one, you’ll want a zipper with some contrast. We chose a black zipper with gold teeth. 3. This one is silly simple! Get a zipper with a more interesting material like denim. 4. 5. Last, the wrap bracelet! And that’s a wrap (hehe!).
Etsy Roundup: TMNT Edition | Top Hat Sasquatch
Etsy is an interesting place. I go there and search every once in a while but I think I’ve only bought things a couple times. Out of curiosity today I searched for Teenage Mutant Ninja Turtles to see what popped up, and what follows are some of the coolest items I found. Some people seem to confuse Etsy with eBay, so I didn’t include anything like vintage clothes, action figures, or things that weren’t made by someone (or at least upcycled). Shredder Cup Cozy by SmakJamCreations Knitted things and crocheted things pop in to my mind first when I think of Etsy, so how appropriate that I found this adorable cup cozy featuring the Turtles’ arch-nemesis, The Shredder. Leonardo Bead Sprite from Turtles in Time by OverworldCreations Bead sprites are another thing that pop up a lot on Etsy when you search for retro things, and rightly so. TMNT NES Cart Portable Hard Drive by FalseStream TMNT Fabric Oven Mitt by DeeZignz I had to include something that used this fabric. Honorable Mentions:
DIY Glitter Vases
Inspired by many reader requests for a DIY tutorial to recreate the glittery mason jar vases from this New Year’s Eve party, today we’re playing with glitter. A whole lot of glitter! I whipped up two different versions of these glitter vasses, both of which are quick and easy. They’re perfect for parties, weddings or just to add a touch of sparkle to your dining room table. Supplies - Glass containers (preferably with smooth, straight sides)Glitter (I used Martha Stewart Crafts glitter in Wintermint and Bronze from Michaels)Foam brushPainter’s tapeModPodge For the first vase I used a small cylindrical vase and using the foam brush, applied a thin and even coat of ModPodge on the interior walls of the vase. Then I just let the vase dry. For the second version, I used a mason jar and went for a glitter-dipped look. Next up, I used a copper glitter and coated the outside of the vase. Once everything was nice and dry, I had two of the prettiest vases going!
Related:
Related:
