
Playing with Displace Filter in Photoshop I have been playing a lot with the Displace filter in Photoshop and I still get impressed with how powerful it is. Even though I have written some tutorials using it, I decided to try to recreate a different effect that I saw in one of the images submitted for the Daily Inspiration. It was a brick wall deformed like it was made of cloth. So in this tutorial, or a quick-tips I will show you how to create a curtain made of bricks or how to deform a brick wall as it was a curtain. To do that we wil use a few stock photos, layer adjustments and the Displace filter in Photoshop CS5. The technique is pretty simple and the tutorial won't take you more than 30 minutes to go through it. Step 1 Open Photoshop and create a new document. Step 2 Let's import another image, now of a girl opening the curtains. Step 3 With the Lasso Tool (L) or the Pen Tool (P) select the empty white. Step 5 Now select the hands/arms of the girl and the curtains. Step 6 Step 7 Go to Layer>Layer Mask>Hide Selection. Step 8
Creation of Aquatic Sounds In this tutorial I will show you how I created “A Life Of Aquatic Sounds”. We will realize it using a variety of blending mode tricks, photo filters and other useful Photoshop techniques. At the end of this process we will have a beautiful photo manipulation, realized in a short time and a very easily way. Preview: Become a Premium Member and get unlimited access to source files and premium resources for only 7$/month. Click here to learn more. Step 1 In this step we will cover the beginning of our manipulation, simple document creation and placement of the base stock image as well as the hue change. Once you have your stock, go ahead and place it into your document as I have done below. We will change the hue of the liquid from red to blue. Our image now looks like the this one: Step 2 In step two, we will drop our background in, and use a few simple blending modes and techniques to simplify the isolation process so it takes no time at all. Our composition should now look like this one:
80+ Photoshop Actions for Giving Your Pictures a Vintage Look | Freebies - StumbleUpon Photoshop actions are great. With just a click of a button you can apply a complicated effect to a photo instantly. One of the most popular type of actions is the vintage or retro style. With the popularity of vintage-inspired Instagram filters and film emulation, the older style is desired with many photos. Fortunately, there are plenty of quality Photoshop actions that will help you to get vintage effects quickly and easily. Instagram Filters (13 actions) Lomocam (10 actions) Lomo Action Hard Lomo Action Holgarizer Vintage Light Leak Action Vintage Heaven Action Vintage Dream Action Retro Cross Action Vintage Matte Action Faded Film Action Old Film Action Retro Style Actions (10 actions) Instant Hipster (10 actions) Prestalgia (10 actions) Vintage Gold Action Aged Black & White Action Glory Days Vintage Actions (7 actions) Muted Colors Vintage Action Old Tones (6 actions) Vintage-Inspired Actions (4 actions) Minty Tint Vintage Action
Vodka Ad Alcohol is one of the most commonly advertised products on the planet. During major sporting events such as the Superbowl, the World Cup and the Olympics, companies spend millions on TV advertisements, and also product advertisements in banner and billboard format at the sporting venue itself. However, because alcohol is a liquid, it can be very difficult to design around since liquid stock images require significant more attention during isolation and blending in order to appear realistic. In this tutorial, you’ll learn how to create a vibrant, colorful alcoholic product advertisement in Adobe Photoshop, using some easy techniques and quality stock images. You’ll learn how to deal with liquid stock images, how to take a brand image and create elements to match, and how to work with colors and composition for a brilliant result. Tools Used Adobe Photoshop Final Image Preview Next we will be adding in some color to our bottle. Now we can set this layers blending mode to color at 100%.
Create Surreal Photo Manipulation With A Man Without Face First, I’d like to thank Joubert Quentin a.k.a hybrid-creation for allowing me to create this tutorial based on his image, Your Skull is Red. You can see his portofolio in DeviantArt or his personal site. Before we start, take at look at the image we are about to create below. In this tutorial we will learn how to create selection, adjusting color, and adding depth to image. Source Needed For this tutorial, we will need these images: Step 1: Selecting The Victorian Man We’ll start by cutting this man from his background. Step 2 Once we’re done creating path, hit ctrl+Enter to change it to a selection. Step 3: Removing Face To remove his face we can just use an eraser. Step 4: Fixing Floating Hat Now, we need to create his bottom hat. Step 5 With clone tool, draw his bottom hat. Step 6 Using lasso tool, create ellipse selection underneath his hat and fill it with black. Step 7 Add Gaussian Blur (Filter > Blur > Gaussian Blur) to give it a soft realistic shadow. Step 8: Fixing Collar Step 9 Step 12
Manipulate Smoke Learn to apply the Warp Tool effectively and a few other tricks to make smoke look like a skull. This technique has a variety of outcomes and works well with water, clouds and a whole bunch of other stuff. This is probably more for intermediate users, as I guide you through the process well, but not every Warp Grid point handle move. Let's get started! Final Image Preview Take a look at the image we'll be creating. Video Tutorial Our video editor Gavin Steele has created this video tutorial to compliment this text + image tutorial. Image Assets Smoker - from my personal collectionSkull - thanks to Martin Land for thatSmoke 1, Smoke 2, Smoke 3, and Smoke 4 Step 1 Open up Smoker image. Step 2 Open the Skull image and draw a path around it using the Pen Tool (set to Paths not Shape Layers). Make a selection from your Path (Command-click the Path icon on the Paths palette) and copy and paste it into the working document. Step 3 Step 4 Change the "CIG_SMOKE" Layer Blending Mode to Screen. Step 5
Post-Apocalyptic City Illustration In this tutorial, we'll change a full of sunshine, ordinary photograph into a gloomy image of the world after destruction of mankind. Using simple tools, we'll turn lively streets into abandoned ruins overgrown with weeds. A number of stock images and a few little tricks will let us optimize our work and make this job more interesting and spectacular. So let's go! Final Image Preview Take a look at the image we'll be creating. Preparation All the photos I've used are taken from the stock.xchng site. Step 1 Open the city image, which you intend to use, and save it under a different name. Step 2 Now, in order to create the appearance of destruction, several actions need to be taken. Step 3 Open the flag image, and separate the flag from the background. Select the Eraser Tool (large size and hardness set at 0%) and remove the side part of the flag. Finally, make the image monochromatic (Image > Adjustments > Black & White). Step 4 Place the flag onto the surface of the main image. Step 5 Step 6
Dramatic Sci-Fi Photomanipulation How to Create Dramatic Sci-Fi Photo Manipulation in PhotoshopReviewed by Jarka Hrnčárková on Sep 19Rating: Preview of Final Results Download the PSD Last Chance.zip | 2.62 MB Download from Website Dramatic Sci-Fi Photo Manipulation Photoshop Tutorial Resources Step 1 – Preparing Background Download the picture of background and open it in Photoshop. Let’s make the very first adjustment. Set the Input Levels on 43; 0,80; 216. Your image should look like the one below so far. Step 2 – Cleaning Foreground In this step you’ll remove roofs in the trees in foreground because they’re quite disturbing. Add new layer on the top of all layers and name it e.g. If you’re not familiar with how to use the Stamp Tool (S) I recommend you to read some tutorials about this excellent tool. Be careful to not to use the same source spot all the time to avoid the repetitive pattern you could get. Step 3 – Adding Sky Download the picture of sky and drag it into your photo manipulation. Step 5 – Making Sky More Dramatic
The Cosmos: Create a Spiral Galaxy A galaxy is a massive collection of stars, stellar remains, gas, dust, and planets. Galaxies can contain as few as 10 million stars, or as many as 100 trillion. Astronomers believe that there are about 170 billion galaxies in our universe, each varying in shape from spiral, elliptical, to irregular. Today's tutorial is part of a 4-part series depicting the journey of the inhabitance of a dying world that must travel into the unknown to find a new world to call home. Tutorial Assets The following assets were used during the production of this tutorial. Step 1 - The Galaxy We will begin with the main feature of this image and the most important. Now select black and fill in your canvas. OK next create a new layer on top and go to the clouds filter and generate some. Then you will go to difference clouds and generate some on the same layer twice. This is what you should get after these steps. OK now let's create another layer and fill it up with black. Now fill the canvas with black.
Create a Surreal Upside Down Mountain Painting in Photoshop In this tutorial we will demonstrate how to create a surreal upside down mountain illustration using digital painting techniques in Photoshop. This piece was part of SlashThree’s latest Paradigm Shift Exhibition. Tutorial Assets The following assets were used during the production of this tutorial. Brushes Before You Begin This piece has been completely done with the help of a graphic tablet, to be precise a Wacom Bamboo Fun. Brushes Used These are the brushes used in this tutorial. Step 1 - The Sketch This sketch was made directly in Photoshop using a tablet and a small round brush. You don't have to be the best artist in the world to do this. I made this piece by thinking about how I could make a mountain that could work as the focus of the piece. This will be more obvious once the painting is completed, in step number 2. Step 2 - The Mountain Sketch is done, we've put some thought into it, let's start painting. Using the Brush tool (B) and the brush number 2 I started painting the mountain.
Create a Dark and Mysterious Fantasy Portrait Create a Dark and Mysterious Fantasy Portrait In this tutorial we will combine several stock images, adjust color, use retouching techiniques as well as make and control custom brushes to create a dark and mysterious blue portrait. Final Image As always, this is the final image that we’ll be creating: Step 1 Open the background image from the resources section for this tutorial and crop it. Our aim is to make it darker, more contrasted and also blurred to make model the focus. Duplicate background copy ( that is applied Gassian Blur) and set the mode to Multipy 100%: We will use Curves to make more contrast and reduce the light, especially the right part. Step 2 Open model stock. You should do basic retouch for model skin before adding next steps. I just need to fix a dark skin part on her forehead and nose top as you can see in screenshot below: Create a new layer, grab Eyedropper Tool ( I ) and pick color on bright part skin on her face: Step 3 Open butterfly 1 stock. Step 4 Step 5 Curves: Step 6
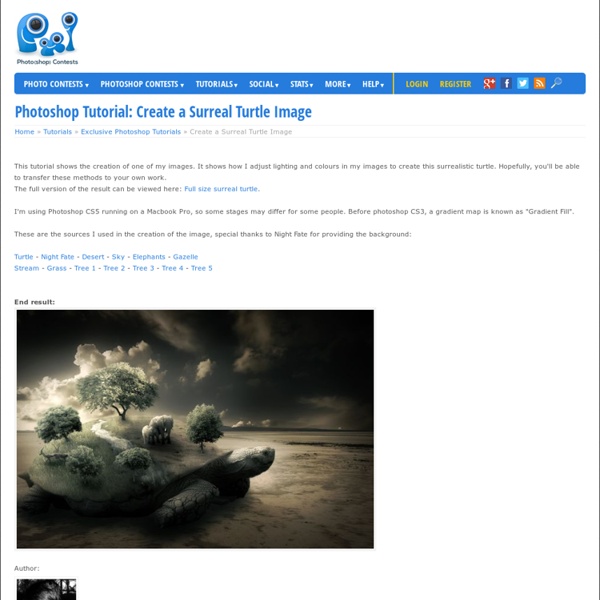
Create a Mysterious and Eerie Surreal Image in Photoshop Create a Mysterious and Eerie Surreal Image in PhotoshopReviewed by Michael Vincent Manalo on Jul 26Rating: Preview of Final Results Mysterious and Eerie Surreal Image Photoshop Tutorial Resources Road 5 – Nighfate stockCanim Lake 4 - Little stock | (Mirror)Window – Mehrunnisa stockCliff type 2_2 – The Strawberry TreeSuit Stock 2 – rhyfelwr stockSwing Stock 2 – Shoofly-StockMetal Texture 15 - Wojtar stockPaper Texture 1 - Wojtar stock Step 1: Create a New Image File Let’s start, first create a new image file, go to the Menu bar and click File > New, and then input the following values on their respective fields: Width: 3000pxHeight: 3000pxResolution: 300pixels/inchColor Mode: RGB Color; 8 bitBackground Contents: Transparent Step 2: Create the Road In this step, we will be creating the foreground of our picture which is the road. Once you’ve cropped it, activate the Move tool by pressing V on your keyboard. We positioned it there so it would be easier for us to resize that image into a square.
Create a Spooky Scarecrow Wallpaper Using Photoshop Create a Spooky Scarecrow Wallpaper Using PhotoshopReviewed by Santhosh Koneru on Jul 25Rating: Preview of Final Results Download the PSD Scarecrow.zip | 46.9 MB Download from FileSonicDownload from Website Scarecrow Photo Manipulation Photoshop Tutorial Resources Scarecrow – jagged-eye Corn Field – sxc.hu Dark Sky – Smoko-Stock Farm House – sxc.hu Tree Brush – lorylinn-stock Fog Brushes – zoozee Moon – wachowicz Crow – sxc.hu Wheat Grass – sxc.hu Scarecrow2 – lindowyn-stock Wood – anjusha Light Specs – Sanami276 Old Paper Texture – bashcorpo Grunge Texture – amptone-stock Scarecrow Font – Urbanfonts Metal Texture – wojtar-stock Step 1 Draw a rough sketch of the concept that you have in mind before proceeding for the search of the resource. Step 2 After sketching the concept have a close look at it to notice the elements that are embedded in it. Step 3 2) Set the Size of the Refine Radius Tool (R) to 127 and select the Output to New Layer. Step 4 Step 5 Step 6