
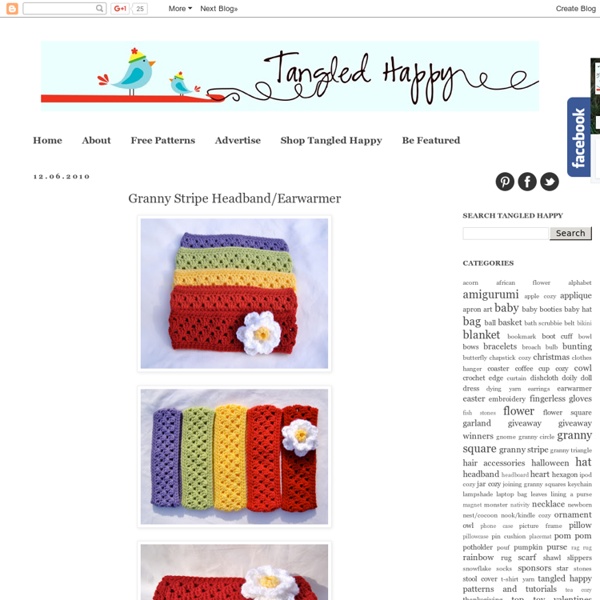
More crochet gifts... Following on from my last post, here are some more gifts I gave at the end of last year. My daughter's teacher was about to go on leave and was heading for the UK and Europe as soon as school ended... hoping for a white Christmas and I'm pretty sure she would have had one. So with her bottle of wine she got a scarf, and a block of Toblerone. (Just 'cause she likes them. :-) ) The scarf is lovely and soft, but there are a few things about it that I wasn't happy with. For starters, it took more wool than I expected; that's why it has black rows either side of the purple. Also it's a bit too short; I was worrying about the amount of yarn I had. I'm 99% sure that I used this pattern. I'm not even sure of the hook size any more, but I think it was a 5 or 6mm (bigger than recommended for the yarn to help the scarf to drape). And here is one more thing I made last year. Anyway, this "ear-warmer" pattern - I thought - was also a great headband pattern. As for the flower patterns...
Tuto pull filet au crochet toutes tailles facile et rapide Pour réaliser ce pull qui est totalement ajustable à toutes les tailles car c'est la chaînette de départ qui compte, prévoir pour une taille enfant entre 300 et 600m de fil et pour une taille adulte je dirais environ 1500m. Très rapide à faire et sans couture, compter environ 4 heures pour une taille enfant J'ai réalisée ce pull avec de la laine qui se tricote en 4-5 et j'ai utilisée un crochet n°5.5 Pour commencer monter une chaînette qui correspond au tour de votre taille en respectant un nombre de maille divisible par 3 + 1 maille Faire 2 rangs de brides. Après ces 2 rangs de brides faire 5 mailles en l'air, sauter 2 mailles et faîtes une maille serrée dans la maille suivante répétez tous le rang. Pour le second rang et ont va travailler en spirale faire 5 mailles en l'air piqué dans l'arceau du rang précédent et faîtes une maille serrée répétez jusqu'à ce que vous arrivez aux dessous des bras. Tous droits réservés.
Fall Crochet Headband Pattern Get ready for back to school with this easy crochet headband pattern! This cute tie together headband works up quickly and will soon be your new go to fall accessory. Read on down for the full FREE crochet pattern. Skill Level Easy Materials Worsted Weight (4) YarnYarn needleScissorsSize H Crochet Hook Main Headband Chain 32ROW 1 : Single Crochet in 2nd Chain from hook. 2nd Piece Join a new piece of yarn with Slip Stitch along the short side in the center of Band you just finished making2 Single Crochets along side,Turn, Chain 1 for 15 timesSingle Crochet 2 TOGETHER and Chain desired amount (I did 15), tie off (this will be the piece you will use to tie your headband together when you wear it!!) 3rd Piece Repeat instructions for 2nd Piece along other short side of headbandWeave in loose ends. I hope you enjoyed this crochet headband pattern and if you have any questions please feel free to send me an email at krista@rescuedpawdesigns.com Happy Crocheting! Krista Extra Information
Twisted Cable Scarf and Headband MaterialsHook: JRed Heart Super Saver in Aran Fleck - 9 oz.Tapestry Needle Special Stitch Front Post Double Crochet (FPdc): YO. Insert hook from front to back on the right side of the dc. Going around the post of the dc, insert hook from back to front on the left side of the dc. Scarf Row 1: Ch 24. Row 2: (3 sc, 3 FPdc around dc below) three times. 3 sc, ch 1, turn. Row 3: Sc across (21 sc). Row 4: (3 sc, 3 FPdc around FPdc below) three times. 3 sc, ch 1, turn. Rows 5 & 6: Repeat Rows 3 and 4. Row 7: Sc across (21 sc). Row 8: (3 sc, sk 2 FPdc below, FPdc around third FPdc below, FPdc around middle FPdc, FPdc around FPdc on the right, sk 3 sc) three times. 3 sc, ch 1, turn. Rows 9-14: Repeat Rows 3 & 4 three times. Rows 15 & 16: Repeat Rows 7-8. Continue in this pattern until the scarf reaches the desired length, ch 3 (instead of 1) and turn for the last Row. Last Row: Dc across (20 dc, plus 3-ch turning ch). Headband Row 1: Ch 12. Row 2: 3 sc, 3 FPdc around dc below, 3 sc, ch 1, turn.
Logiciel pour créer un schéma de crochet PRINCIPE : Ce logiciel permet de réaliser des schémas d'ouvrages en rond. Une version gratuite est disponible ICIOuvrez le logiciel, sur la page d'accueil, cliquez sur File puis New Pattern : Dans la fenêtre qui s'ouvre, indiquer le nom du patron (pattern name), le nom de l'auteur (designer), puis cliquer sur Setup et indiquer le nom sous lequel le patron sera sauvegardé. Répondre oui à la question posée. Cliquez sur Display, vous pouvez choisir certains paramètres :SECTIONS : le nombre de divisions du patron (le nombre de mailles de base du 1er rang), il est compris entre 1 et 512. STITCH COLOR : la couleur des points, on peut choisir grey tones (les points sont gris et noirs), color by stitch (chaque type de point est d'une couleur différente) ou colors by row (couleur différente en fonction des rangs). Par défaut, les divisions sont paramétrées à 8 et il y a une couleur différente par point.
Simple Crochet Headband Pattern Similar Free Crochet Patterns: Simple Crochet Ear Warmer Pattern | Easy Beginner's Crochet Headband Pattern | Free Crochet Headband Patterns | Free Crochet Ear Warmer Patterns | Free Crochet Patterns for Accessories | Free Crochet Patterns for Beginners Project Description: This headband is a fast, easy crochet project. It's made using only two stitches: single crochet and chain stitch. Skill Level: Beginner This pattern is easy enough for beginners, but I recommend this pattern to crocheters of all skill levels who want a quick and easy project to work on. Materials: Worsted Weight Yarn: I crocheted two samples of this headband (and I'm sure I'll be making more of them!) continue reading below our video Crochet Hook: I crocheted both of my sample headbands using a size J crochet hook. Abbreviations Used in This Pattern: rep = repeat sc = single crochet st = stitch Gauge / Finished Size: This headband is designed to be stretchy in the vertical direction. Design Notes: Ch 9. Finishing the Headband
Free crochet headband earwarmer pattern These headbands are a really cute accessory that also keep you warm. They have proven popular items at markets and in my etsy store. I'm pleased to offer you this free pattern and give permission for you to make as many as you like! Chunky Headband / Earwarmer Crochet Pattern by Mel Paton (Mel P Designs). Yarn: Lion Wool Ease Thick and Quick Hook: 10mm Headband Row 1. Flower 1. There you go, a simple pattern that gives great results. ♥ Mel.
Tuto amigurumi - Porte clé mini Yoda - Tout sur le crochet et les "Amigurumis"! Re-bonsoir!! Suite à l'article de cet après midi, Louise (Les tutos de Louise) et maelyschloe2 ont deviné en voyant la tête et un bout du corps que mon nouvel amigurumi est un mini Yoda!! Bravo ;) On entend beaucoup parler de Star Wars en ce moment, et même si je ne suis pas une très grande fan (pour ne pas dire que je ne suis pas fan du tout!) j'ai quand même eu envie de crocheter un petit Yoda!... Il a tout de suite plu à mon fils, surtout quand il l'a vu dans le petit oeuf. Voici le tuto : Niveau de difficulté : 2/5 Matériel : - un peu de laine ou de coton vert - un peu de laine ou de coton couleur crème - un crochet 2.5 mm - 2 yeux de sécurités 3 mm - Un petit bout de tissus brun (ou de le feutrine) - 1 aiguille à tapisserie (ou à laine) - Un peu de rembourrage - Un anneau porte clés Abréviations : ms = maille serrée ml = maille en l'air mc = maille coulée db = demi bride b = bride aug = augmentation dim = diminution Notes : Ce modèle est crocheté en spirale. En vert 1- 6 ms dans un cercle magique (6)
Girlie Headband 2K+Save Here you can find an easy free crochet pattern headband for girls, a flower Girlie Headband that could be worn in winter time as ear warmer too. This is a great project to your stash that filed up to your place. This headband for girls circumference 20” can fit to 3-5 years old. Needed Yarn: Red Heart worsted yarn - stash yarn Yarn I used here >> Spring Green, White, Baby Pink, Shocking Pink, Light Grey Hook: US I9 / 5.50MM Gauge 4" - 18 stitches : 13 rows Laying flat: 9 1/2 x 3 1/2 Stitch Guide 2dc-Tog: Yarn over, insert hook in the same st and draw up a loop, yarn over and draw through first 2 loops on hook, Yarn over, sk next st, insert hook in next st, draw up a loop, yarn over and draw through first 2 loops on hook, yarn over and draw through all 3 loops, 2dc-tog made. Sc new color: Insert the hook in next 1ch sp, catch the new yarn and draw it through two loops on the hook, one loop remains on the hook, single crochet new color. Terms Used Sl St: Slip Stitch Sc: Single Crochet Sk: Skip
Popcorn Headband Popcorn Headband - Free Crochet Pattern Thank you to all those who let me know about the printing problems. I think the "Print Friendly" code is working again. And you can still right click and select print. Material: Red Heart Soft Touch Hook Size: H/8-5.00MM Popcorn Stitch: Work 5 dc in ch indicated, remove hook from loop, insert hook in first dc of 5 dc sts made, pick up the loop and pull through. Ch 53 Row 1: Sc in second ch from hook and in next ch, *ch 3, sk next 3 sts, sc in next 2 sts, repeat from * to end of row. Row 2: Ch 2, dc in first 2 sts, *ch 1, sk next ch, work popcorn in next ch, ch 1, sk next ch, dc in next 2 sts, repeat from * to end of row. Row 3: Ch 1, sc in first 2 sts, *ch 3, sk next ch, sk popcorn st and next ch, sc in next 2 sts, repeat from * to end of row. Edging and Strings Sl st into next st and into ch-3 lp, *ch 1, 5 sc in same lp and in each lp to end, sl st into next 2 sts and working your way around the corner sl st into center of dc st.
Happy jellyfish amigurumi pattern - Amigurumi Today Use this free jellyfish amigurumi pattern to crochet your own happy plush jellyfish! The toy is about 19 cm tall including tentacles if you use the materials specified in this free crochet pattern. Materials: YarnArt Jeans of one main and two additional colours (55% cotton, 45% polyacryl, 50 g/160 m). You can use any other yarn you like.1.75 mm crochet hookholyfiber7 mm safety eyesglueneedlependant loop Note: when crocheting toys you should use a smaller hook than it’s indicated on the yarn label, so that the fiberfill doesn’t look through the holes. The toy is crocheted in a spiral without a slip stitch at the end of each round. The bottom part Rnd 1: 6 sc in a magic ring Rnd 2: (inc) repeat 6 times [12] Mark the last stitch of the round, it’s the place to begin joining tentacles. Tentacles Join the tentacles to the second round of the bottom part. Fasten off and crochet 40 ch + 1 turning chain Crochet across the chain (sc in the next stitch, inc) repeat 20 times.
Coral Candy Headband Crochet Pattern A couple of weeks ago I suddenly realised it's been many a month since I last designed a pattern featuring the Tunisian Knit Stitch! After this slightly shocking realisation, I put my thinking cap on, and came up with this simple knotted headband that can easily be crocheted up in an afternoon!.. Aren't those types of projects usually the best? What You'll Need 10.00mm Crochet Hook Tapestry/Yarn Needle Scissors Size This headband fits 13 Years & Up {Easily adjustable, as explained in pattern} Width - 3.5" You can either add or take away a couple sets of row 2, depending on how long you'd like your headband to be.Fasten off, and weave in loose ends.Taking your tapestry needle, sew both ends of the headband together. Knot