
Creative Wedding Guest Books | ohamanda.com - StumbleUpon Welcome to ohAmanda! See more of my wedding & birthday party posts. It’s kinda my hobby to find fun party ideas! My sister-in-law is getting married in August. 1. Source: etsy.com via ohAmanda {impress your kids} on Pinterest 2. Source: clarkwalkerblog.com via ohAmanda {impress your kids} on Pinterest 3. Source: stylemepretty.com via ohAmanda {impress your kids} on Pinterest 4. Source: etsy.com via ohAmanda {impress your kids} on Pinterest 5. Source: etsy.com via ohAmanda {impress your kids} on Pinterest I think I love this car and balloons better. Source: etsy.com via ohAmanda {impress your kids} on Pinterest But this one? Source: pearlseventsblog.com via ohAmanda {impress your kids} on Pinterest 6. Source: etsy.com via ohAmanda {impress your kids} on Pinterest 7. Source: etsy.com via ohAmanda {impress your kids} on Pinterest 9. Source: greenweddingshoes.com via ohAmanda {impress your kids} on Pinterest 10. Source: etsy.com via ohAmanda {impress your kids} on Pinterest So, what do you think?
DIY: Bathroom Baskets | Little Miss Wedding Planner We had a major wedding craft session in our household this weekend, so expect a lot of DIY posts from me this week. First up: Bathroom Baskets! I know, I know…it seems a bit early to be doing bathroom baskets, since the wedding is still 7 months away. In effort to stay organized and meet my goal of “no wedding tasks left to complete wedding week,” I am trying to knock off as many little tasks as possible early on—one of those being bathroom baskets. If you’re not familiar with the wedding world, you might be asking yourself what bathroom baskets are (Dr. The Boys’ The Girls’ I bought the baskets at Michael’s a few weeks ago when they were having a may-jah sale (and my 40% off coupons didn’t hurt, either!). The poem says: So happy you’re here sharing our special day But just in case something should go astray: Please help yourself to the contents within Mouthwash, hand lotion or ibuprofen Use what you need, and just leave the rest For it may be useful to some other guest! So what’s in em?
Recycled Geometric Light This isn’t so much a DIY project complete with tons of instructions so much as it is a jaw-dropping example of what you can do when you grab a bunch of repurposed trash and really put your mind to it. If you can follow these photos well enough to replicate this stunning light, more to you. We kind of just wanted to blog about it to highlight what a modern idea it is. “Designer Ed Chew takes a green step in the right direction with the TetraBox lamp, a light object made from discarded drink packets that would have otherwise ended up in landfills already packed to the brim. What do you think? Images: Yanko Design
101 Handmade Valentine&s Day Ideas - StumbleUpon I’ve gathered some creative tutorials, free printables and just plain fabulous ideas to help make your Valentine’s Day extra sweet this year! There’s a little something for your home, gifts for friends and ideas for your children to share at school. It doesn’t have to cost you a ton to make Valentine’s Day super fun. Make it a handmade holiday! That should give you some ideas and make you look like the Creative Diva you really are…right?! New for 2013 — 101 Valentine’s Day Printables {Free!} You’ll also find tons of sweet printables for gifts on this list of 101 Pretty Printables. Looking for something for that special man in your life? Feel free to share it with your friends…they’ll think you are the bestest friend in the world! ~Kim Hooked on Tutorials?
HANDMADE PAPER ARTS Posted by: otilrotcod on Sep 16, 2011 Tagged in: Untagged STEP 1 (SOAKING OF PAPER) Soak paper in a DEEP CONTAINER. Make sure that the paper is fully soaked for quick pulping. STEP 2 (PULPING OF PAPER) There are 2 ways to PULP paper- By OSTERIZER or By HAND(Manually) Once you achieved its claylike pulpiness make sure that any traces of its original form(paper) is gone and that pulped paper was formed. STEP 3 PREPARE A PLYWOOD AS BASE FOR YOUR CREATION. STEP 4 (DRYING AND SMOOTHING) Just let your pulped creation dry under the sun. STEP 5 (BASE PAINTING) After your design has been smoothen. STEP 6 (PAINTING AND EMBELLISHING) Paint your design. STEP 7 (FRAMING) This would depend whether you wish to frame your work of art. Four Leaf Clover Charm [ Close Privacy Policy ] Privacy Policy / Your California Privacy Rights Revised and posted as of March 4, 2013 Prime Publishing, LLC ("Company," "we" or "us") reserves the right to revise this Privacy Policy at any time simply by posting such revision, so we encourage you to review it periodically. In order to track any changes to this Privacy Policy, we will include a historical reference at the top of this document. This Privacy Policy will tell you, among other things: Your California privacy rights. ACKNOWLEDGEMENT/YOUR AGREEMENT Company websites are not intended for use by individuals under the age of 18 or those who are not legal residents of the United States. HOW DO WE COLLECT INFORMATION AND WHAT INFORMATION DO WE COLLECT? Distribution Partners Website operators that license our ad serving technology pass information to us so that we may serve advertisements to you. Website Registration Forms We collect information about you when you register on one of our websites.
Life As Lou :: Magic Boxes: A Life As Lou Online Class :: January :: 2008 Due to popular demand, I am doing a tutorial on the Magic Boxes I showed off in some previous posts. To begin, choose your paper. You need six sheets of matching paper (preferably a heavier weight). Choose one for your outside, budgeting for a contrasting one for your lid, and 4 to create the inside boxes. Cut as follows (all measurement are in inches): Outside: 6 x 11 3/4ths Lid: 8.5 x 8.5 4 inner boxes: 8 x 8 The only challenging part of this project is creating the lid and inside compartments. 1. 2. fold the tips of your paper in so that they meet at the center. Fold in all four sides, and then unfold. 3. This fold gives you the sides of your box. 4. I have also colored four triangles. 5. 6. Do the same thing on the other side. 7. Repeat this process on your 8 inch and 8.5 inch papers. Now for the outside. 1. 2. To put the boxes in, first adhere one to the very top right corner, making certain that you are flush with the corner of the outside paper. Here are a few that I’ve made.
Anatomical Rib Cage Flexible Silicone Mold/Mould 42mm by MoldMuse Re-purposing: Tshirts into 5-strand-braided-headbands I was walking through Target a few weeks ago and noticed this little knit fabric headband that was not just braided together…….but woven. I decided they were charging way too much for something that could be made with t-shirt scraps. And that means free. So there you have it. A nice and easy project to give my bad-hair-day head some love. (Or you may need one for working out. I kinda love it on my little girl . She always has little hair fly-aways that get into her face…….and this helps with that problem. It even works great with her hair down…..and keeps that hair tucked behind her ears. And yep, good for me too. Thanks little t-shirt scraps. Want to make your own? First, find some old t-shirts. Then, cut your fabric into long strips. Next, stack your 5 strips on top of each other and sew together at one end. Now, pull on each strip of fabric so that they kind of curl on the edges. But let me explain a little better. First, you’ll work on the left side. And that’s it. This post is sponsored by:
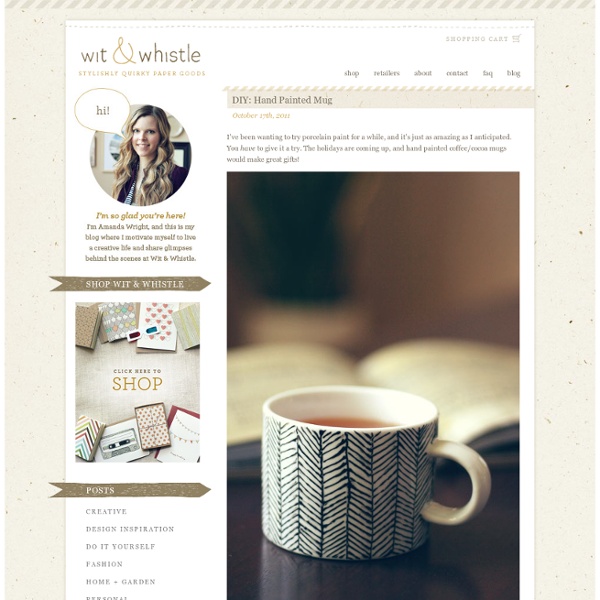
Scratch-Off Save-the-Date How-To You won the lottery when you found each other, so send this cheeky save-the-date card to let guests share in your luck. After scraping off the paint with a penny, they'll hit the jackpot: your wedding date! Tools and Materials White card stock Fine-tip pen or marker Clear packing tape Freezer paper Metallic acrylic paint Liquid dishwashing soap Foam brush Craft knifePennies A2 or 4-bar envelopes Scratch-Off Save-the-Date How-To Download our PDF file and replace the placeholder text with your own (you only need to do this in one box; the form will automatically fill in the rest). Note: A card backed with decorative paper will fit in a size A2 envelope.
Make-up Magnet Board We all know with craft blogs that original ideas are often hard to come by, we find ideas we love and make them our own but we didn't come up with the idea ourselves. I feel like I've finally done something original here and I'm excited about it. I'll show you the finished product and then explain. Behold my Make-up Magnet Board. I have a friend who is beautiful and stylish and has always loved make-up but recently took a course that intensified her love. The basket was a mess and I was overwhelmed with all my choices never knowing what to use, digging through to see what I had and find what I wanted was a pain. I painted it (The hard way, with a brush instead of spray paint. I went to the hardware store and picked up some metal and had them cut it to fit inside my frame. Here comes the brilliant part though. Here's the stash of eye shadows we're talking about (I've even added a couple since this picture). Next I wanted a place to store my brushes and liners though.
Friendship Bracelets {Craft Camp} I am excited to be offering 30 days of fun crafts to keep kids active and entertained this summer! You won’t want to miss a day of these fun crafts for kids from some amazing bloggers! Please be sure to pay them a visit! Hi I am Beckie from Infarrantly Creative and Knock Off Décor and I am back here on STML showing you how to make woven friendship bracelets As I was thinking about what project to do for this series I tried to remember what my most favorite craft was when I was a girl. These are different than the macramé knot tying bracelets. Supplies: Embroidery Floss Scissors Pins Nimble fingers 1. 2. 3. Depending on how you want your bracelet to look you will loop your pinky under that strand and pull the end loop (#7 and #8) through them all. 4. 5. 6. 7. Your girls will be kept busy making embroidery floss bracelets all summer.