
Magic Wand Tutorial | Natural Kids Team When you are done sew the two main pieces together; first check where you want your stick to sit and starting just to the side of where it will come out, stitch up and around leaving about an inch or so open at the bottom/side for stuffing. Using a chopstick, a pencil, knitting needle or just your fingers stuff gently – aim for it to be firm but not fat – you can add a little right at the end before you close it if you need to. ok – now for ribbons (if you are lucky your baby might wake up just in time to help you with this bit, mine did!) Cut three, four, five lengths of narrow ribbon in whichever colours you like/have. I made mine all different lengths, some longer than the stick and varying ones between. Thread your needle with a new piece of floss (two strands the same colour you used to sew the outside edge) and knot the ends. Keeping the thread attached; poke the stick up inside your wand top and give it a wiggle til it sits nicely. close your eyes tight and make a wish
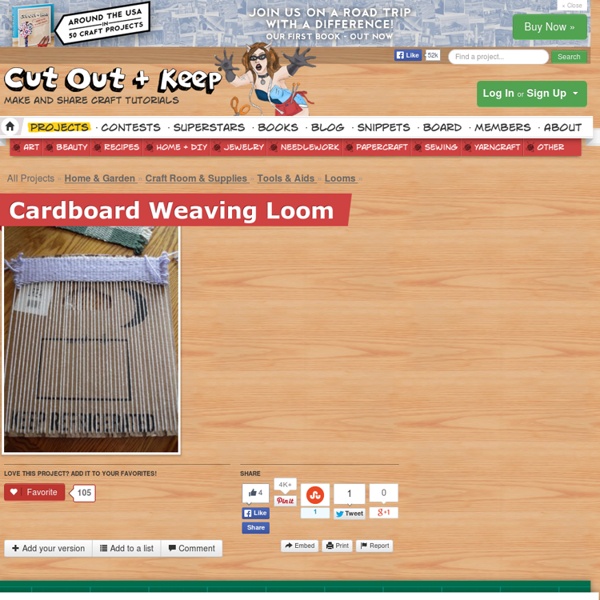
Loom Weaving Weaving Frame A simple weaving frame can be made by making incisions in both ends of strong cardboard. With a heavy ball of string, cover the frame. Start at one of the edges and thread the frame up and around each incision. When finished, pull off the frame and cut the loops and the side and tie knots. Circle Loom Coaster Begin with a circle of cardboard, notched around the circumference. Wind string around the cardboard, beginning at any point on the circumference, through the center, moving forward one notch each time, until the string is wound around the circle. Beginning at the center, weave yarn over and under, using any pattern the child wishes. Variation The fan loom is a variation of the circle loom. Beginning at one side, weave yarn over and under, using any pattern the child wishes. Oatmeal or Salt Box Loom Mark off notches at the top and bottom of the box 1/2' apart. When the weaving is finished, remove it from the loom. Woven Bag Material Presentation Finger Weaving Materials Yarn
Watermark Tee by Sweet Verbana Hello U-Create readers! I am so excited to be guest posting here today. It just so happens to be my first guest post and I'm still a little shocked that it's here at Ucreate, one of my favorite blogs! A little bit about me.. I'm from a little town called Keller, Texas. I'm a junior at Texas A&M University (whoop!). I'm working on my education degree and expect to be an elementary school teacher in just two short years. When I'm not busy studying for classes, I love to sew. I just started blogging in May and have already met all kinds of wonderful women, I hope you'll stop by and say hi too! Watermark Tee Tutorial What I love about this project is that it's completely customizable. Materials: Elmer's Blue Gel Glue (it must be the blue gel, white won't work) Fabric Dye (RIT is my tried and true brand) A white cotton Tee, Tank, Dress etc. Tutorial: If you're unfamiliar with Batiking, it's a method of dyeing fabric in which you create a design with a dye- resist. Step 1: Prepare Step 2: Design
Meu Mundo Craft: Tricô sem agulhas Este é da yuncity.com Dá pra fazer com caixa de papelão, em casa mesmo. Muito parecido com a técnica de tricô nos dedos, porém circular ! Bjus The Ruffle Headband Hi everyone! I hope you all had a nice Thanksgiving! Today I wanted to share with you a great idea I had for a ruffle (or more accurately - a gathered) headband. It's very simple and a it would make a great stocking stuffer or gift for a friend in the office. You'll need: 22" x 4" piece of fabric (or 42" x 4" for more gathers as in the red/white headband) 15" x 3" piece of fabric, interfaced light weight fusible interfacing (15" x 4") 6" piece of 1/4" wide elastic (4.5" for child size and 3.5" for toddler size) the ruffle headband pattern (found here) To gather the fabric, set your sewing machine to the longest stitch length and sew two parallel lines 1/4" and 1/2" away from the edge of the 22" long (or 42" long) piece. Pull the bottom threads and gather the fabric to be approximately 15" long. Lightly iron in place and iron the interfacing on the wrong side. Take your pattern piece and cut out the headband from the top (ruffled) and bottom (15" x 3" plain) pieces. And here's the result:
Long time no craft: Choco-mint style stars! Tutorials for Recycling T-Shirts So way way back, in June, I wrote this Studio Organization post, about starting the process of organizing my studio by cleaning out the closet full of junk. Well, it's September and...let's just say the closet is a work in progress. Some of the things that are taking up space in the closet are shirts that I never wear anymore. I realized I could repurpose them into something else! Here are some tutorials for recycling shirts: Check out these t-shirt scarves! Create cute little bows for accessories or packaging with this tutorial. Gorgeous ruffled pillow tutorial here. Looks like I have a lot of projects ahead of me to keep me from cleaning out my closet! Knitting spools THE LOST ART OF KNITTING NANCYS Pictures and instructions on how to make and use them (Viewed best in Internet Explorer. Some other browsrs may not be able to open the image files. Whether you call them Knitting Nancys, Bizzy Lizzys, knitting mushrooms, knitting spools, corkers, peg knitters, knitting nobbys (or knitting noddys) or knitting knobbys, these knitting devices all owe their existence to the medieval lucet. It's used by threading yarn through the hole then in a figure eight around the prongs. Knitting Nancys are four-prong variants of the lucet. Versions like the one pictured above used to be made out of wooden thread spools, something difficult to do in these modern times since thread spools are now plastic. Yarn is fed down through the hole and left to hang. The knitting is then accomplished by holding the spool between the index finger and thumb while the yarn is held against the palm by the other three fingers. Knitting Nancys come in many shapes and sizes. To increase:
Free Patterns and Projects to Sew for Kids [ Close Privacy Policy ] Privacy Policy / Your California Privacy Rights Revised and posted as of March 4, 2013 Prime Publishing, LLC ("Company," "we" or "us") reserves the right to revise this Privacy Policy at any time simply by posting such revision, so we encourage you to review it periodically. This Privacy Policy will tell you, among other things: Your California privacy rights. ACKNOWLEDGEMENT/YOUR AGREEMENT Company websites are not intended for use by individuals under the age of 18 or those who are not legal residents of the United States. HOW DO WE COLLECT INFORMATION AND WHAT INFORMATION DO WE COLLECT? Distribution Partners Website operators that license our ad serving technology pass information to us so that we may serve advertisements to you. Offer Forms We also collect information about you when you complete a survey or offer form on one of our websites or web pages. Website Registration Forms We collect information about you when you register on one of our websites.
Tassels I’m very excited about today’s post! I’ve been seeing tassels everywhere from handbags to jewelry. I decided to make mine using embroidery thread (37 cents at Michaels!!) What you’ll need: – Embroidery thread in different colors – Gold Thread – Scissors – Ruler – Piece of cardboard (1″x1″) – Jump Rings 1. 2. 3. 4. 5. And you’re done! Related DIY Rhinestone Tassel Earrings So much of my DIY inspiration comes from seeing something and instantly saying "I could totally make that!" April 9, 2014 In "D.I.Y" DIY Tassel Bracelet Earlier this week I posted a tutorial on how to make tassels out of embroidery thread. April 5, 2013 DIY Thread Wrapped Bracelets I recently made a trip to Hobby Lobby, my newest obsession since my first visit to one in Chicago.
Tutorials Hola there! Here you can find an organized list of all my tutorials, projects and printables. I want to point out that I am no sewing expert and have no formal education in either sewing or English (Spanish is my native language) So I might not always use the correct terminology or best technique, I am always learning too! It might not always be perfect, but it’s sure a lot of fun! All of my tutorials and printables for personal use only, if you want to sell items made with these tutorials please purchase a Limited Production License. Flowers & Jewelry Tutorial: Anthropologie Inspired Necklace Link: Go to Tutorial Difficulty: Easy Tutorial: Duct Tape Joyful Flower Link: Go to Tutorial Difficulty: Easy Clothes and Upcycled Projects Tutorial: Upcycled dress for Burda Style Link: Go to Post Difficulty: Intermediate Tutorial: Loose fitting summer vest from t-shirts Link: Go to Tutorial Difficulty: Easy Tutorial: Upcycled Ruffles dress Link: Go to Tutorial Difficulty: Intermediate Nursery Printables
T Yarn Recycle TutorialTools & Materials: 1. T-shirts (those without side-seam) 2. A pair of sharp scissors Place the T-shirt flat on the floor or working table. We only need the bottom-halve portion of the T-shirt. Fold the T-shirt from side to side, leaving an inch allowance as shown. Cut into strips as shown, remember not to cut the 1 inch allowance. Finish cutting the T-shirt from top to bottom evenly. Unfold the 1 inch allowance and it will look as shown below. The next process is to make a slant cut from strip 1 to strip 2, strip 2 to strip 3 and so on in order to create a continuous strip for the whole T-shirt. I purposely leave the first strip uncut until I have finished all. Now, I have a loooooooong strip of continuous T-shirt yarn waiting for the next process. Next is to turn the strip into a tubular yarn. See, the strip will curl and form a tubular shape after the tug. The strip has now turned into tubular yarn, from Fettuccine to Spaghetti ***wink***.
I Really Wish I Could Sew | Pioneer Woman Home & Garden A sweet friend of mine sent the girls and me a box of adorably adorable owl pillows this week. She doesn’t sell them, doesn’t have an Etsy shop…she just makes them. I think they might be the sweetest things I’ve ever seen, and I think they’ll be precious in the girls’ new room. I don’t know what it is about owl pillows. Or owls in general. They’re just so charming. It must have something to do with the eyes. I love this vinyl detailing. Vinyl? Which brings me to my current fixation: I really wish I could sew. But when I see things like this, all I can think about is that I really wish I could sew. I’d love to be able to grab a pile of fabric scraps and turn them into…an owl. I love this one. Boo! It would take me approximately eighty years to make one of these pillows. That’s because I’d keep taking breaks to go cook. And eat. So maybe it’s best that I don’t know how to sew. If I did, I might be tempted to make things like this. And then nothing would ever get cooked in this house. Yep. Ahem.