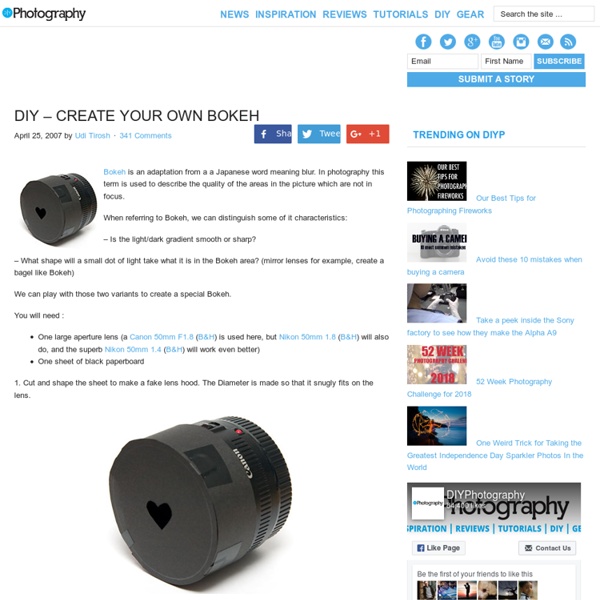
Early 1900s in Colour - All around the world
All around the world - Franny Wentzel - Thursday, May 6th, 2010 : goo [previous] :: [next] In the early part of the 20th century French-Jewish capitalist Albert Kahn set about to collect a photographic record of the world, the images were held in an 'Archive of the Planet'. Before the 1929 stock market crash he was able to amass a collection of 180,000 metres of b/w film and more than 72,000 autochrome plates, the first industrial process for true colour photography www.albert-kahn.fr/english/ Autochrome was the first industrial process for true colour photography. www.albertkahn.co.uk A few photos from the collection. Portraits Algeria Dahomey - now Benin Bosnia Brasil Bulgaria Cambodia Canada China Croatia Dijbouti Egypt England France Germany Greece Holland India Iran Iraq Ireland Italy King Faisal Lebenon Macedonia Mongolia Montenegro Morocco Norway Palestine Serbia Spain Sri Lanka Sweden Switzerland Syria Turkey United States of America Vietnam This article has been viewed 3310964 times in the last 4 years dglenn: Fantastic!!
Understanding Light | Digital Photography Courses
Light and The Photographer Written by: Digital Photography Photography Lesson #1 Light is the primary working tool of the photographer. When we place a prism in front of a white ray, the prism will diffract (separate) that light into all the colors of the spectrum. When we place a LENS in front of any ray, that lens will simply refract (bend) that ray. So, being in focus simply means moving the lens elements forward or backward until all the rays coming toward the camera from the subject meet at one point; the focal point on the film. In the illustration above, you will see a point where the rays meet. Here’s lesson #2: Light and the Human Eye.
The House of Smiths - Home DIY Blog - Interior Decorating Blog - Decorating on a Budget Blog
How to adjust shutter speed and ISO to create a non blurry image when taking pictures I'm so happy to welcome Emilie from Photo by Emilie back on the blog today! If you've been reading our blog in this past year or so, then you know that I credit almost all of my photo-taking-skills to Miss Emilie and her amazing photography classes that she hosts both online, and here in Utah. One technique that I was having issues with learning, was how to get those great action moments to be captured in a still, clear, focused image. Every time I tried to take a photo (no matter how much adjusting I would do) I ended up with fuzzy moving images for the end result. So I reached out to Emilie and she schooled me in a little advanced lesson on how to capture a great quality image with a moving subject. I was so happy to FINALLY have a better understanding of how to photograph movement better, that I asked Emilie if she'd be willing to share with you what she taught me, and happily she said yes! *Practice.
Your First High Speed Photography Accessory - A Contact Trigger
High Speed Photography may seem intimidating with all the high end Arduino Triggers and crazy setups that are going around. If you just want to have a quick stub at high speed photography, your best chance is probably selecting a subject that is easy to shoot (pun intended) in the dark, and light it using a strobe. “How will the strobe know when to pop?” A contact sensor is one of the most primitive and easy to build high speed photography sensors and is basically build from two conductive surfaces each connected to one of the strobes contacts. This is how the picture in the top of the post (by Henrik Vento) was taken, an arrow hits a contact trigger after passing through the egg and a burst of light is made. The nice thing about contact trigger is that is very (very) easy to build (about 10 minutes of work and 2 pennies worth of equipment. In the pictorial below, Ian Montes shows us how to easily build a high speed photography contact trigger. The stuff you need Strip the wire Ball punch
The Photojojo Store! - the Most Awesome Photo Gifts and Gear for Photographers - StumbleUpon
Five Places to Take Pictures in All 50 U.S. States
The “Great American Road Trip” is a dream shared by many, myself included. So I got to thinking about what I would like to do if I were to visit every state in the U.S. There are obviously too many great things in this country for one person to photograph everything in-depth during one lifetime so I came up with the idea for this blog post – Five Places to Take Pictures in All 50 U.S. Coming up with five places to photograph in every state was not as easy as I had initially thought so in addition to personal experience it required me to do some research on state tourism websites, Trip Advisor, stock photography websites, Google Images, Smithsonian guide books and soliciting feedback from other photographers both on this blog and on a popular nature photography forum. This list is based on my interests which are landscapes, history and American culture. Alabama Alaska Arizona Arkansas California Colorado Connecticut Delaware Florida Georgia Hawaii Idaho Illinois Indiana Iowa Kansas Kentucky Louisiana
Improve Photography | Portrait and Landscape Photography Tips
Hover over this picture to pin this article on Pinterest! This is the largest collection of portrait photography tips ever assembled on a single page of the Internet. To write this portrait photography article, I asked members of the Improve Photography community to submit their favorite portrait photography tips. If you’d like to join the Improve Photography community, LIKE our Facebook fan page! 1. 2. 3. Window light 4. 5. I call it a “macro portrait.” 6. 7. 8. 9. 10. 11. Especially where brides are wearing white dresses, the bride’s teeth need to be perfect. 12. 13. 14. 15. Backlighting is great for hard mid-day light. 16. 17. 18. 19. Bubblegum can be a fun prop to help the model get a few casual shots. 20. 21. 22. Have the expert editors at Improve Photography review your photography portfolio in-depth and send you an audio feedback file for just $39 Check it out 23. 24. To have your subject framed, she doesn’t have to sit in the middle of the frame. 25. 26. 27. 28. 29. 30. 31. 32. 33.
If Fire Was Made Of Water... [PICTURES] - Boredstop.com - StumbleUpon